Yamaha MGP16X Owner's Manual - Page 11
Security Cover Mounting, the top side, to the installed rack-mount brack
 |
View all Yamaha MGP16X manuals
Add to My Manuals
Save this manual to your list of manuals |
Page 11 highlights
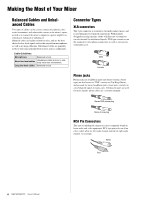
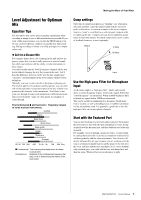
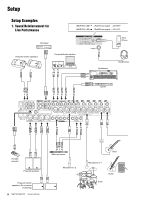
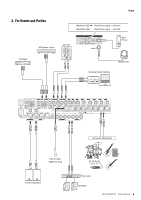
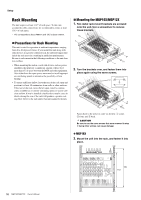
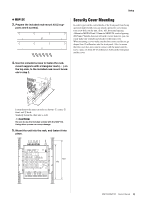
MGP12X 3. Prepare the included rack-mount kit (2 sup- ports and 6 screws). Setup Security Cover Mounting In order to prevent the control knobs of the front panel from being operated inadvertently, you can attach a protective cover using four screw holes on the unit. (Size: M3; horizontal spacing: 410mm for MGP16X and 311mm for MGP12X; vertical spacing: 208.5mm.) Yamaha does not sell such a cover; however, you can easily make one yourself and attach it to the front cover. When mounting a cover make sure that the screws used do not go deeper than 12 millimeters into the front panel. Also, to ensure that the cover does not come in contact with the panel controls, leave a space of about 20-25 millimeters between the front panel and the cover. 4. Use the included screws to fasten the rack- mount supports with a triangular mark ( ) on the top side, to the installed rack-mount brackets in step 2. e q w Fasten them to the mixer in order (as shown): q center, w front, and e back. Similarly fasten the other side as well. CAUTION Be sure to use the included screws with the MGP12X. Using other screws can cause damage. 5. Mount the unit into the rack, and fasten it into place. 13U 11U MGP16X/MGP12X Owner's Manual 11
-
 1
1 -
2
-
3
-
4
-
5
-
 6
6 -
 7
7 -
 8
8 -
 9
9 -
 10
10 -
 11
11 -
 12
12 -
 13
13 -
 14
14 -
 15
15 -
 16
16 -
17
-
18
-
19
-
20
-
21
-
22
-
23
-
24
-
25
-
26
-
27
-
28
-
29
-
30
-
31
-
32
-
33
-
34
-
35
-
36
 |
 |
