Yamaha MGP16X Owner's Manual - Page 14
Step 6 <Application> Using the Ducker function, nel MGP16X: CH8, MGP12X: CH4. - first try
 |
View all Yamaha MGP16X manuals
Add to My Manuals
Save this manual to your list of manuals |
Page 14 highlights
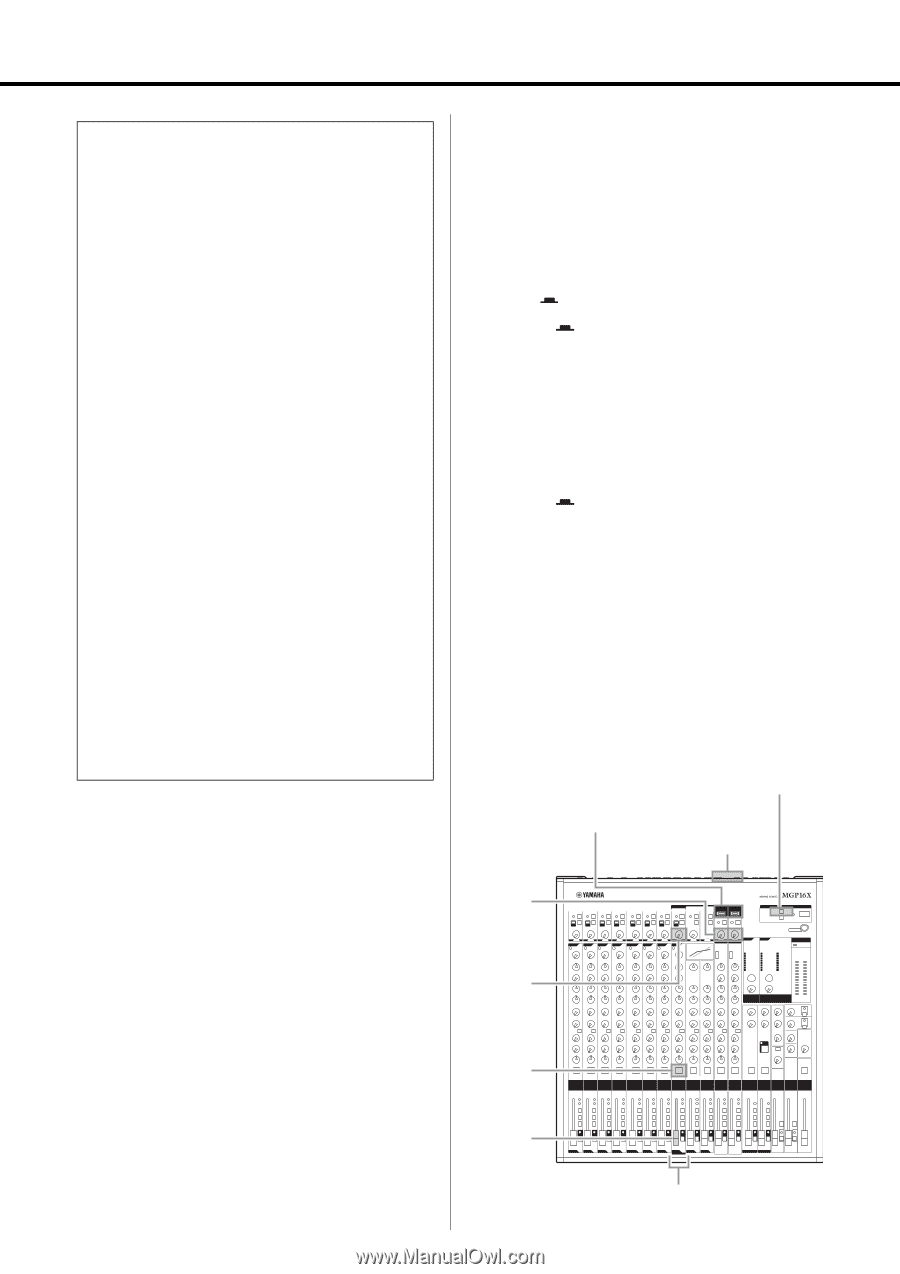
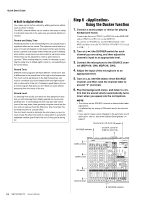
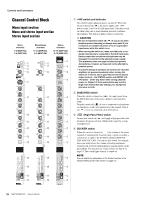
Quick Start Guide Built-in digital effects Your mixes can be further refined by adding ambience effects such as reverb or delay. The MGP's internal effects can be used to add reverb or delay to individual channels in the same way as external effects processors. Reverb and Delay Time Small adjustments to the reverb/delay time can actually have a significant effect on the sound. The optimum reverb time for a piece of music will depend on the music's tempo and density, but as a general rule longer reverb times are good for ballads, while shorter reverb times are more suited to up-tempo tunes. Delay times can be adjusted to create a wide variety of "grooves." When adding delay to a vocal, for example, try setting the delay time to dotted eighth notes (e.) corresponding to the tune's tempo. Reverb Tone Different reverb programs will have different "reverb tone" due to differences in the reverb time of the high or low frequencies. Too much reverb, particularly in the high frequencies, can result in unnatural sound and interfere with the high frequencies in other parts of the mix. It's always a good idea to choose a reverb program that gives you the depth you want without detracting from the clarity of the mix. Reverb Level It's amazing how quickly your ears can lose perspective and fool you into believing that a totally washed-out mix sounds perfectly fine. To avoid falling into this trap start with reverb level all the way down, then gradually bring the reverb into the mix until you can just hear the difference. Any more than this normally becomes a "special effect." You don't want reverb to dominate the mix unless you are trying to create the effect of a band in a cave-which is a perfectly legitimate creative goal if that's the sort of thing you're aiming for. Step 6 Using the Ducker function 1. Connect a music player or device for playing background music. Connect the device to CH13/14 or CH15/16 on the MGP16X, and to CH9/10 or CH11/12 on the MGP12X. To connect an iPod/iPhone, use the USB terminal of the MGP, and then set to the TO CH15/16 (TO CH11/12) switch to USB ( ). 2. Turn on ( ) the DUCKER switch for each channel you are using, and then adjust the channel's input to an appropriate level. 3. Connect the microphone to the SOURCE chan- nel (MGP16X: CH8, MGP12X: CH4). 4. Adjust the input of the microphone to an appropriate level. 5. Turn on ( ) the ON switch of the SOURCE channel, and then raise the channel fader to around "0" (nominal). 6. Play the background music, and listen to con- firm that the sound volume automatically turns down when you speak into the microphone. NOTE • The volume on the SOURCE channel is detected after fader adjustment. It is affected by the setting of ON switch and/or the channel fader. • If you want to make custom changes to the automatic sound attenuation, refer to "About the Detailed Setting Mode" on page 21. TO CH15/16 (TO CH11/12) switch 1 DUCKER switches 2 CH13/14, CH15/16 (CH9/10, CH11/12) 1 2 GAIN controls 4 GAIN control 14 MGP16X/MGP12X Owner's Manual 5 ON switch 5 Channel fader 3 SOURCE channel
-
 1
1 -
2
-
3
-
4
-
5
-
6
-
7
-
8
-
 9
9 -
 10
10 -
 11
11 -
 12
12 -
 13
13 -
 14
14 -
 15
15 -
 16
16 -
 17
17 -
 18
18 -
 19
19 -
20
-
21
-
22
-
23
-
24
-
25
-
26
-
27
-
28
-
29
-
30
-
31
-
32
-
33
-
34
-
35
-
36
 |
 |