Yamaha MTX MTX/MRX system Firmware Update Guide - Page 8
■ Updating the Dante firmware, Run the Dante Firmware Update Manager with administrator privileges.
 |
View all Yamaha MTX manuals
Add to My Manuals
Save this manual to your list of manuals |
Page 8 highlights
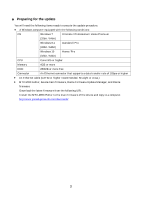
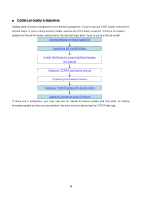
Updating the Dante firmware Described below are the procedures to update the Dante module firmware integrated in the device. Use an Ethernet cable to connect your computer to the device. If the Dante device is connected via a redundant connection, connect your computer to the network switch that is connected to the [PRIMARY] connector. For details on Dante Firmware Update Manager, refer to "User Guide Dante Firmware Update Manager" in the Dante folder of the compressed file. If your computer enters Sleep or Energy Save mode, data transfer to the device may stop. Therefore, you should disable these functions to prevent this from happening. We also recommend that you do not use any screen saver or similar background programs. 1. Turn on the power to the device. 2. Run the Dante Firmware Update Manager with administrator privileges. If you're using Windows 7, click [Start]->[All Programs]->[Audinate]->[Dante Firmware Update Manager], then right-click [Dante Firmware Update Manager] and choose [Run as administrator]. If you're using Windows 8/8.1, go to the "Start" screen -> ([All apps]), then right-click [Dante Firmware Update Manager], and choose [Run as administrator] from the choices that appear at the bottom of the screen. Check that the version number is 1.4.5 or higher from the title bar. The "User Account Control" dialog box may appear. Click [Continue] or [Yes]. 3. If you see the interface selection screen, select the interface card to connect the Dante device. 4. Click [Update Dante Firmware]. 5. Click [Browse] and select "FWUpdate_MRX7-D_vyyy_swzzz.dnt" in case of MRX7-D, "FWUpdate_MTX5-D_vyyy_swzzz.dnt" in case of MTX5-D, or "FWUpdate_XMVxxxx-D_vyyy_swzzz.dnt" in case of XMV of Dante model. Then click [Open]. yyy and zzz represent the firmware version number. The Dante firmware does not operate normally if its path contains any multi-byte character (including Japanese characters). If you use a directory name containing any multi-byte character in your computer, store the firmware update files in a directory that consists only of ASCII characters (e.g. C:\temp). Be sure to ensure compatibility of the update files with device. If update files other than device are applied, the device will become inoperable. In general, do not check the [Override Device Matching] option. If this option is left unchecked, only devices that support the file can be selected, ensuring that updating the device with invalid or wrong files is prevented. 6. Click [Next]. In some cases, Windows firewall may block MTX-MRX Editor when you make this setting. Select the [Private Network] check box, and click [Allow Access]. 8
-
 1
1 -
2
-
 3
3 -
 4
4 -
 5
5 -
 6
6 -
 7
7 -
 8
8 -
 9
9 -
 10
10 -
 11
11 -
 12
12 -
 13
13 -
14
 |
 |
