Yamaha MW10C MW8CX/MW10C Owners Manual - Page 9
Adjusting Level and Tone, Level Adjustment
 |
View all Yamaha MW10C manuals
Add to My Manuals
Save this manual to your list of manuals |
Page 9 highlights
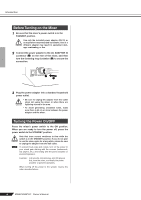
Mixer Basics Quick Guide 4 Step Adjusting Level and Tone Level Adjustment 1 The first step is to set the level controls on all instruments and other sources appropriately. 2 Adjust the channel GAIN controls so that the corresponding PEAK indicators flash briefly on the highest peak levels. (GAIN controls are not provided on the stereo channels-7/8 (MW8CX), or 7/8 and 9/10 (MW10C)). 3 Raise the STEREO Master control to the "▼" position. 4 Adjust the LEVEL control to create the desired initial balance while monitoring via headphones or monitor speakers. The overall headphone level is adjusted by the MONITOR/PHONES control. Tone Adjustment The MW mixer's compressors and 3-band equalizers make it easy to shape the tone of independent channels to achieve the best possible mix. Use the High-pass Filter for Microphone Input As the name implies, a "high-pass filter" allows only signals above a certain frequency to pass. Conversely, signals below that "cutoff frequency" are attenuated. When an MW highpass filter is turned on, signals below 80 Hz are attenuated. This can be useful for minimizing low-frequency breath noise from a vocalist, as well as handling noise, or rumble transmitted via the microphone stand. It is generally a good idea to turn the high-pass filter on for microphone channels. Compression One form of compression known as "limiting" can, when properly used, produce a smooth, unified sound with no excessive peaks or distortion. A common example of the use of compression is to "tame" a vocal that has a wide dynamic range in order to tighten up the mix. Compression can also be applied to guitar tracks to add extra sustain. Too much compression can be a cause of feedback, however, so use it sparingly. GAIN control PEAK indicator OUTPUT (Min) (Max) LEVEL controls MONITOR/PHONES control STEREO Master control INPUT Equalizer Tips The best advice that can be given regarding equalization while recording is simply to use as little equalization as possible. If you want a little more presence you can turn the HIGH end up a bit. Or you can boost the bass a little if you feel the low end is lacking. During recording it's better to use EQ sparingly for compensation only. MW8CX/MW10C Owner's Manual 9
-
 1
1 -
2
-
3
-
 4
4 -
 5
5 -
 6
6 -
 7
7 -
 8
8 -
 9
9 -
 10
10 -
 11
11 -
 12
12 -
 13
13 -
 14
14 -
15
-
16
-
17
-
18
-
19
-
20
-
21
-
22
-
23
-
24
-
25
-
26
-
27
-
28
-
29
-
30
-
31
-
32
-
33
-
34
 |
 |
