Yamaha MX49 Owner's Manual - Page 32
Changing the Controller Set for, the Voice Voice Edit, Part01, Voice, Part10, DrumKit, Source, Insert
 |
View all Yamaha MX49 manuals
Add to My Manuals
Save this manual to your list of manuals |
Page 32 highlights
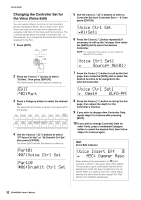
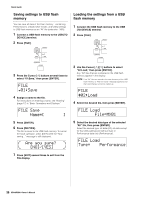
Quick Guide Changing the Controller Set for the Voice (Voice Edit) You can assign different functions for the controllers (Knobs, Modulation Wheel, etc.) to each Voice. Each Voice can have up to six sets which determine the available controllers for the Voice and their functions. The controller assignments are called a "Controller Set." In this example, we'll change the Controller Set of the Voice assigned to the Part. 1 Press [EDIT]. 2 Press the Cursor [E] button to select "02:Part," then press [ENTER]. The Performance Part Edit display is called up. EDIT s02:Part 3 Press a Category button to select the desired Part. The selected Part number is shown in the upper left of the display. 4 Use the Cursor [V]/[E] buttons to select "07:Voice Ctrl Set" or "06:Drumkit Ctrl Set," then press [ENTER]. The Voice Edit Controller Set display is called up. Part01 2 d07:Voice*Ctrl*Set Part10 2 d06:DrumKit*Ctrl*Set 5 Use the Cursor [V]/[E] buttons to select a Controller Set from Controller Sets 1 - 6, then press [ENTER]. Voice*Ctrl*Set 2 a01:Set1 6 Press the Cursor [V] button repeatedly if necessary to call up the 1st page, then rotate the [DATA] dial to select the desired Controller. NOTE For details about the settings, see the "Reference Manual" PDF document. Voice*Ctrl*Set1 2 a*****Source=*MW(01) 7 Press the Cursor [E] button to call up the 2nd page, then rotate the [DATA] dial to select the desired function to be assigned to the selected Controller. Voice*Ctrl*Set1 2 a**Dest=*****ELFO]PM 8 Press the Cursor [E] button to call up the 3rd page, then adjust the depth for the Controller's function. 9 If you wish to change other Controller Sets, repeat steps 5 to 8 above after pressing [EXIT]. 10 If you wish to change Controller Sets for other Parts, press a numbered Category button to select the desired Part, then follow steps 5 to 9 above again. HINT Voice Edit indicator Voice*Insert*Eff 2 a***MSC:*Damper*Reso When editing Voice parameters, an & (Edit) indicator is shown in the upper right of the display. This provides a quick confirmation that the Voice assigned to a Part has been modified but not yet stored. When you want to store the current status, execute the Voice Store function (page 33). After storing, this indication disappears. 32 MX49/MX61 Owner's Manual
-
 1
1 -
2
-
3
-
4
-
5
-
6
-
7
-
8
-
9
-
10
-
11
-
12
-
13
-
14
-
15
-
16
-
17
-
18
-
19
-
20
-
21
-
22
-
23
-
24
-
25
-
26
-
 27
27 -
 28
28 -
 29
29 -
 30
30 -
 31
31 -
 32
32 -
 33
33 -
 34
34 -
 35
35 -
 36
36 -
 37
37 -
38
-
39
-
40
-
41
-
42
-
43
-
44
-
45
-
46
-
47
-
48
 |
 |
