Yamaha MX49 Owner's Manual - Page 34
Changing Voices smoothly while performing, CncrtGrand
 |
View all Yamaha MX49 manuals
Add to My Manuals
Save this manual to your list of manuals |
Page 34 highlights
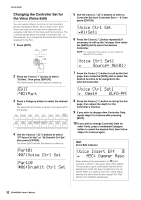
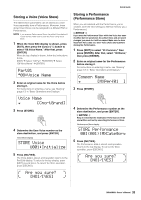
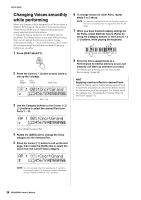
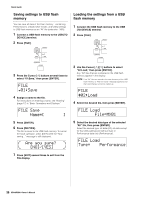
Quick Guide Changing Voices smoothly while performing When you change a Voice assigned to a Part or select a different Performance, the sound of the previous Voice/ Performance will be cut off, replaced abruptly by the newly selected Voice/Performance. In live performance situations, you probably want to avoid this. To change Voices as you play without having them cut off, assign the Voices you intend to play beforehand to Parts 1 - 16 of a Performance, then select the corresponding Part (with the numbered Category buttons) as you play. 1 Press [PART SELECT]. 6 To change Voices for other Parts, repeat steps 2 to 5 above. NOTE You can also change Parts with the Category buttons or the Cursor [M]/[S] button in pages other than the 1st page. 7 When you have finished making settings for the Parts, select different Voices (Parts) by using the Category buttons or the Cursor [M]/ [S] buttons, while playing the keyboard. 2 Press the Cursor [V] button several times to call up the 1st page. Voice category Voice number Voice name AP*:*001:CncrtGrand a0003123456789tyuiop@ Part 1 - 16 3 Use the Category buttons or the Cursor [M]/ [S] buttons to select the desired Part from Parts 1 - 16. 8 Store the Voice assignments as a Performance to internal memory so you can instantly call them up whenever you want. For details about storing, see the "Storing the Performance" (page 33). HINT Applying Insertion effects to desired Parts Insertion effects can be independently applied to up to four Parts (maximum) to which the desired Voices for live performance are assigned. For details about the settings, see "Changing the Insertion Effect of the Voice" (page 31). AP*:*001:CncrtGrand a0003123456789tyuiop@ Cursor indicates the selected Part 4 Rotate the [DATA] dial to change the Voice category for the selected Part. 5 Press the Cursor [E] button to call up the 2nd page, then rotate the [DATA] dial to select the Voice from the current Voice category. AP*:*001:CncrtGrand d0001233456789tyuiop@ NOTE You can also edit other Part parameters in the 3rd or subsequent pages. For details about each parameter, see the "Reference Manual" PDF document. 34 MX49/MX61 Owner's Manual
-
 1
1 -
2
-
3
-
4
-
5
-
6
-
7
-
8
-
9
-
10
-
11
-
12
-
13
-
14
-
15
-
16
-
17
-
18
-
19
-
20
-
21
-
22
-
23
-
24
-
25
-
26
-
27
-
28
-
 29
29 -
 30
30 -
 31
31 -
 32
32 -
 33
33 -
 34
34 -
 35
35 -
 36
36 -
 37
37 -
 38
38 -
 39
39 -
40
-
41
-
42
-
43
-
44
-
45
-
46
-
47
-
48
 |
 |
