Yamaha PR7 Reference Manual - Page 17
Markers, Marker mode screen, Adding a marker
 |
View all Yamaha PR7 manuals
Add to My Manuals
Save this manual to your list of manuals |
Page 17 highlights
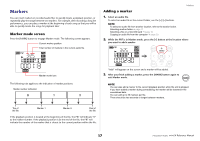
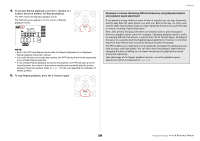
Markers You can insert markers in recorded audio files to quickly locate a playback position, or repeatedly play the range between two markers. For example, after recording a long live performance, you can place a marker at the beginning of each song so that you will be able to quickly locate the songs for playback later. Marker mode screen Press the [MARK] button to engage Marker mode. The following screen appears. Current marker position Total number of markers in the current audio file Markers Adding a marker 1. Select an audio file. To select an audio file in the current folder, use the [] buttons. NOTE To select an audio file from another location, refer to the section below. Selecting another folder ➔ page 11 Selecting a file on a microSD card ➔ page 10 Copying an audio file from the computer ➔ page 33 2. While the PR7 is in Marker mode, press the [+] button at the location where you want to add a marker. Marker mode icon The following rule applies to the indication of marker positions: Marker number indication 0 1 2 "Add" will appear on the screen and a marker will be added. 3. After you finish adding a marker, press the [MARK] button again to exit Marker mode. NOTE You can also add a marker to the current playback position while the unit is stopped. If you have added a marker during overdubbing, the marker will be inserted in the overdubbed data. You can add up to 36 markers per file. There should be two seconds or longer between markers. Top of the file Marker 1 Marker 2 End of the file If the playback position is located at the beginning of the file, the PR7 will indicate "0" as the marker number. If the playback position is at the end of the file, the PR7 will indicate the number of the marker that is closest to the current position within the file. 17 Reference Manual
-
 1
1 -
2
-
3
-
4
-
5
-
6
-
7
-
8
-
9
-
10
-
11
-
 12
12 -
 13
13 -
 14
14 -
 15
15 -
 16
16 -
 17
17 -
 18
18 -
 19
19 -
 20
20 -
 21
21 -
 22
22 -
23
-
24
-
25
-
26
-
27
-
28
-
29
-
30
-
31
-
32
-
33
-
34
-
35
-
36
-
37
-
38
-
39
-
40
-
41
 |
 |
