Yamaha PR7 Reference Manual - Page 4
Controls and Functions, REC SET] button
 |
View all Yamaha PR7 manuals
Add to My Manuals
Save this manual to your list of manuals |
Page 4 highlights
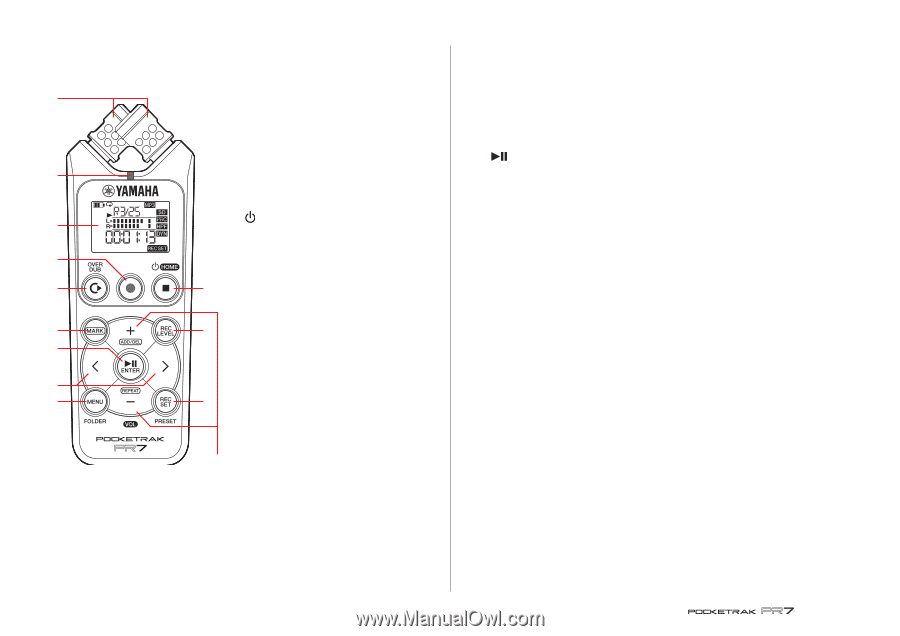
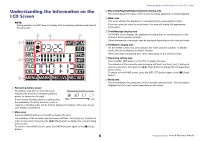
Controls and Functions 1 Built-in microphones 1 The PR7 features XY-type microphones. 2 REC LED Lights up steadily or flashes during recording or operation. 3 LCD screen 2 Displays various information. Understanding the Information on the LCD Screen ➔ page 6 3 4 (Power on/Standby)/[■] (Stop) button If the power is off (standby mode), press this button once briefly to turn the power 5 on. Press and hold down the button for about three seconds to turn the power off 6 4 (standby). To stop playback or recording, press this button. While the LCD screen displays any mode 8 7 screen other than the HOME screen, press 9 this button to return to the HOME screen. Press this button repeatedly while the HOME screen is displayed to switch to the C following screen in the sequence. A 0 Folder name and file number ➔ Date and time ➔ Recording format for the selected file (tonal quality) ➔ Available recording time ➔ Folder name and file number ➔ ... B About HOME screen ➔ page 8 5 [●] (Record) button Stands by, starts, or pauses recording. 6 [OVERDUB] button Places the PR7 into overdubbing mode, which enables you to overdub an existing recorded file (page 20). Controls and Functions 7 [REC LEVEL] button Sets the recording level or playback level for overdubbing. Setting the recording level ➔ page 9 Overdubbing ➔ page 20 8 [MARK] button Places the PR7 into marker mode, which enables you to insert markers into files (page 17). 9 [ ] (Play) button If the HOME screen is displayed this button starts or pauses file playback, or starts recording. If the menu or any setting screen is displayed, this button functions as an Enter (execute) button to confirm parameter settings and edits. 0 [REC SET] button Enables you to change the recording format (sound quality), switch the save destination for recorded files between the built-in memory and a microSD card, and set other recording parameters. A [MENU] button Selects functions other than recording, such as the tuner or metronome. Using the tuner ➔ page 24 Using the metronome ➔ page 25 Adjusting the playback speed ➔ page 26 B [+]/[-] buttons Adjust the PR7's audio volume if the HOME screen is displayed. These buttons also enable you to edit parameter values or select a setting item if a menu screen or mode screen is displayed. If the marker mode screen is displayed, this button enables you to add or delete markers or turn the Repeat function on or off. C [] buttons Enable you to select an audio file or navigate the screen. During playback, these buttons are used to fast reverse and fast forward respectively. 4 Reference Manual
-
 1
1 -
 2
2 -
 3
3 -
 4
4 -
 5
5 -
 6
6 -
 7
7 -
 8
8 -
 9
9 -
 10
10 -
11
-
12
-
13
-
14
-
15
-
16
-
17
-
18
-
19
-
20
-
21
-
22
-
23
-
24
-
25
-
26
-
27
-
28
-
29
-
30
-
31
-
32
-
33
-
34
-
35
-
36
-
37
-
38
-
39
-
40
-
41
 |
 |