Yamaha PR7 Reference Manual - Page 25

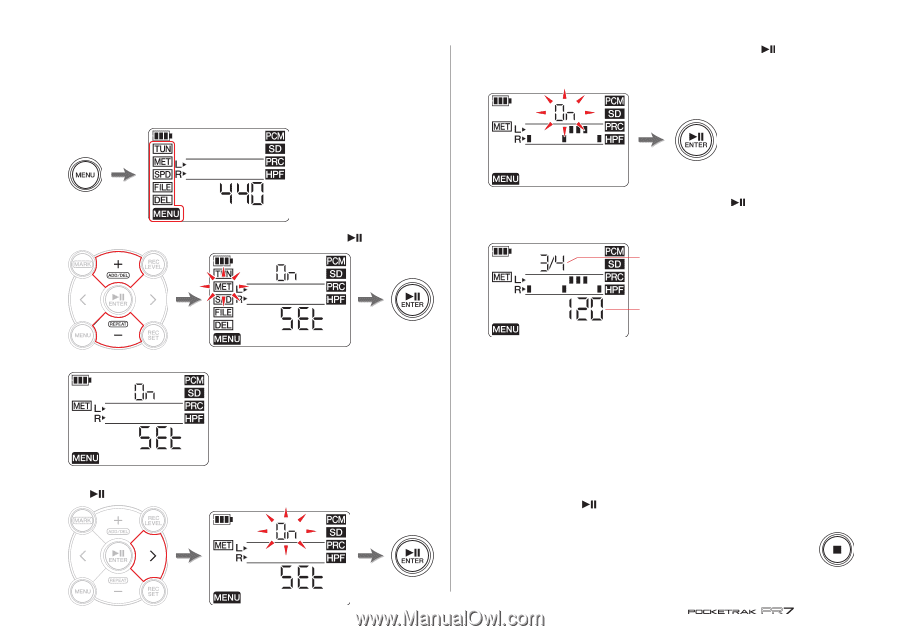
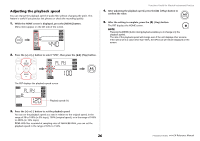
Using the metronome, Press the [>] button to select the metronome On/Off parameter, then press

Page 25 highlights

Using the metronome The PR7 features a built-in metronome, which you can use while the unit is stopped or recording. 1. While the HOME screen is displayed, press the [MENU] button. Menu items appear on the left side of the screen. Functions Useful for Musical Instrument Practice 4. Press the [+] or [-] button to select "On", then press the [ ] (Play) button. If you turn on the metronome in this step, the metronome will sound during recording. If you want to use only the metronome function, proceed to step 5. 2. Press the [+] or [-] button to select "MET", then press the [ ] (Play) button. 5. Press the [] button to select the metronome On/Off parameter, then press the [ ] (Play) button. 6. Press the [+] or [-] button to edit the tempo value, then press the [>] button. 7. Press the [+] or [-] button to edit the beat value. You can set the tempo in the range of 30 to 250, and the beat in the range of 0/4 to 8/4. If you set the beat to 0/4, the metronome will sound without any accent beats. If you set it to 4/4, accent beats will fall on the first of every four beats. If you set it to 8/4, accent beats will fall on the first of every eight beats. To change the tempo, press the [

  • 1
  • 2
  • 3
  • 4
  • 5
  • 6
  • 7
  • 8
  • 9
  • 10
  • 11
  • 12
  • 13
  • 14
  • 15
  • 16
  • 17
  • 18
  • 19
  • 20
  • 21
  • 22
  • 23
  • 24
  • 25
  • 26
  • 27
  • 28
  • 29
  • 30
  • 31
  • 32
  • 33
  • 34
  • 35
  • 36
  • 37
  • 38
  • 39
  • 40
  • 41

Functions Useful for Musical Instrument Practice
Reference Manual
25
Using the metronome
The PR7 features a built-in metronome, which you can use while the unit is stopped or
recording.
1.
While the HOME screen is displayed, press the [MENU] button.
Menu items appear on the left side of the screen.
2.
Press the [+] or [–] button to select “MET”, then press the [
] (Play) button.
The PR7 displays the metronome screen.
3.
Press the [>] button to select the metronome On/Off parameter, then press
the [
] (Play) button.
4.
Press the [+] or [–] button to select “On”, then press the [
] (Play) button.
If you turn on the metronome in this step, the metronome will sound during
recording. If you want to use only the metronome function, proceed to step 5.
5.
Press the [<] button to select “SEt” then press the [
] (Play) button.
The PR7 displays the metronome setting screen, and then metronome starts.
The tempo parameter is initially selected on the metronome setting screen.
6.
Press the [+] or [–] button to edit the tempo value, then press the [>] button.
7.
Press the [+] or [–] button to edit the beat value.
You can set the tempo in the range of 30 to 250, and the beat in the range of 0/4
to 8/4.
If you set the beat to 0/4, the metronome will sound without any accent beats. If
you set it to 4/4, accent beats will fall on the first of every four beats. If you set it to
8/4, accent beats will fall on the first of every eight beats.
To change the tempo, press the [<] button to return to the tempo parameter.
If you select “On” in step 4, the metronome will sound (during recording) at the
beat and tempo you set here.
To return to the metronome screen, press the [<] button while you are setting the
tempo, or press the [
] (Play) button while you are setting the beat. The
metronome will stop.
8.
After the settings are complete, press the [
] (Stop) button.
The PR7 displays the HOME screen.
NOTE
The volume level of the metronome is affected by the playback level of the PR7.
Adjusting the recording level
page 9
Beat
Tempo