Yamaha PSR-450 Owner's Manual - Page 28
Play Different Voices With the Left and Right Hands, One-touch Split Voice Selection - piano
 |
View all Yamaha PSR-450 manuals
Add to My Manuals
Save this manual to your list of manuals |
Page 28 highlights
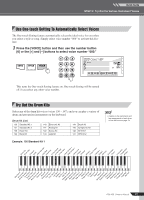
Quick Guide STEP 4 • Try Out the Various Instrument Voices Play Different Voices With the Left and Right Hands When you select any of the "split" voices (126 ~ 135) different voices will sound in the left-hand and right-hand ranges of the keyboard. If you select voice number 126, for example, you can play acoustic bass with the left hand and grand piano with the right. Split point As shown in the above illustration the key that divides the left- and right-hand keyboard ranges is known as the "split point." The initial default split point is set at key number 54 (F#2), but you can change this setting to suit your own playing style by following the procedure described in "Changing the Split Point," below. One-touch Split Voice Selection As mentioned above, selecting a voice number between 126 and 135 will split the keyboard allowing you to play different voices with the left and right hands. When any other voice is selected you can instantly recall the last split voice selected (126 ~ 135) simply by pressing the [SPLIT] button. Changing the Split Point The keyboard is divided into left- and right-hand ranges at the "split point." When a style is selected and accompaniment is on, the keys to the left of the split point function as the accompaniment range in which you play chords to define the accompaniment (page 19). When accompaniment is off, the split point separates the left- and right-hand instruments in the split voices (126 ~ 135). The initial default split point is set at key number 54 (F#2), but you can change this setting to suit your own playing requirements. 1 Press the [STYLE] button, and then press and hold the [ACMP ON/OFF] button for longer than a second so that the split point setting display appears. Current split point setting 054 Split point 2 Use the number buttons [0] ~ [9] or the [+] and [-] buttons to set the split point at the desired key. Default split-point setting: 54 (F#2) 36 48 60 72 84 96 Each key is assigned a number as shown in the above illustration. Refer to the illustration when setting the split point. The currently set split point is shown highlighted (inverted) in the keyboard illustration in the display. 28 PSR-450 Owner's Manual NOTE • The default split point of 54 (F#2) can be instantly reset by simultaneously pressing the [+] and [-] buttons.
-
 1
1 -
2
-
3
-
4
-
5
-
6
-
7
-
8
-
9
-
10
-
11
-
12
-
13
-
14
-
15
-
16
-
17
-
18
-
19
-
20
-
21
-
22
-
 23
23 -
 24
24 -
 25
25 -
 26
26 -
 27
27 -
 28
28 -
 29
29 -
 30
30 -
 31
31 -
 32
32 -
 33
33 -
34
-
35
-
36
-
37
-
38
-
39
-
40
-
41
-
42
-
43
-
44
-
45
-
46
-
47
-
48
-
49
-
50
-
51
-
52
-
53
-
54
-
55
-
56
-
57
-
58
-
59
-
60
-
61
-
62
-
63
-
64
-
65
-
66
-
67
-
68
-
69
-
70
-
71
-
72
-
73
-
74
-
75
-
76
-
77
-
78
-
79
-
80
-
81
-
82
-
83
-
84
-
85
-
86
-
87
-
88
 |
 |
