Yamaha PSR-740 Owner's Manual - Page 101
Press the [NEXT] button., Press the [RECORD] button to exit from the Record mode.
 |
View all Yamaha PSR-740 manuals
Add to My Manuals
Save this manual to your list of manuals |
Page 101 highlights
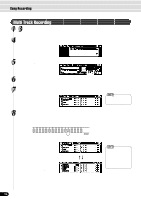
12 Press the [NEXT] button. Song Recording 13 Select the Quantize size (resolution). Use the data dial, the [+/YES] button or the [-/NO] button. Set the Quantize value to correspond to the smallest notes in the track you are working with. For example, if the data was recorded with both quarter notes and eighth notes, use 1/8 for the quantize value. If the quantize function is applied in this case with the value set to 1/4, the eighth notes would be moved on top of the quarter notes. q Quantize Size Size Note 1/4 Quarter note 1/6 Quarter note triplet 1/8 Eighth note 1/12 Eighth note triplet 1/16 Sixteenth note 1/24 Sixteenth note triplet 1/32 Thirty-second note One measure of 8th notes before quantization After quantization 14 Press the [NEXT] button to display the Quantize operation screen. 15 Press the [+/YES] button to execute the Quantize operation. To abort the Quantize operation, press the [-/NO] button. CAUTION • While the Quantize operation is being executed, never eject the floppy disk or turn the power off. The Quantize operation is completed... 16 Press the [RECORD] button to exit from the Record mode. 101 99
-
 1
1 -
2
-
3
-
4
-
5
-
6
-
7
-
8
-
9
-
10
-
11
-
12
-
13
-
14
-
15
-
16
-
17
-
18
-
19
-
20
-
21
-
22
-
23
-
24
-
25
-
26
-
27
-
28
-
29
-
30
-
31
-
32
-
33
-
34
-
35
-
36
-
37
-
38
-
39
-
40
-
41
-
42
-
43
-
44
-
45
-
46
-
47
-
48
-
49
-
50
-
51
-
52
-
53
-
54
-
55
-
56
-
57
-
58
-
59
-
60
-
61
-
62
-
63
-
64
-
65
-
66
-
67
-
68
-
69
-
70
-
71
-
72
-
73
-
74
-
75
-
76
-
77
-
78
-
79
-
80
-
81
-
82
-
83
-
84
-
85
-
86
-
87
-
88
-
89
-
90
-
91
-
92
-
93
-
94
-
95
-
 96
96 -
 97
97 -
 98
98 -
 99
99 -
 100
100 -
 101
101 -
 102
102 -
 103
103 -
 104
104 -
 105
105 -
 106
106 -
107
-
108
-
109
-
110
-
111
-
112
-
113
-
114
-
115
-
116
-
117
-
118
-
119
-
120
-
121
-
122
-
123
-
124
-
125
-
126
-
127
-
128
-
129
-
130
-
131
-
132
-
133
-
134
-
135
-
136
-
137
-
138
-
139
-
140
-
141
-
142
-
143
-
144
-
145
-
146
-
147
-
148
-
149
-
150
-
151
-
152
-
153
-
154
-
155
-
156
-
157
-
158
-
159
-
160
-
161
-
162
-
163
-
164
-
165
-
166
-
167
-
168
-
169
-
170
-
171
-
172
-
173
-
174
-
175
-
176
-
177
-
178
-
179
-
180
-
181
-
182
-
183
-
184
-
185
-
186
-
187
-
188
 |
 |
