Yamaha PSR-740 Owner's Manual - Page 55
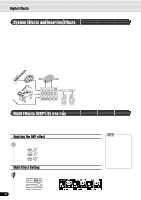
Set the effect depth for DSP1 - 3.
 |
View all Yamaha PSR-740 manuals
Add to My Manuals
Save this manual to your list of manuals |
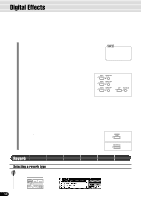
Page 55 highlights
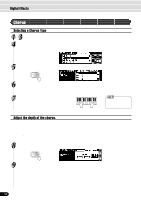
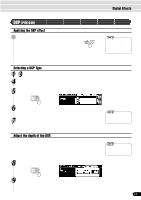
2 Specify the multi effect connection. Use the data dial, the [+/YES] button or the [-/NO] button. There are six types as shown below. RIGHT1 RIGHT2 DSP1mDSP2mDSP3 DSP1mDSP2 DSP3 DSP1mDSP2 DSP1 DSP2 DSP1 DSP2mDSP3 DSP1 3 Press the [NEXT] button. BACK NEXT LEFT DSP3 DSP3 DSP2mDSP3 Digital Effects • When the Voice Set function is ON (page 136), the multi effect connection settings may automatically change according to the selected R1 panel voice. 4 Select the desired multi effect system. Use the data dial, the [+/YES] button or the [-/NO] button. DSP4 is the effect for the microphone sound (page 83). 5 Press the [NEXT] button. 6 Select the effect type for DSP1 - 3. Use the data dial, the [+/YES] button or the [-/NO] button. Refer to the Multi Effect Type List (page 156). 7 Press the [NEXT] button. • The DSP 1/2/3 type settings may automatically change when a panel voice is selected for R1. 8 Set the effect depth for DSP1 - 3. Use the data dial, the [+/YES] button, the [-/NO] button or the number buttons [1]-[0]. The Dry/Wet setting determines the amount of effect sound that is heard in comparison to the unprocessed sound. The word "dry" refers to the original sound that has no effects applied to it, while "wet" refers to the effect-processed sound. q Dry/Wet [1 Only dry sound is output. q Dry/Wet [64] ......... Equal balance between the dry and wet levels. q Dry/Wet [127] ....... Only wet sound is output. 9 Play the keyboard. Try some of the other connection settings and types as well. • The dry/wet settings cannot be done for some of the DSP 1/2/3 types. • The Dry/Wet settings for DSP 1/2/3 may automatically change when a panel voice is selected for R1. 55 53
-
 1
1 -
2
-
3
-
4
-
5
-
6
-
7
-
8
-
9
-
10
-
11
-
12
-
13
-
14
-
15
-
16
-
17
-
18
-
19
-
20
-
21
-
22
-
23
-
24
-
25
-
26
-
27
-
28
-
29
-
30
-
31
-
32
-
33
-
34
-
35
-
36
-
37
-
38
-
39
-
40
-
41
-
42
-
43
-
44
-
45
-
46
-
47
-
48
-
49
-
 50
50 -
 51
51 -
 52
52 -
 53
53 -
 54
54 -
 55
55 -
 56
56 -
 57
57 -
 58
58 -
 59
59 -
 60
60 -
61
-
62
-
63
-
64
-
65
-
66
-
67
-
68
-
69
-
70
-
71
-
72
-
73
-
74
-
75
-
76
-
77
-
78
-
79
-
80
-
81
-
82
-
83
-
84
-
85
-
86
-
87
-
88
-
89
-
90
-
91
-
92
-
93
-
94
-
95
-
96
-
97
-
98
-
99
-
100
-
101
-
102
-
103
-
104
-
105
-
106
-
107
-
108
-
109
-
110
-
111
-
112
-
113
-
114
-
115
-
116
-
117
-
118
-
119
-
120
-
121
-
122
-
123
-
124
-
125
-
126
-
127
-
128
-
129
-
130
-
131
-
132
-
133
-
134
-
135
-
136
-
137
-
138
-
139
-
140
-
141
-
142
-
143
-
144
-
145
-
146
-
147
-
148
-
149
-
150
-
151
-
152
-
153
-
154
-
155
-
156
-
157
-
158
-
159
-
160
-
161
-
162
-
163
-
164
-
165
-
166
-
167
-
168
-
169
-
170
-
171
-
172
-
173
-
174
-
175
-
176
-
177
-
178
-
179
-
180
-
181
-
182
-
183
-
184
-
185
-
186
-
187
-
188
 |
 |
