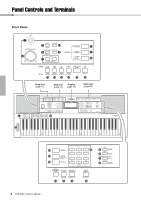
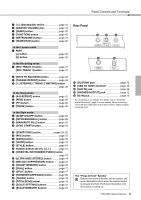
Yamaha PSR-A350 PSR-A350 Owners Manual - Page 11
Using Batteries, Installing the batteries, Setting the battery type
 |
View all Yamaha PSR-A350 manuals
Add to My Manuals
Save this manual to your list of manuals |
Page 11 highlights
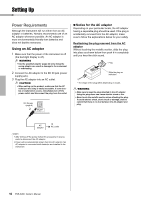
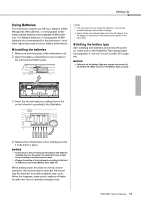
Setting Up Using Batteries This instrument requires six "AA" size, Alkaline (LR6)/ Manganese (R6) batteries, or rechargeable nickelmetal hydride batteries (rechargeable Ni-MH batteries). The Alkaline batteries or rechargeable Ni-MH batteries are recommended for this instrument, since other types may result in poorer battery performance. Installing the batteries 1 Make sure that the power of the instrument is off. 2 Open the battery compartment cover located on the instrument's bottom panel. NOTE • This instrument cannot charge the batteries. Use only the specified charger device when charging. • Power will be automatically drawn from the AC adaptor if an AC adaptor is connected while batteries are installed in the instrument. Setting the battery type After installing new batteries and turning the power on, make sure to set the Battery Type appropriately (rechargeable or not) via Function number 061 (page 44). NOTICE • Failure to set the Battery Type may shorten the amount of the battery life. Make sure to set the Battery Type correctly. 3 Insert the six new batteries, putting them in the correct direction according to the illustration. 4 Replace the compartment cover, making sure that it locks firmly in place. NOTICE • Connecting or disconnecting the AC adaptor with batteries installed may turn the power off, resulting in loss of data being recorded or transferred at the time. • Change the setting of the instrument according to the kind of battery you are using (Battery Type; page 44). When battery power becomes too low for proper operation, the volume may be reduced, the sound may be distorted, and other problems may occur. When this happens, make sure to replace all batteries with new ones or already-recharged ones. PSR-A350 Owner's Manual 11
-
 1
1 -
2
-
3
-
4
-
5
-
 6
6 -
 7
7 -
 8
8 -
 9
9 -
 10
10 -
 11
11 -
 12
12 -
 13
13 -
 14
14 -
 15
15 -
 16
16 -
17
-
18
-
19
-
20
-
21
-
22
-
23
-
24
-
25
-
26
-
27
-
28
-
29
-
30
-
31
-
32
-
33
-
34
-
35
-
36
-
37
-
38
-
39
-
40
-
41
-
42
-
43
-
44
-
45
-
46
-
47
-
48
-
49
-
50
-
51
-
52
-
53
-
54
-
55
-
56
-
57
-
58
-
59
-
60
-
61
-
62
-
63
-
64
-
65
-
66
-
67
-
68
-
69
-
70
-
71
-
72
-
73
-
74
-
75
-
76
-
77
-
78
-
79
-
80
 |
 |
