Yamaha PSR-S550 Owner's Manual - Page 37
Song Clear-Deleting User Songs, Play the User Song, Save to USB flash Memory see - style files
 |
View all Yamaha PSR-S550 manuals
Add to My Manuals
Save this manual to your list of manuals |
Page 37 highlights
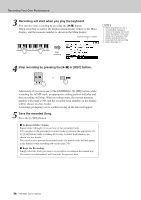
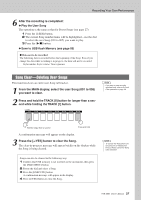
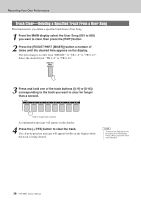
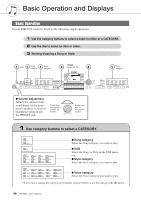
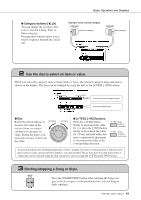
Recording Your Own Performance 6 After the recording is completed: ◆ Play the User Song The operation is the same as that for Preset Songs (see page 27). 1 Press the [USER] button. 2 The current Song number/name will be highlighted-use the dial to select the user Song (001 to 005) you want to play. 3 Press the [>/■] button. ◆ Save to USB flash Memory (see page 86) ● Data not to be recorded The following data is recorded before the beginning of the Song. Even if you change the data while recording is in progress, the data will not be recorded. Style number, Style volume, Time signature Song Clear-Deleting User Songs This function clears an entire user Song (all tracks). 1 From the MAIN display, select the user Song (001 to 005) you want to clear. 2 Press and hold the TRACK [8] button for longer than a second while holding the TRACK [1] button. NOTE • If you want to clear a single, specified track, refer to the Track Clear operation on page 38. Hold for longer than a second Press and hold A confirmation message will appear on the display. 3 Press the [+/YES] button to clear the Song. The clear-in-progress message will appear briefly on the display while the Song is being cleared. Songs can also be cleared in the following way. 1 Confirm that USB memory is not inserted on the instrument, then press the [FILE MENU] button. 2 Rotate the dial and select a Song. 3 Press the [EXECUTE] button. A confirmation message will appear in the display. 4 Press [+/YES] button to clear the Song. NOTE • To execute the Song Clear function press the [+/YES] button. Press [-/NO] to cancel the Song Clear operation. PSR-S550 Owner's Manual 37
-
 1
1 -
2
-
3
-
4
-
5
-
6
-
7
-
8
-
9
-
10
-
11
-
12
-
13
-
14
-
15
-
16
-
17
-
18
-
19
-
20
-
21
-
22
-
23
-
24
-
25
-
26
-
27
-
28
-
29
-
30
-
31
-
 32
32 -
 33
33 -
 34
34 -
 35
35 -
 36
36 -
 37
37 -
 38
38 -
 39
39 -
 40
40 -
 41
41 -
 42
42 -
43
-
44
-
45
-
46
-
47
-
48
-
49
-
50
-
51
-
52
-
53
-
54
-
55
-
56
-
57
-
58
-
59
-
60
-
61
-
62
-
63
-
64
-
65
-
66
-
67
-
68
-
69
-
70
-
71
-
72
-
73
-
74
-
75
-
76
-
77
-
78
-
79
-
80
-
81
-
82
-
83
-
84
-
85
-
86
-
87
-
88
-
89
-
90
-
91
-
92
-
93
-
94
-
95
-
96
-
97
-
98
-
99
-
100
-
101
-
102
-
103
-
104
-
105
-
106
-
107
-
108
-
109
-
110
-
111
-
112
-
113
-
114
-
115
-
116
-
117
-
118
-
119
-
120
-
121
-
122
-
123
-
124
-
125
-
126
-
127
-
128
-
129
-
130
-
131
-
132
-
133
-
134
-
135
-
136
-
137
-
138
-
139
-
140
-
141
-
142
 |
 |
