Yamaha PSR-S910 Owner's Manual - Page 58
Saving Files
 |
View all Yamaha PSR-S910 manuals
Add to My Manuals
Save this manual to your list of manuals |
Page 58 highlights
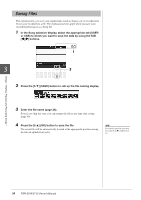
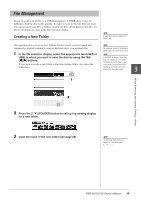
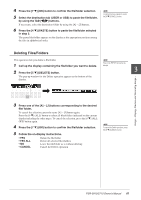
Saving Files This operation lets you save your original data (such as Songs you've recorded and Voices you've edited) to a file. The explanations here apply when you save your recorded performance as a Song file. 1 In the Song selection display, select the appropriate tab (USER or USB) to which you want to save the data by using the TAB [E][F] buttons. 1 3 2 2 Press the [6 ▼] (SAVE) button to call up the file naming display. Songs - Playing, Practice and Recording Songs - 3 Enter the file name (page 26). Even if you skip this step, you can rename the file at any time after saving (page 60). 4 Press the [8 ▲] (OK) button to save the file. The saved file will be automatically located at the appropriate position among the files in alphabetical order. NOTE If you want to cancel the Save operation, press the [8 ▼] (CANCEL) button. 58 PSR-S910/S710 Owner's Manual
-
 1
1 -
2
-
3
-
4
-
5
-
6
-
7
-
8
-
9
-
10
-
11
-
12
-
13
-
14
-
15
-
16
-
17
-
18
-
19
-
20
-
21
-
22
-
23
-
24
-
25
-
26
-
27
-
28
-
29
-
30
-
31
-
32
-
33
-
34
-
35
-
36
-
37
-
38
-
39
-
40
-
41
-
42
-
43
-
44
-
45
-
46
-
47
-
48
-
49
-
50
-
51
-
52
-
 53
53 -
 54
54 -
 55
55 -
 56
56 -
 57
57 -
 58
58 -
 59
59 -
 60
60 -
 61
61 -
 62
62 -
 63
63 -
64
-
65
-
66
-
67
-
68
-
69
-
70
-
71
-
72
-
73
-
74
-
75
-
76
-
77
-
78
-
79
-
80
-
81
-
82
-
83
-
84
-
85
-
86
-
87
-
88
-
89
-
90
-
91
-
92
-
93
-
94
-
95
-
96
-
97
-
98
-
99
-
100
-
101
-
102
-
103
-
104
-
105
-
106
-
107
-
108
-
109
-
110
-
111
-
112
 |
 |
