Yamaha PSR-SX700 PSR-SX900/PSR-SX700 Owners Manual - Page 18
Attaching the Music Rest, Rear Panel
 |
View all Yamaha PSR-SX700 manuals
Add to My Manuals
Save this manual to your list of manuals |
Page 18 highlights
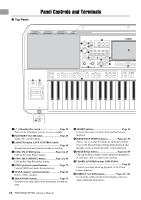
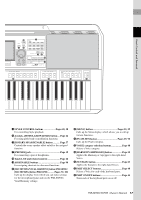
@8 REGISTRATION MEMORY buttons........... Page 86 For registering and recalling panel setups. @9 ONE TOUCH SETTING buttons............Pages 43, 54 Calls up the appropriate panel settings for the Style. #0 MULTI PAD CONTROL buttons ...........Pages 53, 64 Selects and plays a rhythmic or melodic Multi Pad phrase. #1 UPPER OCTAVE buttons Page 55 Shifts the pitch of the keyboard in octave steps. Panel Setup (Panel Settings) By using the controls on the panel, you can make various settings as described here. These settings of the instrument are together referred to as "panel setup" or "panel settings" in this manual. Rear Panel q w e rt yu q DC IN jack Page 20 For connecting the power adaptor. w SUB (AUX) OUTPUT [1 (L/L+R)], [2 (R)] jacks (PSR-SX900 Page 102 For connecting external audio devices. These jacks function as either SUB 1-2 or AUX outputs, depending on the Line Out settings. e MAIN OUTPUT [L/L+R], [R] jacks Page 102 For connecting external audio devices. r [AUX IN] jack Page 103 For connecting an external audio device, such as a portable audio player. t [MIC GUITAR] switch Page 100 For switching between "MIC" and "Guitar" for proper use of the [MIC/GUITAR INPUT] jack. y [MIC/GUITAR INPUT] jack Page 100 For connecting a microphone or guitar. Attaching the Music Rest Insert the music rest into the slots as shown. 18 PSR-SX900/SX700 Owner's Manual
-
 1
1 -
2
-
3
-
4
-
5
-
6
-
7
-
8
-
9
-
10
-
11
-
12
-
 13
13 -
 14
14 -
 15
15 -
 16
16 -
 17
17 -
 18
18 -
 19
19 -
 20
20 -
 21
21 -
 22
22 -
 23
23 -
24
-
25
-
26
-
27
-
28
-
29
-
30
-
31
-
32
-
33
-
34
-
35
-
36
-
37
-
38
-
39
-
40
-
41
-
42
-
43
-
44
-
45
-
46
-
47
-
48
-
49
-
50
-
51
-
52
-
53
-
54
-
55
-
56
-
57
-
58
-
59
-
60
-
61
-
62
-
63
-
64
-
65
-
66
-
67
-
68
-
69
-
70
-
71
-
72
-
73
-
74
-
75
-
76
-
77
-
78
-
79
-
80
-
81
-
82
-
83
-
84
-
85
-
86
-
87
-
88
-
89
-
90
-
91
-
92
-
93
-
94
-
95
-
96
-
97
-
98
-
99
-
100
-
101
-
102
-
103
-
104
-
105
-
106
-
107
-
108
-
109
-
110
-
111
-
112
-
113
-
114
-
115
-
116
-
117
-
118
-
119
-
120
-
121
-
122
-
123
-
124
-
125
-
126
-
127
-
128
-
129
-
130
-
131
-
132
-
133
-
134
-
135
-
136
 |
 |
