Yamaha PSR-SX900 PSR-SX900/PSR-SX700 Owners Manual - Page 40
Playing with Styles—Setting Up, Setting up Styles
 |
View all Yamaha PSR-SX900 manuals
Add to My Manuals
Save this manual to your list of manuals |
Page 40 highlights
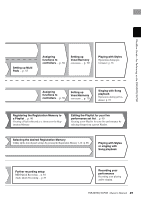
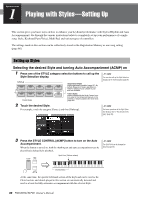
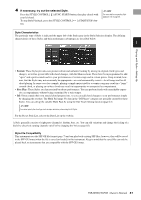
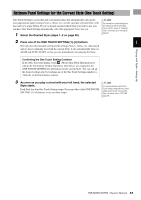
Operation Guide 1 Playing with Styles-Setting Up This section gives you basic steps on how to enhance your keyboard performance with Styles (Rhythm and Auto Accompaniment). Go through the various instructions below to completely set up your performance of a single song: Style, Keyboard Part (Voice), Multi Pad, and various types of controllers. The settings made in this section can be collectively stored in the Registration Memory as one song setting (page 86). Setting up Styles Selecting the desired Style and turning Auto Accompaniment (ACMP) on 1 Press one of the STYLE category selection buttons to call up the Style Selection display. NOTE You can also call up the Style Selection display via the Home display (page 26). Preset Styles • Expansion Styles Styles additionally installed (page 97). By default, Expansion Styles specially provided for playing music suitable in your area are installed. • User Styles Styles created with the Style Creator function (refer to the Reference Manual on the website), or Styles copied to the User drive (page 34). 2 Touch the desired Style. For example, touch the category [Dance], and then [Dubstep]. NOTE For basic operations of the Style Selection display, refer to "File Selection Display" (page 28). 3 Press the STYLE CONTROL [ACMP] button to turn on the Auto Accompaniment. When the button is turned on, both the rhythm part and auto accompaniment can be played back during Style playback. Split Point (F#2 as default) NOTE The Split Point can be changed as desired (page 45). Chord section At the same time, the specific left-hand section of the keyboard can be used as the Chord section, and chords played in this section are automatically detected and used as a basis for fully automatic accompaniment with the selected Style. 40 PSR-SX900/SX700 Owner's Manual
-
 1
1 -
2
-
3
-
4
-
5
-
6
-
7
-
8
-
9
-
10
-
11
-
12
-
13
-
14
-
15
-
16
-
17
-
18
-
19
-
20
-
21
-
22
-
23
-
24
-
25
-
26
-
27
-
28
-
29
-
30
-
31
-
32
-
33
-
34
-
 35
35 -
 36
36 -
 37
37 -
 38
38 -
 39
39 -
 40
40 -
 41
41 -
 42
42 -
 43
43 -
 44
44 -
 45
45 -
46
-
47
-
48
-
49
-
50
-
51
-
52
-
53
-
54
-
55
-
56
-
57
-
58
-
59
-
60
-
61
-
62
-
63
-
64
-
65
-
66
-
67
-
68
-
69
-
70
-
71
-
72
-
73
-
74
-
75
-
76
-
77
-
78
-
79
-
80
-
81
-
82
-
83
-
84
-
85
-
86
-
87
-
88
-
89
-
90
-
91
-
92
-
93
-
94
-
95
-
96
-
97
-
98
-
99
-
100
-
101
-
102
-
103
-
104
-
105
-
106
-
107
-
108
-
109
-
110
-
111
-
112
-
113
-
114
-
115
-
116
-
117
-
118
-
119
-
120
-
121
-
122
-
123
-
124
-
125
-
126
-
127
-
128
-
129
-
130
-
131
-
132
-
133
-
134
-
135
-
136
 |
 |
