Yamaha PSR-SX900 PSR-SX900/PSR-SX700 Owners Manual - Page 46
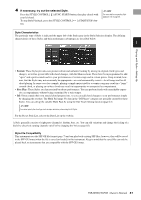
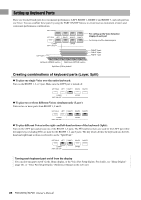
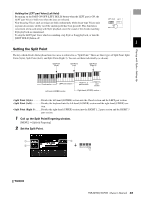
by Style, Split Point Left is indicated by Left
 |
View all Yamaha PSR-SX900 manuals
Add to My Manuals
Save this manual to your list of manuals |
Page 46 highlights
q Split Point (Style + Left) Sets Split Point (Style) and Split Point (Left) to the same note. In this case, the Chord Section and the LEFT part section occupy the same area. Specify the Split Point directly from the keyboard by simultaneously holding [Style + Left] on the display and pressing the desired key on the keyboard. Split Point (Style + Left) Chord + LEFT part section (Left-hand section) Right-hand section w Split Point Sets each Split Point individually. (Style, Left, Right 3) Specify the Split Point directly from the keyboard by simultaneously holding the correspond- ing item on the display and pressing the desired key on the keyboard. You can also specify each Split Point by note name, touching the controls. Split Point (Style) is indicated by "Style," Split Point (Left) is indicated by "Left," and Split Point (Right 3) is indicated by "Right 3." NOTE Once you have touched the Split Point type you are controlling is focused (corresponding indicator is colored). In this condition, you can change the value of the focused Split Point type by rotating the Data dial. NOTE Split Point (Left) cannot be set lower than Split Point (Style), and Split Point (Right 3) cannot be set lower than Split Point (Left). 46 PSR-SX900/SX700 Owner's Manual
-
 1
1 -
2
-
3
-
4
-
5
-
6
-
7
-
8
-
9
-
10
-
11
-
12
-
13
-
14
-
15
-
16
-
17
-
18
-
19
-
20
-
21
-
22
-
23
-
24
-
25
-
26
-
27
-
28
-
29
-
30
-
31
-
32
-
33
-
34
-
35
-
36
-
37
-
38
-
39
-
40
-
 41
41 -
 42
42 -
 43
43 -
 44
44 -
 45
45 -
 46
46 -
 47
47 -
 48
48 -
 49
49 -
 50
50 -
 51
51 -
52
-
53
-
54
-
55
-
56
-
57
-
58
-
59
-
60
-
61
-
62
-
63
-
64
-
65
-
66
-
67
-
68
-
69
-
70
-
71
-
72
-
73
-
74
-
75
-
76
-
77
-
78
-
79
-
80
-
81
-
82
-
83
-
84
-
85
-
86
-
87
-
88
-
89
-
90
-
91
-
92
-
93
-
94
-
95
-
96
-
97
-
98
-
99
-
100
-
101
-
102
-
103
-
104
-
105
-
106
-
107
-
108
-
109
-
110
-
111
-
112
-
113
-
114
-
115
-
116
-
117
-
118
-
119
-
120
-
121
-
122
-
123
-
124
-
125
-
126
-
127
-
128
-
129
-
130
-
131
-
132
-
133
-
134
-
135
-
136
 |
 |
