Yamaha RX 497 Owners Manual - Page 13
Installing batteries in the remote control, Using the remote control, Notes on batteries
 |
UPC - 027108923888
View all Yamaha RX 497 manuals
Add to My Manuals
Save this manual to your list of manuals |
Page 13 highlights
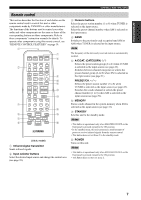
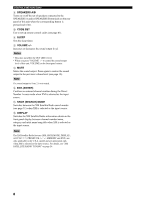
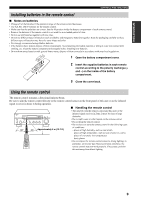
INTRODUCTION CONTROLS AND FUNCTIONS Installing batteries in the remote control ■ Notes on batteries • Change all of the batteries if the operation range of the remote control decreases. • Use AA, R6, UM-3 batteries for the remote control. • Make sure that the polarities are correct. See the illustration inside the battery compartment of each remote control. • Remove the batteries if the remote control is not used for an extended period of time. • Do not use old batteries together with new ones. • Do not use different types of batteries (such as alkaline and manganese batteries) together. Read the packaging carefully as these different types of batteries may have the same shape and color. • We strongly recommend using alkaline batteries. • If the batteries have leaked, dispose of them immediately. Avoid touching the leaked material or letting it come into contact with clothing, etc. Clean the battery compartment thoroughly before installing new batteries. • Do not throw away batteries with general house waste; dispose of them correctly in accordance with your local regulations. 2 1 3 1 Open the battery compartment cover. 2 Insert the supplied batteries in each remote control according to the polarity markings (+ and -) on the inside of the battery compartment. 3 Close the cover back. Using the remote control The remote control transmit a directional infrared beam. Be sure to aim the remote control directly at the remote control sensor on the front panel of this unit or on the infrared signal receiver in Zone 2 during operation. MASTER ON OFF MAIN ZONE ON/OFF INPUT ZONE 2 ON/OFF ZONE CONTROL FM/AM l TUNING/CH h XM/ANT EDIT MEMORY TUN MODE/DISP SEARCH MODE MAN'L/AUTO FM AUTO/MAN'L PURE DIRECT MD/TAPE MONITOR A/B/C/D/E 1 CATEGORY PHONES SPEAKERS A B 2 3 4 5 6 BASS 0 1 1 2 2 3 3 4 -5 4 5+ TREBLE 0 1 1 2 2 3 3 4 -5 4 5+ BALANCE 0 1 1 2 2 3 3 4 L5 4 5R 7 8 LOUDNESS FLAT 1 2 -30dB 10 3 9 4 8 5 7 6 VOLUME 30 30 Approximately 6 m (19.7 ft) POWER POWER TV AV STANDBY POWER CD MD/TAPE TUNER XM DVD DTV/CBL VCR PHONO REC DISC SKIP TV VOL CH AUDIO SPEAKERS A B SLEEP VOLUME MUTE INPUT 1 2 5 6 9 0 MUTE 3 4 7 8 10 ENT. TITLE BAND A-E/CAT. RETURN MEMORY ENTER PRESET/CH MENU SRCH MODE A-E/CAT. DISPLAY ■ Handling the remote control • The area between the remote control and this unit (or the infrared signal receiver in Zone 2) must be clear of large obstacles. • Do not spill water or other liquids on the remote control. • Do not drop the remote control. • Do not leave or store the remote control in the following types of conditions: - places of high humidity, such as near a bath - places of high temperature, such as near a heater or a stove - places of extremely low temperatures - dusty places • Do not expose the remote control sensor to strong lighting, in particular, an inverter type fluorescent lamp; otherwise, the remote control may not work properly. If necessary, position this unit away from direct lighting. 9
-
 1
1 -
2
-
3
-
4
-
5
-
6
-
7
-
 8
8 -
 9
9 -
 10
10 -
 11
11 -
 12
12 -
 13
13 -
 14
14 -
 15
15 -
 16
16 -
 17
17 -
 18
18 -
19
-
20
-
21
-
22
-
23
-
24
-
25
-
26
-
27
-
28
-
29
-
30
-
31
-
32
-
33
-
34
-
35
-
36
-
37
-
38
-
39
-
40
-
41
-
42
-
43
-
44
-
45
-
46
-
47
-
48
-
49
-
50
-
51
-
52
-
53
 |
 |
