Yamaha RX 497 Owners Manual - Page 40
Switching the remote control ID
 |
UPC - 027108923888
View all Yamaha RX 497 manuals
Add to My Manuals
Save this manual to your list of manuals |
Page 40 highlights
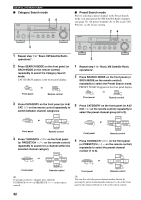
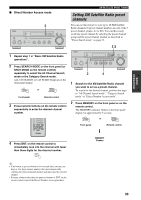
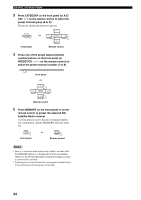
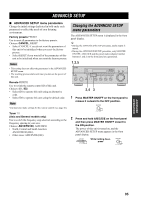
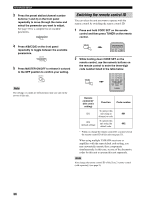
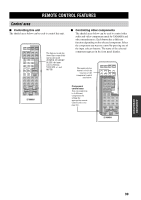
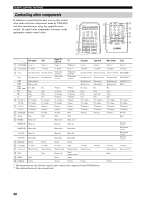
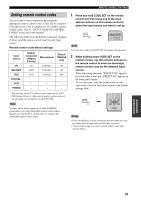
ADVANCED SETUP 3 Press the preset station/channel number buttons (1 and 2) on the front panel repeatedly to move through the menu and select the parameter you want to adjust. See page 35 for a complete list of available parameters. 1 2 Switching the remote control ID You can select the unit you want to operate with the remote control by switching the remote control ID. 1 Press and hold CODE SET on the remote control and then press TUNER on the remote control. 4 Press A/B/C/D/E on the front panel repeatedly to toggle between the available parameters. A/B/C/D/E CATEGORY 5 Press MASTER ON/OFF to release it outward to the OFF position to confirm your setting. MASTER ON OFF Note The settings you made are reflected next time you turn on the power of this unit. CODE SET MENU POWER POWER TV AV STANDBY POWER CD MD/TAPE TUNER XM DVD DTV/CBL VCR PHONO 2 While holding down CODE SET on the remote control, use the numeric buttons on the remote control to enter the three-digit code number listed in the table below. CODE SET MENU 1 2 3 4 5 6 7 8 9 0 10 ENT. TITLE BAND ENTER A-E/CAT. RETURN MEMORY PRESET/CH MENU SRCH MODE A-E/CAT. DISPLAY Remote control ID* (this unit's setting) ID1 ID2 (default setting) Function To operate this unit using an alternative code. To operate this unit using the default code. Code number 801 802 * When you change the remote control ID, you must switch the remote control ID of this unit (see page 35). When using multiple YAMAHA receivers or amplifiers with the same default code setting, you may unwantedly operate those components simultaneously. In this case, set one of the alternative codes for this unit to operate this unit separately. Note Also change the remote control ID of the Zone 2 remote control (sold separately) (see page 9). 36
-
 1
1 -
2
-
3
-
4
-
5
-
6
-
7
-
8
-
9
-
10
-
11
-
12
-
13
-
14
-
15
-
16
-
17
-
18
-
19
-
20
-
21
-
22
-
23
-
24
-
25
-
26
-
27
-
28
-
29
-
30
-
31
-
32
-
33
-
34
-
 35
35 -
 36
36 -
 37
37 -
 38
38 -
 39
39 -
 40
40 -
 41
41 -
 42
42 -
 43
43 -
 44
44 -
 45
45 -
46
-
47
-
48
-
49
-
50
-
51
-
52
-
53
 |
 |
