Yamaha VS-10 Owner's Manual - Page 17
Connecting the Main Speakers
 |
View all Yamaha VS-10 manuals
Add to My Manuals
Save this manual to your list of manuals |
Page 17 highlights
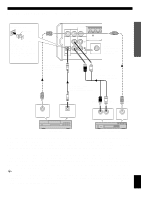
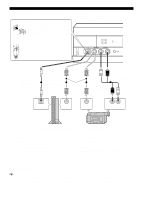
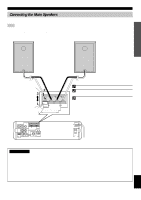
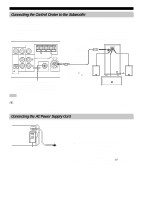
CONNECTIONS Connecting the Main Speakers Connect the main speakers to the control center. Note • Do not connect any speakers to the speaker terminals on the control center except for the supplied main speakers (NX-VS10M). Damage may result if a different speaker is connected. Right main speaker (Rear panel) Left main speaker (Rear panel) PREPARATION Bare wire 2 3 -- -- 1+ + Tab DO NOT CONNECT THIS UNIT TO SPEAKERS OTHER THAN NX-VS10M MAIN SPEAKERS Control center (Rear panel) VIDEO SIGNAL MONITOR OUT + DO NOT CONNECT THIS UNIT TO SPEAKERS OTHER THAN NX-VS10M MAIN SPEAKERS + MARK DIGITAL 1 VIDEO 1 TV (V/PCM) INPUT OUT SUBWOOFER SYSTEM CONNECTOR UNSWITCED 1 Open the tab. 2 Insert the bare wire of the speaker cord into the hole. 3 Return the tab until it clicks. • Connect the white cord to the + terminal (red), and the black cord to the - terminal (black). • Once connected, pull gently on the speaker cords to check that they are connected securely. 0.8A MAX. 120V 60Hz 100W MAX. AC OUTLET CAUTIONS • Do not let the bare speaker wire touch each other and do not let them touch any metal part of the speakers. This could damage the speakers. • Do not mistakenly connect positive (+) to negative (-) or vice versa when connecting speaker cords. • Insert the speaker cords securely so that positive (+) and negative (-) do not short. The speaker may not output any sound or may output noise, causing damage to the speakers, if speaker cords are not inserted securely. • Only insert the bare wire portion of the speaker cords into the holes. Sound will not be output if you insert as far as the plastic insulation part of the cord. • Secure the speaker cords so that they will not catch on hands or feet. 13 English
-
 1
1 -
2
-
3
-
4
-
5
-
6
-
7
-
8
-
9
-
10
-
11
-
 12
12 -
 13
13 -
 14
14 -
 15
15 -
 16
16 -
 17
17 -
 18
18 -
 19
19 -
 20
20 -
 21
21 -
 22
22 -
23
-
24
-
25
-
26
-
27
-
28
-
29
-
30
-
31
-
32
-
33
-
34
-
35
-
36
-
37
-
38
-
39
-
40
-
41
-
42
-
43
-
44
-
45
 |
 |
