Zanussi ZOD35561XK Product Manaul - Page 13
Care and cleaning - dishwasher
 |
View all Zanussi ZOD35561XK manuals
Add to My Manuals
Save this manual to your list of manuals |
Page 13 highlights
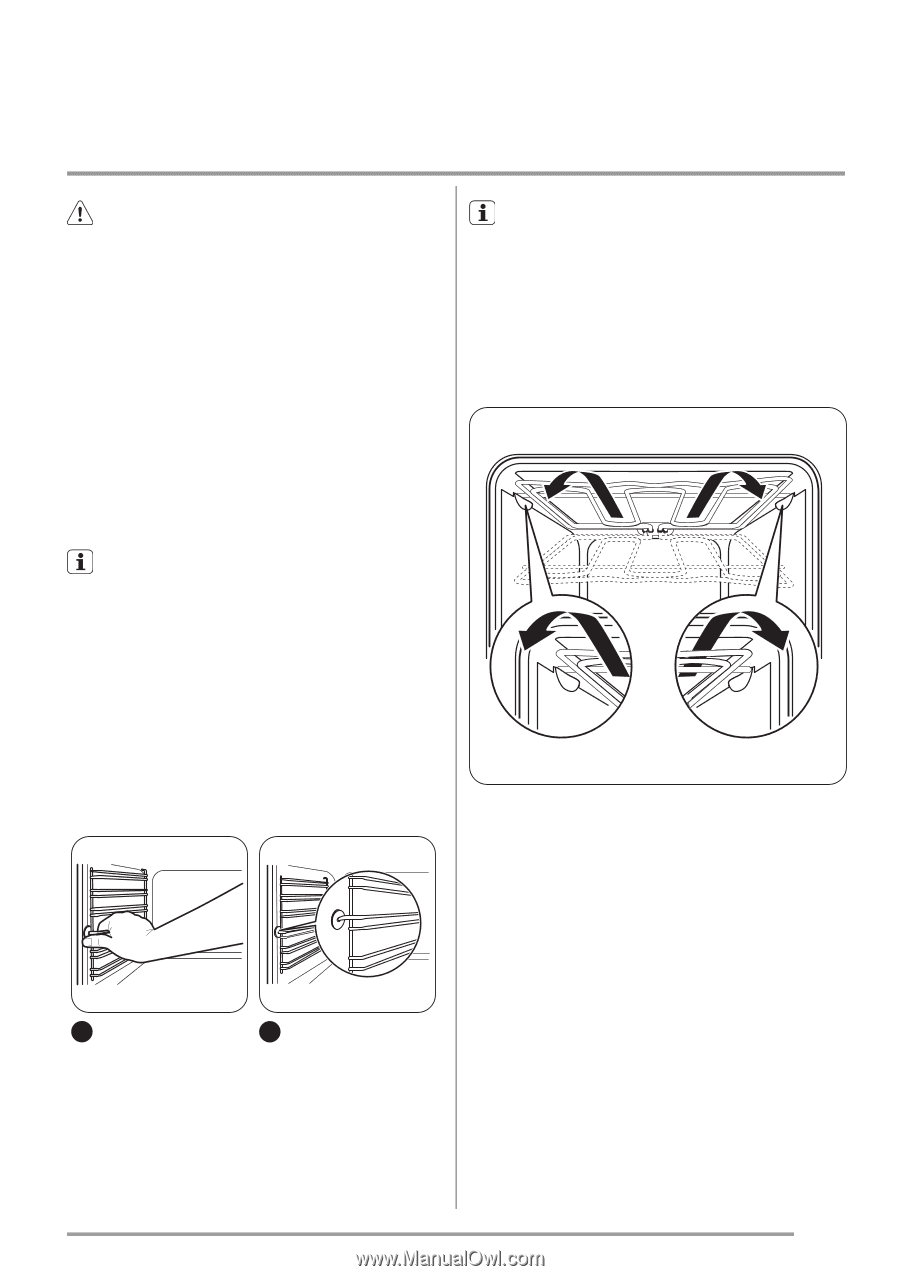
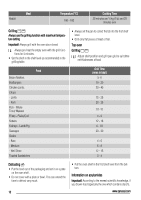
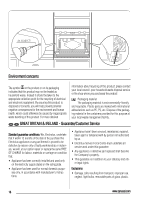
acrylamides can pose a health risk. Thus, we recommend that you cook at the lowest temperatures and do not brown food too much. Care and cleaning Warning! Refer to "Safety information" chapter. • Clean the front of the appliance with a soft cloth with warm water and cleaning agent. • To clean metal surfaces use a usual cleaning agent • Clean the oven interior after each use. Thus you can re- move dirt more easily and it does not burn on. • Clean stubborn dirt with a special oven cleaner. • Clean all oven accessories (with a soft cloth with warm water and cleaning agent) after each use and let them dry. • If you have nonstick accessories, do not clean them using an aggressive agents, sharp edged objects or dishwasher. It can destroy nonstick coating! Stainless steel or aluminium appliances: Clean the oven door with a wet sponge only. Dry it with a soft cloth. Do not use steel wool, acids or abrasive materials as they can damage the oven surface. Clean the oven control panel with the same precautions Shelf Support Rails You can remove the shelf support rails to clean the side walls. Removing the shelf support rails 1 Pull the front of the shelf support rail away from the side wall. 2 Pull the rear shelf support rail away from the side wall and remove it. Installing the shelf support rails Install the shelf support rails in opposite sequence. The rounded ends of the shelf support rails must point to the front. Oven Ceiling You can fold down the heating element on the oven ceiling to clean the oven ceiling easily. Folding down the heating element 1. Remove the shelf support rails. 2. Hold the heating element with the two hands at the front 3. Pull it forwards against the spring pressure and out along the support on both sides. 4. The heating element folds down. The oven ceiling is ready to clean. Installing the heating element 1. Install the heating element in opposite sequence. Important! Install the heating element correctly on the two sides above the support on the inner wall of the oven. 2. Insert shelf support rails. Oven door and glass panels To clean the oven door remove it. www.zanussi.com 13
-
 1
1 -
2
-
3
-
4
-
5
-
6
-
7
-
 8
8 -
 9
9 -
 10
10 -
 11
11 -
 12
12 -
 13
13 -
 14
14 -
 15
15 -
 16
16 -
 17
17 -
 18
18 -
19
-
20
 |
 |