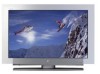
Zenith L30W26 Operating Guide - Page 20
PC Setup
 |
View all Zenith L30W26 manuals
Add to My Manuals
Save this manual to your list of manuals |
Page 20 highlights
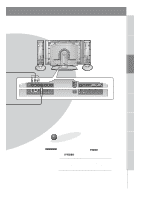
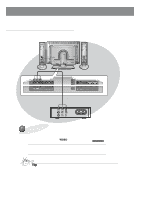
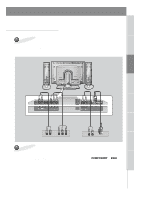
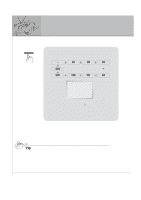
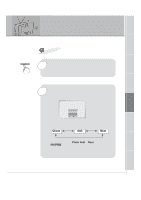
PC Setup - You can easily connect the Plasma Display to your PC for outstanding image and sound. Setup Instructions to Connect a PC to your Monitor • To set up this monitor in your PC window environment, select Normal, Standard or Default Monitor. This monitor does not support Plug and Play functionality. • An image is not visible if the resolution is set to over UXGA. • Connect the signal cable from the monitor Output port on the PC to the RGB1(PC/DTV INPUT) port on the Monitor. • Connect the audio cable from the PC to the Audio ports on the Monitor. • If your PC computer is equipped with a sound card, adjust the sound output on the PC. • Set the display resolution of the PC to 1024X768 for the best picture. This monitor's resolution is 1280X768. DC OUTPUT R AUDIO L MONO (DC 12V) AV INPUT VIDEO S-VIDEO Y PB PR COMPONENT (DVD/DTV INPUT) Monitor Connection Panel AC INPUT R AUDIO LL RGB 2 INPUT RGB 1 INPUT RS 232C INPUT (DIGITAL RGB INPUT) (PC/DTV INPUT) (CONTROL/SERVICE) How to use INPUT SELECT On the remote control PC Setup • First, turn on the PC computer and press the ON/OFF button on the Monitor to apply power to it. Second, turn on the display by pressing the button on the Monitor or by pressing the POWER button on the Monitor's remote control. • Use the INPUT SELECT button on the remote control to select the RGB1 input source. • Set the resolution output of the PC to SXGA or under (1280 x 1024, 75Hz). Tip • Avoid keeping a fixed image on the Monitor's screen for a long period of time. The fixed image may become permanently imprinted on the screen; use a screen saver when possible. • Change the output resolution of PC to a displayable mode (Refer to page 21) and connect to RGB1/RGB2 Input (PC/DTV Input) jacks of the monitor. 20
-
 1
1 -
2
-
3
-
4
-
5
-
6
-
7
-
8
-
9
-
10
-
11
-
12
-
13
-
14
-
 15
15 -
 16
16 -
 17
17 -
 18
18 -
 19
19 -
 20
20 -
 21
21 -
 22
22 -
 23
23 -
 24
24 -
 25
25 -
26
-
27
-
28
-
29
-
30
-
31
-
32
-
33
-
34
-
35
-
36
-
37
-
38
-
39
-
40
-
41
-
42
-
43
-
44
-
45
-
46
-
47
-
48
-
49
-
50
-
51
-
52
-
53
-
54
-
55
-
56
 |
 |
