ZyXEL VMG4380 User Guide - Page 164
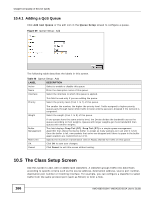
The Queue Setup Screen
 |
View all ZyXEL VMG4380 manuals
Add to My Manuals
Save this manual to your list of manuals |
Page 164 highlights
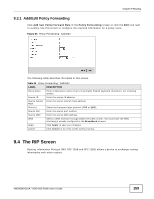
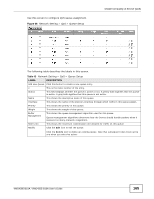
Chapter 10 Quality of Service (QoS) The following table describes the labels in this screen. Table 44 Network Setting > QoS > General LABEL QoS WAN Managed Upstream Bandwidth DESCRIPTION Select the Enable check box to turn on QoS to improve your network performance. Enter the amount of upstream bandwidth for the WAN interfaces that you want to allocate using QoS. The recommendation is to set this speed to match the interfaces' actual transmission speed. For example, set the WAN interfaces' speed to 100000 kbps if your Internet connection has an upstream transmission speed of 100 Mbps. You can set this number higher than the interfaces' actual transmission speed. The Device uses up to 95% of the DSL port's actual upstream transmission speed even if you set this number higher than the DSL port's actual transmission speed. You can also set this number lower than the interfaces' actual transmission speed. This will cause the Device to not use some of the interfaces' available bandwidth. LAN Managed Downstream Bandwidth If you leave this field blank, the Device automatically sets this number to be 95% of the WAN interfaces' actual upstream transmission speed. Enter the amount of downstream bandwidth for the LAN interfaces (including WLAN) that you want to allocate using QoS. The recommendation is to set this speed to match the WAN interfaces' actual transmission speed. For example, set the LAN managed downstream bandwidth to 100000 kbps if you use a 100 Mbps wired Ethernet WAN connection. You can also set this number lower than the WAN interfaces' actual transmission speed. This will cause the Device to not use some of the interfaces' available bandwidth. Upstream traffic priority Assigned by Apply Cancel If you leave this field blank, the Device automatically sets this to the LAN interfaces' maximum supported connection speed. Select how the Device assigns priorities to various upstream traffic flows. • None: Disables auto priority mapping and has the Device put packets into the queues according to your classification rules. Traffic which does not match any of the classification rules is mapped into the default queue with the lowest priority. • Ethernet Priority: Automatically assign priority based on the IEEE 802.1p priority level. • IP Precedence: Automatically assign priority based on the first three bits of the TOS field in the IP header. • Packet Length: Automatically assign priority based on the packet size. Smaller packets get higher priority since control, signaling, VoIP, internet gaming, or other real-time packets are usually small while larger packets are usually best effort data packets like file transfers. Click Apply to save your changes. Click Cancel to restore your previously saved settings. 10.4 The Queue Setup Screen Click Network Setting > QoS > Queue Setup to open the screen as shown next. 164 VMG4380-B10A / VMG4325-B10A User's Guide
-
 1
1 -
2
-
3
-
4
-
5
-
6
-
7
-
8
-
9
-
10
-
11
-
12
-
13
-
14
-
15
-
16
-
17
-
18
-
19
-
20
-
21
-
22
-
23
-
24
-
25
-
26
-
27
-
28
-
29
-
30
-
31
-
32
-
33
-
34
-
35
-
36
-
37
-
38
-
39
-
40
-
41
-
42
-
43
-
44
-
45
-
46
-
47
-
48
-
49
-
50
-
51
-
52
-
53
-
54
-
55
-
56
-
57
-
58
-
59
-
60
-
61
-
62
-
63
-
64
-
65
-
66
-
67
-
68
-
69
-
70
-
71
-
72
-
73
-
74
-
75
-
76
-
77
-
78
-
79
-
80
-
81
-
82
-
83
-
84
-
85
-
86
-
87
-
88
-
89
-
90
-
91
-
92
-
93
-
94
-
95
-
96
-
97
-
98
-
99
-
100
-
101
-
102
-
103
-
104
-
105
-
106
-
107
-
108
-
109
-
110
-
111
-
112
-
113
-
114
-
115
-
116
-
117
-
118
-
119
-
120
-
121
-
122
-
123
-
124
-
125
-
126
-
127
-
128
-
129
-
130
-
131
-
132
-
133
-
134
-
135
-
136
-
137
-
138
-
139
-
140
-
141
-
142
-
143
-
144
-
145
-
146
-
147
-
148
-
149
-
150
-
151
-
152
-
153
-
154
-
155
-
156
-
157
-
158
-
 159
159 -
 160
160 -
 161
161 -
 162
162 -
 163
163 -
 164
164 -
 165
165 -
 166
166 -
 167
167 -
 168
168 -
 169
169 -
170
-
171
-
172
-
173
-
174
-
175
-
176
-
177
-
178
-
179
-
180
-
181
-
182
-
183
-
184
-
185
-
186
-
187
-
188
-
189
-
190
-
191
-
192
-
193
-
194
-
195
-
196
-
197
-
198
-
199
-
200
-
201
-
202
-
203
-
204
-
205
-
206
-
207
-
208
-
209
-
210
-
211
-
212
-
213
-
214
-
215
-
216
-
217
-
218
-
219
-
220
-
221
-
222
-
223
-
224
-
225
-
226
-
227
-
228
-
229
-
230
-
231
-
232
-
233
-
234
-
235
-
236
-
237
-
238
-
239
-
240
-
241
-
242
-
243
-
244
-
245
-
246
-
247
-
248
-
249
-
250
-
251
-
252
-
253
-
254
-
255
-
256
-
257
-
258
-
259
-
260
-
261
-
262
-
263
-
264
-
265
-
266
-
267
-
268
-
269
-
270
-
271
-
272
-
273
-
274
-
275
-
276
-
277
-
278
-
279
-
280
-
281
-
282
-
283
-
284
-
285
-
286
-
287
-
288
-
289
-
290
-
291
-
292
-
293
-
294
-
295
-
296
-
297
-
298
-
299
-
300
-
301
-
302
-
303
-
304
-
305
-
306
-
307
-
308
-
309
-
310
-
311
-
312
-
313
-
314
-
315
-
316
-
317
-
318
-
319
-
320
-
321
-
322
-
323
-
324
-
325
-
326
-
327
-
328
-
329
-
330
-
331
-
332
-
333
-
334
-
335
-
336
-
337
-
338
-
339
-
340
-
341
-
342
-
343
-
344
-
345
-
346
-
347
-
348
-
349
-
350
-
351
-
352
-
353
-
354
-
355
-
356
-
357
-
358
-
359
-
360
-
361
-
362
-
363
-
364
-
365
-
366
-
367
 |
 |