eMachines EL1200 eMachines Desktop PC User Guide (Windows XP) - Page 56
Setting up an Ethernet network
 |
View all eMachines EL1200 manuals
Add to My Manuals
Save this manual to your list of manuals |
Page 56 highlights
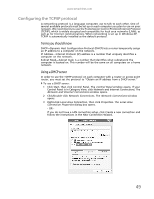
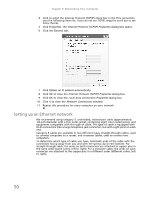
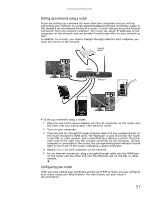
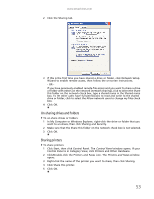
Chapter 5: Networking Your Computer 4 Click to select the Internet Protocol (TCP/IP) check box in the This connection uses the following items list. If you do not see TCP/IP, drag the scroll bar to see more choices. 5 Click Properties. The Internet Protocol (TCP/IP) Properties dialog box opens. 6 Click the General tab. 7 Click Obtain an IP address automatically. 8 Click OK to close the Internet Protocol (TCP/IP) Properties dialog box. 9 Click OK to close the Local Area Connection Properties dialog box. 10 Click X to close the Network Connections window. 11 Repeat this procedure for every computer on your network. Setting up an Ethernet network We recommend using category 5, unshielded, twisted-pair cable (approximately 1/4-inch diameter with a thin outer-jacket, containing eight color-coded wires), and equipment compatible with this type of cable. This type of cable is equipped with RJ-45 connectors (like a large telephone jack connector, but with eight pins) on each end. Category 5 cables are available in two different types; straight-through cables, used to connect computers to a router, and crossover cables, used to connect two computers. To determine which type of cable you have, hold both ends of the cable with the connectors facing away from you and with the spring clip on the bottom. For straight-through cable, the wires on both connectors are attached to copper pins in the same order (same colors, left to right). For a crossover cable, the wires on each connector are attached to the copper pins in a different order (different colors, left to right). 50
-
 1
1 -
2
-
3
-
4
-
5
-
6
-
7
-
8
-
9
-
10
-
11
-
12
-
13
-
14
-
15
-
16
-
17
-
18
-
19
-
20
-
21
-
22
-
23
-
24
-
25
-
26
-
27
-
28
-
29
-
30
-
31
-
32
-
33
-
34
-
35
-
36
-
37
-
38
-
39
-
40
-
41
-
42
-
43
-
44
-
45
-
46
-
47
-
48
-
49
-
50
-
 51
51 -
 52
52 -
 53
53 -
 54
54 -
 55
55 -
 56
56 -
 57
57 -
 58
58 -
 59
59 -
 60
60 -
 61
61 -
62
-
63
-
64
-
65
-
66
-
67
-
68
-
69
-
70
-
71
-
72
-
73
-
74
-
75
-
76
-
77
-
78
-
79
-
80
-
81
-
82
-
83
-
84
-
85
-
86
-
87
-
88
-
89
-
90
-
91
-
92
-
93
-
94
 |
 |
