1997 Chevrolet Malibu Owner's Manual - Page 252
1997 Chevrolet Malibu Manual
Page 252 highlights
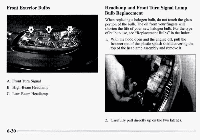
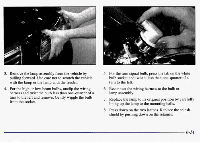
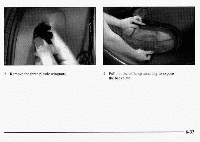
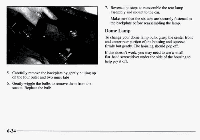
3. Remove the lamp assembly from the vehicle by pulling forward. Use care not scratch the vehicle to with thelamp or the lamp with fender. the 4. For the high or low-beam bulbs, unclip the wiring 5. For the turn signal bulb, press the on the white tab bulb socket and twist less than one-quarter a it of turn to the left. 6. Reconnect the wiring harness to the bulb or lamp assembly. 7. Replace the lamp to its original position by carefully lining up the lamp to the mounting balls. harness and twist the bulb less than one-quartera of turn to the left and remove. Gently wiggle the bulb from the socket. 8. Press down on the two latches. Replace splash the shield by pushing down on the retainer. 6-31
-
 1
1 -
2
-
3
-
4
-
5
-
6
-
7
-
8
-
9
-
10
-
11
-
12
-
13
-
14
-
15
-
16
-
17
-
18
-
19
-
20
-
21
-
22
-
23
-
24
-
25
-
26
-
27
-
28
-
29
-
30
-
31
-
32
-
33
-
34
-
35
-
36
-
37
-
38
-
39
-
40
-
41
-
42
-
43
-
44
-
45
-
46
-
47
-
48
-
49
-
50
-
51
-
52
-
53
-
54
-
55
-
56
-
57
-
58
-
59
-
60
-
61
-
62
-
63
-
64
-
65
-
66
-
67
-
68
-
69
-
70
-
71
-
72
-
73
-
74
-
75
-
76
-
77
-
78
-
79
-
80
-
81
-
82
-
83
-
84
-
85
-
86
-
87
-
88
-
89
-
90
-
91
-
92
-
93
-
94
-
95
-
96
-
97
-
98
-
99
-
100
-
101
-
102
-
103
-
104
-
105
-
106
-
107
-
108
-
109
-
110
-
111
-
112
-
113
-
114
-
115
-
116
-
117
-
118
-
119
-
120
-
121
-
122
-
123
-
124
-
125
-
126
-
127
-
128
-
129
-
130
-
131
-
132
-
133
-
134
-
135
-
136
-
137
-
138
-
139
-
140
-
141
-
142
-
143
-
144
-
145
-
146
-
147
-
148
-
149
-
150
-
151
-
152
-
153
-
154
-
155
-
156
-
157
-
158
-
159
-
160
-
161
-
162
-
163
-
164
-
165
-
166
-
167
-
168
-
169
-
170
-
171
-
172
-
173
-
174
-
175
-
176
-
177
-
178
-
179
-
180
-
181
-
182
-
183
-
184
-
185
-
186
-
187
-
188
-
189
-
190
-
191
-
192
-
193
-
194
-
195
-
196
-
197
-
198
-
199
-
200
-
201
-
202
-
203
-
204
-
205
-
206
-
207
-
208
-
209
-
210
-
211
-
212
-
213
-
214
-
215
-
216
-
217
-
218
-
219
-
220
-
221
-
222
-
223
-
224
-
225
-
226
-
227
-
228
-
229
-
230
-
231
-
232
-
233
-
234
-
235
-
236
-
237
-
238
-
239
-
240
-
241
-
242
-
243
-
244
-
245
-
246
-
 247
247 -
 248
248 -
 249
249 -
 250
250 -
 251
251 -
 252
252 -
 253
253 -
 254
254 -
 255
255 -
 256
256 -
 257
257 -
258
-
259
-
260
-
261
-
262
-
263
-
264
-
265
-
266
-
267
-
268
-
269
-
270
-
271
-
272
-
273
-
274
-
275
-
276
-
277
-
278
-
279
-
280
-
281
-
282
-
283
-
284
-
285
-
286
-
287
-
288
-
289
-
290
-
291
-
292
-
293
-
294
-
295
-
296
-
297
-
298
-
299
-
300
-
301
-
302
-
303
-
304
-
305
-
306
-
307
-
308
-
309
-
310
-
311
-
312
-
313
-
314
-
315
-
316
-
317
-
318
-
319
-
320
-
321
-
322
-
323
-
324
-
325
-
326
-
327
-
328
-
329
-
330
-
331
-
332
-
333
-
334
-
335
-
336
-
337
-
338
-
339
-
340
-
341
-
342
-
343
-
344
-
345
-
346
-
347
-
348
-
349
-
350
-
351
-
352
-
353
-
354
 |
 |

3.
Remove the lamp
assembly from the
vehicle
by
pulling
forward.
Use
care
not
to scratch
the
vehicle
with
the lamp or
the
lamp
with
the fender.
harness
and
twist
the
bulb
less
than
one-quarter
of
a
turn to the left and
remove.
Gently
wiggle
the
bulb
from
the
socket.
4.
For
the
high
or
low-beam
bulbs,
unclip
the
wiring
5.
For the
turn
signal
bulb,
press
the
tab on the white
bulb
socket
and
twist
it less
than
one-quarter
of
a
turn to the left.
6.
Reconnect the wiring
harness
to
the
bulb
or
lamp
assembly.
lining
up the lamp to the
mounting
balls.
7.
Replace the lamp to its original
position
by
carefully
8.
Press
down
on
the
two
latches.
Replace
the splash
shield
by
pushing
down
on
the
retainer.
6-31