2005 Chrysler Crossfire Owner's Manual - Page 17
2005 Chrysler Crossfire Manual
Page 17 highlights
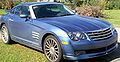
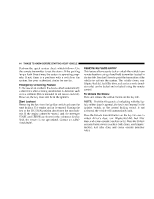
THINGS TO KNOW BEFORE STARTING YOUR VEHICLE 17 • Remove the old batteries. approximately 30 seconds, insert the key in the ignition and turn it to the ON/RUN position. The remote control should once again be operational. SECURITY ALARM SYSTEM The system monitors the doors, rear liftgate/decklid, hood, and ignition for unauthorized operation. The security alarm system is automatically armed or disarmed with the remote control or any of your vehicle's keys by locking or unlocking the vehicle. The antitheft alarm is armed within approximately 10 seconds after locking the vehicle. A blinking light in the tow away alarm switch indicates that the alarm is armed. Once the alarm system has been armed, the exterior vehicle lights will flash and an alarm will sound when a door, the rear liftgate/decklid, the hood, or the glove compartment is opened, or if someone attempts to raise the vehicle for towing. The alarm will flash the exterior lamps for approximately three minutes and sound an audible alarm for 30 seconds. The alarm will stay on even if the activating element is immediately closed. 2 • Insert the new batteries in the direction of the arrow with the positive symbol facing upwards. • Replace the battery cover and press on it until you feel it engage. NOTE: Only replace the batteries in pairs. The system may have to be resynchronized if the transmitter is without voltage for several minutes. To synchronize, aim the transmitter eye at the vehicle and briefly press either the Lock or the Unlock button twice. Within
-
 1
1 -
2
-
3
-
4
-
5
-
6
-
7
-
8
-
9
-
10
-
11
-
 12
12 -
 13
13 -
 14
14 -
 15
15 -
 16
16 -
 17
17 -
 18
18 -
 19
19 -
 20
20 -
 21
21 -
 22
22 -
23
-
24
-
25
-
26
-
27
-
28
-
29
-
30
-
31
-
32
-
33
-
34
-
35
-
36
-
37
-
38
-
39
-
40
-
41
-
42
-
43
-
44
-
45
-
46
-
47
-
48
-
49
-
50
-
51
-
52
-
53
-
54
-
55
-
56
-
57
-
58
-
59
-
60
-
61
-
62
-
63
-
64
-
65
-
66
-
67
-
68
-
69
-
70
-
71
-
72
-
73
-
74
-
75
-
76
-
77
-
78
-
79
-
80
-
81
-
82
-
83
-
84
-
85
-
86
-
87
-
88
-
89
-
90
-
91
-
92
-
93
-
94
-
95
-
96
-
97
-
98
-
99
-
100
-
101
-
102
-
103
-
104
-
105
-
106
-
107
-
108
-
109
-
110
-
111
-
112
-
113
-
114
-
115
-
116
-
117
-
118
-
119
-
120
-
121
-
122
-
123
-
124
-
125
-
126
-
127
-
128
-
129
-
130
-
131
-
132
-
133
-
134
-
135
-
136
-
137
-
138
-
139
-
140
-
141
-
142
-
143
-
144
-
145
-
146
-
147
-
148
-
149
-
150
-
151
-
152
-
153
-
154
-
155
-
156
-
157
-
158
-
159
-
160
-
161
-
162
-
163
-
164
-
165
-
166
-
167
-
168
-
169
-
170
-
171
-
172
-
173
-
174
-
175
-
176
-
177
-
178
-
179
-
180
-
181
-
182
-
183
-
184
-
185
-
186
-
187
-
188
-
189
-
190
-
191
-
192
-
193
-
194
-
195
-
196
-
197
-
198
-
199
-
200
-
201
-
202
-
203
-
204
-
205
-
206
-
207
-
208
-
209
-
210
-
211
-
212
-
213
-
214
-
215
-
216
-
217
-
218
-
219
-
220
-
221
-
222
-
223
-
224
-
225
-
226
-
227
-
228
-
229
-
230
-
231
-
232
-
233
-
234
-
235
-
236
-
237
-
238
-
239
-
240
-
241
-
242
-
243
-
244
-
245
-
246
-
247
-
248
-
249
-
250
-
251
-
252
-
253
-
254
-
255
-
256
-
257
-
258
-
259
-
260
-
261
-
262
-
263
-
264
-
265
-
266
-
267
-
268
-
269
-
270
-
271
-
272
-
273
-
274
-
275
-
276
-
277
-
278
-
279
-
280
-
281
-
282
-
283
-
284
-
285
-
286
-
287
-
288
 |
 |