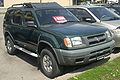
2000 Nissan Xterra Owner's Manual - Page 95
2000 Nissan Xterra Manual
Page 95 highlights
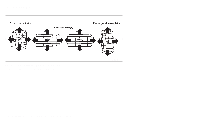
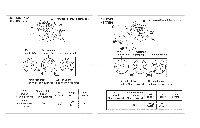
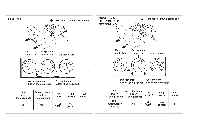
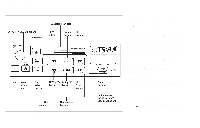
2. Turn the air control dial to the sition. po- 3. Turn the fan control dial to the desired position. 4. Push on the air conditioner button. The indicator light comes on. 5. Turn the temperature control dial to the desired position. perature is more than 45°F(7°C). This dehumidifies the air which helps defog the mode automatically windshield. The turns off, allowing outside air to be drawn into the passenger compartment to further improve the defogging performance. AIR FLOW CHARTS The following charts show the button and dial positions for MAXIMUM AND QUICK heating, cooling or defrosting. The air recirculation switch should always be in the OFF position for heating and defrosting. Operating tips Keep windows and sunroof closed while the air conditioner is in operation. After parking in the sun, drive for two or three minutes with the windows open to vent hot air from the passenger compartment. Then, close the windows. This allows the air conditioner to cool the interior more quickly. The air conditioning system should be operated for approximately ten minutes at least once a month. This helps prevent damage to the system due to lack of lubrication. If the engine coolant temperature gauge indicates engine coolant temperature over the normal range, turn the air conditioner off. See ''If your vehicle overheats'' in the ''In case of emergency'' section of this manual. Dehumidified defrosting/defogging This mode directs warmed and dryed air to the defrost outlets to defrost/defog the windows. 1. Turn the air control dial to the tion. posi- 2. Turn the fan control dial to the desired position. 3. Push on the air conditioner button. The indicator light comes on. 4. Turn the temperature control dial to the desired position. When the , or positions in between are selected, the air conditioner automatically turns on (however the indicator light will not illuminate) if the outside tem- 4-6 Heater, air conditioner and audio systems
-
 1
1 -
2
-
3
-
4
-
5
-
6
-
7
-
8
-
9
-
10
-
11
-
12
-
13
-
14
-
15
-
16
-
17
-
18
-
19
-
20
-
21
-
22
-
23
-
24
-
25
-
26
-
27
-
28
-
29
-
30
-
31
-
32
-
33
-
34
-
35
-
36
-
37
-
38
-
39
-
40
-
41
-
42
-
43
-
44
-
45
-
46
-
47
-
48
-
49
-
50
-
51
-
52
-
53
-
54
-
55
-
56
-
57
-
58
-
59
-
60
-
61
-
62
-
63
-
64
-
65
-
66
-
67
-
68
-
69
-
70
-
71
-
72
-
73
-
74
-
75
-
76
-
77
-
78
-
79
-
80
-
81
-
82
-
83
-
84
-
85
-
86
-
87
-
88
-
89
-
 90
90 -
 91
91 -
 92
92 -
 93
93 -
 94
94 -
 95
95 -
 96
96 -
 97
97 -
 98
98 -
 99
99 -
 100
100 -
101
-
102
-
103
-
104
-
105
-
106
-
107
-
108
-
109
-
110
-
111
-
112
-
113
-
114
-
115
-
116
-
117
-
118
-
119
-
120
-
121
-
122
-
123
-
124
-
125
-
126
-
127
-
128
-
129
-
130
-
131
-
132
-
133
-
134
-
135
-
136
-
137
-
138
-
139
-
140
-
141
-
142
-
143
-
144
-
145
-
146
-
147
-
148
-
149
-
150
-
151
-
152
-
153
-
154
-
155
-
156
-
157
-
158
-
159
-
160
-
161
-
162
-
163
-
164
-
165
-
166
-
167
-
168
-
169
-
170
-
171
-
172
-
173
-
174
-
175
-
176
-
177
-
178
-
179
-
180
-
181
-
182
-
183
-
184
-
185
-
186
-
187
-
188
-
189
-
190
-
191
-
192
-
193
-
194
-
195
-
196
-
197
-
198
-
199
-
200
-
201
-
202
-
203
-
204
-
205
-
206
-
207
-
208
-
209
-
210
-
211
-
212
-
213
-
214
-
215
-
216
-
217
-
218
-
219
-
220
-
221
-
222
-
223
-
224
-
225
-
226
-
227
-
228
-
229
-
230
-
231
-
232
-
233
-
234
-
235
-
236
-
237
-
238
-
239
-
240
-
241
-
242
-
243
-
244
-
245
-
246
-
247
-
248
-
249
-
250
-
251
-
252
-
253
-
254
-
255
-
256
-
257
-
258
-
259
-
260
-
261
-
262
-
263
 |
 |