Acer V360 User Guide
Acer V360 Manual
 |
View all Acer V360 manuals
Add to My Manuals
Save this manual to your list of manuals |
Acer V360 manual content summary:
- Acer V360 | User Guide - Page 1
- Acer V360 | User Guide - Page 2
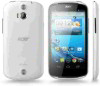
© 2013 All Rights Reserved Acer Liquid E1 V360 User's Manual Model: V360 First issue: 2/2013 Acer Liquid E1 V360 Smartphone Model number Serial number Date of purchase Place of purchase - Acer V360 | User Guide - Page 3
smartphone 5 Getting to know your smartphone 5 Installing or removing the battery 6 Installing a SIM or microSD Card 8 Using your smartphone 10 calls 26 Calling a contact's Internet calling address 26 Calling a phone number using Internet calling 26 Messaging 28 Creating a new message - Acer V360 | User Guide - Page 4
PC 47 FM radio 48 Multimedia playback 48 Restoring to factory settings 49 Accessories and tips 51 Using the headset 51 Using a Bluetooth headset 51 Inserting a microSD Card 51 Appendix 52 FAQ and troubleshooting 52 Other sources of help 53 Warnings and precautions 53 Emergency calls 56 - Acer V360 | User Guide - Page 5
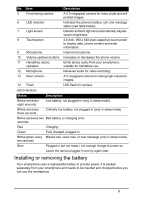
Acer Liquid E1 V360 Smartphone • Battery • Quick Guide • USB cable • AC adapter • Headset Getting to know your smartphone Views 2 3 4 5 7 6 1 8 12 10 13 11 14 9 No. Item 1 Micro USB connector 2 3.5 mm headphone jack 3 Power button 4 Phone - Acer V360 | User Guide - Page 6
video chats and self portrait images. 6 LED indicator Indicates the phone's battery, call, and message status (see table below). 7 Light high-resolution images. 14 Flash LED flash for camera. LED Indicators Status Description Blinks red every eight seconds Low battery, not plugged in (only - Acer V360 | User Guide - Page 7
the tabs on the cover into the slots on the phone. Gently press the cover until it snaps in place. CAUTION: RISK OF EXPLOSION IF BATTERY IS REPLACED BY AN INCORRECT TYPE. DISPOSE OF USED BATTERIES ACCORDING TO THE INSTRUCTIONS. Charging the battery For initial use, you need to charge your smartphone - Acer V360 | User Guide - Page 8
holding the power button. 2. Open the cover and remove the battery as described in "Removing the battery" on page 8. 3. Insert the SIM or microSD Card as shown. 4. Replace the battery and battery cover. Important: Turn off your phone before installing or removing the microSD Card. Note: Ensure that - Acer V360 | User Guide - Page 9
SIM card lock Your smartphone may come with a SIM card lock, i.e., you will only be able to use the SIM card provided by your network operator. To cancel the SIM lock, contact your network provider. 9 - Acer V360 | User Guide - Page 10
before you can use your smartphone. Follow the onscreen instructions to complete setup. Sign in to or create a be required to enter your PIN each time you switch on the phone function. Activating a new SIM card If you are using your SIM services. Your smartphone will lock automatically if it is not used - Acer V360 | User Guide - Page 11
both ways). For additional security, you may set an unlock pattern, a set of dots that must be touched in the correct order to access the phone. Open the Application menu and then tap Settings > Security > Screen lock. Note: If you forget your unlock pattern, please refer to "Unlock pattern" on page - Acer V360 | User Guide - Page 12
You can choose another input language by tapping and holding the comma key. Alternatively, you can open the Application menu and then tap Settings > Language & input. Then tap the Settings button next to "Android keyboard" > Input languages. The keyboard layout changes according to the selected - Acer V360 | User Guide - Page 13
Otherwise, scroll through the list by dragging your finger, and tap the word you want. Press and hold the Swype key to access settings, features, updates, preferences, and help. Tap the +!= button to see numbers and special characters; tap the page (shift) key to see even more. Additional keys vary - Acer V360 | User Guide - Page 14
display information such as the time and weather, or provide additional controls and direct access to applications and other frequently used features of your smartphone. Search Time and Status Application menu Navigation At the bottom of the screen is the application dock which displays default - Acer V360 | User Guide - Page 15
and links (such as custom shortcuts, contacts or bookmarks) that you can add to a Home screen. Widgets are small applications that display constantly-updated information or quick shortcuts to applications or special functions. To move an App or Widget to the Home screen, tap and hold an item until - Acer V360 | User Guide - Page 16
Resizing widgets Some widgets can be resized. As soon as you place a widget on the Home screen, you can resize it by dragging the corners. To resize a widget that is already on the Home screen, tap and hold the widget. Once the Remove icon appears, release the widget. If the widget is resizable, you - Acer V360 | User Guide - Page 17
Managing the lock screen Tap and hold any open area on the Home screen. Tap the Lock screen manager tab to turn on and off lock screen icons or change which lock screen icons appear. Changing home screen settings Tap and hold any open area on the Home screen. Tap the Home screen settings tab to - Acer V360 | User Guide - Page 18
a variety of icons to inform you of your phone's status. The left side of the Notification area displays event icons that indicate a new event (such as a new message). The icons on the right side indicate signal strength, connection, battery status and the time. Drag the Notification area down - Acer V360 | User Guide - Page 19
Icon Speakerphone is on New Gmail message New/unread SMS/MMS Problem with sending SMS/MMS New Google Talk message New voicemail Upcoming or not installed Vibrate mode Ringer is silenced Phone microphone is off Application update available System update available Missed call Song is playing More - Acer V360 | User Guide - Page 20
Home screen, then start the new application. To view your active applications, tap to go to the application. . Then tap an icon Tip: To prolong battery life, it is better to close an application when you've finished using it. Do this by either pressing the Back key or the Menu - Acer V360 | User Guide - Page 21
the People application from the Application menu or tap from the Dialer to view your contacts. If you don't have any contacts stored on your phone, you can import your Google account contacts, add a new contact or import contacts from your SIM or SD card. Open the People application from the - Acer V360 | User Guide - Page 22
can be viewed by tapping the Call Log tab at the top of the screen. It displays recent received, dialed, and missed calls. Tap the phone icon to redial. To view details of the call, tap the number or contact's name. While viewing the details of a call, tap the Menu button - Acer V360 | User Guide - Page 23
on the country you are calling and your network provider. We suggest you check all call rates with your network provider, to avoid excessive phone bills. If you are using your smartphone abroad, roaming charges will apply. Consult your network provider for roaming rates specific to the country you - Acer V360 | User Guide - Page 24
default voice call screen. To do so, open the Notification area and tap the Float caller button. Answering or declining a call When you have an incoming call, the number will be shown on the screen. To accept or decline the call, tap the appropriate icon and slide your finger across the screen. To - Acer V360 | User Guide - Page 25
Voice call options Icon Description Place the call on hold. Mute a call. Speakerphone. Access the keypad while a call is in progress. Two options: • Add a second call • Record the conversation. Minimizes the call window to a "floating" screen. Saving a dialed number to contacts You can save a - Acer V360 | User Guide - Page 26
discard the changes, or tap the Menu button and then select Remove account to delete the existing account. Using Internet calling You can configure your phone to use Internet calling (when you're connected to WiFi) for all calls, only for Internet calls, or to ask each time you place a call - Acer V360 | User Guide - Page 27
Important: Calling a phone number using Internet calling requires that your service provider supports it, and may incur additional charges. Please contact your service provider if you have any questions. 27 - Acer V360 | User Guide - Page 28
access Messaging tap Messaging on the Home screen. Creating a new message You can use your phone to compose Phone (SMS and MMS) messages. Tap to compose a new message. Tap , or enter the recipient's phone number or name in the To field. Suggested contacts will be displayed in a dropdown list below - Acer V360 | User Guide - Page 29
in the Notification area and the message icon at the bottom of the phone displays the number of unread text messages. Tap Messaging on the Home screen Ask your network provider for the necessary information if you need to manually set up the MMS profile. Receiving MMS messages When a new MMS message - Acer V360 | User Guide - Page 30
Note: Downloads can take a long time, depending on your connection quality. If you reply or open another application, the download will be stopped. Important: You may be charged to download message content, especially if you are roaming. Please contact your provider if you have any questions. 3. Tap - Acer V360 | User Guide - Page 31
Going online Browsing the Internet In order to browse the Internet with your smartphone, you must be connected to a data or wireless network. Using the browser To start browsing, tap the Chrome icon on the Home screen, or open the Application menu and select Chrome. To open a new website, tap the - Acer V360 | User Guide - Page 32
account address and password when you first started your phone, follow the on screen instructions. Composing an email 1. Make sure your smartphone is account. If necessary, enter your email address and tap Manual setup to enter the parameters manually. Tap Next to finish the setup process. Google - Acer V360 | User Guide - Page 33
access Google Play, you will need to read and accept the Terms of Service. Tap Play Store from the Application menu to open the Google Play. Here you can also browse for and purchase movies, books, magazines, or music. Updates may add new categories or change how to navigate Google Play at any time - Acer V360 | User Guide - Page 34
Get easy-to-follow directions using Google Maps, view real-time traffic condition and navigate by using spoken, turn-by-turn driving instructions with Navigation, view where your friends are and places of interest and local businesses on Google Maps using Places and Latitude. Important: Maps - Acer V360 | User Guide - Page 35
Using the map Tap the Maps icon in the applications menu. Drag the map with your finger to move the map around. To zoom in or out: 1. Double tap a location on the map to zoom in on the location, and tap once to zoom out, or 2. Touch an area with two fingers at once and spread them apart to zoom in, - Acer V360 | User Guide - Page 36
the AcerCloud setup program from the AcerCloud website (https://www.cloud.acer.com/ops/ downloads) and select AcerCloud Installer in the Windows part. After download, double-click on the installer and follow the instructions to install AcerCloud. AcerCloud is designed for Windows 7 and Windows 8. It - Acer V360 | User Guide - Page 37
Cloud ID. You must use this information to sign in to the AcerCloud service from each follow the instructions to register a new Acer ID. After entering the information, tap Next to apply for an Acer ID. Check your email account for an Acer ID activation message and click on the link in the email to - Acer V360 | User Guide - Page 38
is not available, click on the AcerCloud icon in the notification area (the bottom-right corner of the Windows desktop) and select Check for updates to install AcerCloud Docs. Note: You can access and change these AcerCloud settings from the AcerCloud icon in the Notification area (the bottom-right - Acer V360 | User Guide - Page 39
bottom-right corner to open the gallery. Icon Description Switches between camera and camcorder. Switches between the front-facing and rear camera. Turns the flash on, off, or to automatic. * Only for the rear camera. Adds photo effects, such as Mono, Sepia, or Negative, Aqua, Blackboard, and - Acer V360 | User Guide - Page 40
Icon Description * Resolution: Set the photo quality. * Image adjustment: Set Brightness, Contrast, Saturation, Sharpness, and Hue. Scene mode: Set Auto, Night, Sunset, Party, Portrait, Landscape, Night portrait, Theatre, Beach, Snow, Steady photo, Fireworks, Sports, Candle light * Set the - Acer V360 | User Guide - Page 41
2. Align the camera to take a photo of one end of the panoramic scene (the furthest left, right, top or bottom). 3. Press the camera button to take the first image; then smoothly turn the camera to the left or right to take the next image of the scene. • A blue dot shows the center of the next image - Acer V360 | User Guide - Page 42
needed. 2. Tap to start recording. Tap or press again to stop recording. Supported formats Type Image Video Formats JPEG, GIF, PNG, BMP MPEG-4, H.263, H. Gallery. From Gallery you can share the file directly using various services. Note: Share options vary depending on the file type. Geotagging - Acer V360 | User Guide - Page 43
Airplane mode on or off 1. Open the Notification area. 2. Tap the Airplane mode button. -OR- 1. Press and hold the power button until you get the phone options menu. 2. Tap Airplane mode to switch it ON or OFF. Note: When Airplane mode is active, the Notification area. icon will be displayed in - Acer V360 | User Guide - Page 44
network: Set your options for connecting to mobile networks. Important: If your phone is in Airplane mode, the option to turn Bluetooth on will be to "Putting your smartphone in Airplane mode" on page 43 for instructions on turning Airplane mode on or off. Adjusting Bluetooth settings You can - Acer V360 | User Guide - Page 45
ON in the top-right corner. Note: To send or recieve tags your phone must be powered on and not in sleep mode. Sending tags 1. With NFC to receive tags). 2. To recieve the information, place the backside of your phone at least 4 cm from the NFC device that is transmitting the information. Internet - Acer V360 | User Guide - Page 46
are traveling, manually selecting a network may help to reduce your roaming charges. Check with your home service provider for the phone jumping between networks when you move around. Note: Contact your service provider should you have any problems obtaining voice mail and the text message service - Acer V360 | User Guide - Page 47
keys and on certain UI interactions. Display To adjust your phone's display settings, in the Application menu tap Settings > If you wish to transfer information between the microSD Card in your phone and your computer, you can connect your phone to a PC using the supplied USB cable. Plug the USB - Acer V360 | User Guide - Page 48
sync your calendar, email and contacts on your phone and never worry about losing them again. Sync Google) and then follow the on screen instructions. Google Sync In Google, you can set -sync. Tap again to uncheck any for manual synchronization. To manually synchronize an item, make sure the item - Acer V360 | User Guide - Page 49
your smartphone to set the date and time based on information it receives from the network. Setting alarms There are two predefined alarms on your phone by default. Tap Clock in the Application menu, and then tap Set alarm to edit alarm settings. You may: • Turn the alarm on or off - Acer V360 | User Guide - Page 50
! This will erase all your personal information, any contacts stored on your phone and any programs you installed. If your phone is responding to screen input, then open Settings from the Application menu. Tap Backup & reset > Factory data reset > Reset phone and then Erase everything to format your - Acer V360 | User Guide - Page 51
chapter shows you how to use accessories with your smartphone, as well EDGE connection on your phone, obtain the access point name and settings (including username and password if required) from your wireless service provider. 1. Open Card" on page 8 for instructions on installing a microSD Card. 51 - Acer V360 | User Guide - Page 52
play a file that is not supported. Refer to "Multimedia" on page 58. How do I check the OS version of my device? Tap Settings > About phone to check the OS version (Build number) and other hardware and software information. I can't turn on the device. The battery power may be depleted. Recharge - Acer V360 | User Guide - Page 53
of use, such as watching a video or a long phone conversation. Other sources of help For information on: Refer to: Up-to-date information regarding your www.acer.com smartphone mobile.acer.com Service enquiries www.acer.com/support Warnings and precautions • Do not use this product near - Acer V360 | User Guide - Page 54
listening to music To protect your hearing, follow these instructions. • Increase the volume gradually until you can hear noticeably shorter than normal, buy a new battery. Use only Acer approved batteries, and recharge your battery only with Acer approved chargers designated for this device. Unplug - Acer V360 | User Guide - Page 55
local regulations when disposing of used batteries. Additional safety information Your device and equipment, including wireless phones, may interfere with when any regulations posted in these areas instruct you to do so. Hospitals or interference occurs, consult your service provider. Vehicles RF - Acer V360 | User Guide - Page 56
service may be dangerous and may invalidate any warranty that may apply to the device. Check regularly that all wireless equipment in your vehicle is mounted and operating properly. Do not store or carry flammable liquids instructions this guide or your service would a mobile phone or other small - Acer V360 | User Guide - Page 57
5. DO NOT use or store your smartphone in any location that is dusty, damp or wet. 6. DO use a soft, damp cloth to clean your smartphone. If the surface of the screen becomes soiled, clean it with a soft cloth moistened with diluted window-cleaning solution. 7. DO NOT press down on the screen with - Acer V360 | User Guide - Page 58
of RAM • 4 GB of ROM • Android operating system Display • 4.5" qHD TFT, capacitive touch panel • 960 x 540 resolution Multimedia Formats supported: Type Audio playback Ringtone Video / HSDPA / GPRS / EDGE • GPS / AGPS Camera • 5-megapixel • Auto focus • LED flash • 0.3-megapixel front camera 58 - Acer V360 | User Guide - Page 59
Expansion • microSD memory card slot (up to 32 GB) Battery • Rechargeable high density 1760 mAh Lithium-ion battery (replaceable) Note: Length of battery operation will depend on power consumption which is based on system resource use. For example, constantly using the backlight or using power- - Acer V360 | User Guide - Page 60
to leak acid, become hot, explode or ignite and cause injury and/or damage. Do not pierce, open or disassemble the battery. If the battery leaks and you come into contact with the leaked fluids, rinse thoroughly with water and seek medical attention immediately. For safety reasons, and to prolong - Acer V360 | User Guide - Page 61
properly. Do not disassemble or dispose of them in fire. Keep them away from children. Follow local regulations when disposing of used batteries. Disposal and recycling information Do not throw this electronic device into the trash when discarding. To minimize pollution and ensure utmost protection - Acer V360 | User Guide - Page 62
all frequency bands of the mobile telephone. For body worn operation, this phone (EU model) has been tested and meets the ICNIRP exposure guidelines, and use with accessories that contain no metal and that position the handset a minimum of 1.5 cm from the body. Use of other accessories may not - Acer V360 | User Guide - Page 63
accessory and are not holding the phone at the ear, position the handset a minimum of 1.5 cm from your body when the phone is switched on. During use, the actual SAR level is usually much lower than the maximum value, because the mobile telephone works in different output - Acer V360 | User Guide - Page 64
Certification logos To view the certification logos on your device: tap Settings > About phone > Legal information > Certification logo. 64 - Acer V360 | User Guide - Page 65
du mêre type ou d' un type équivalent recommandé par le constructeur. Mettre au rebut les batteries usagées conformément aux instructions du fabricant. ADVARSEL! Eksplosjonsfare ved feilaktig skifte av batteri. Benytt samme batteritype eller en tilsvarende type anbefalt av apparatfabrikanten. Brukte - Acer V360 | User Guide - Page 66
Incorporated Date: December 20, 2012 Declaration of Conformity We, Acer Incorporated, of 8F., No. 88, Sec. 1, Xintai 5th Rd., Xizhi Dist, New Taipei City, 22181, Taiwan Declare under sole responsibility that the product: Model: V360 Description: Smart Handheld To which this declaration relates, is - Acer V360 | User Guide - Page 67
For the addresses/telephone numbers of Acer service centers, please refer to the warranty card. 67 - Acer V360 | User Guide - Page 68
SERVICES Acer is not obligated to provide technical or other support for the Software. ACER LIVE UPDATE Certain of the software contains elements that enable the use of the Acer Live Update service, which allows for updates for such software to be automatically downloaded and installed on your phone - Acer V360 | User Guide - Page 69
TO THE USE OF OR INABILITY TO USE THE SOFTWARE, THE PROVISION OF OR FAILURE TO PROVIDE SUPPORT SERVICES, OR OTHERWISE UNDER OR IN CONNECTION WITH ANY of the Software; 2. Destroy or return to Acer the original and all copies of the Software; and 3. Delete the Software from all phones on which
-
 1
1 -
 2
2 -
 3
3 -
 4
4 -
 5
5 -
 6
6 -
 7
7 -
8
-
9
-
10
-
11
-
12
-
13
-
14
-
15
-
16
-
17
-
18
-
19
-
20
-
21
-
22
-
23
-
24
-
25
-
26
-
27
-
28
-
29
-
30
-
31
-
32
-
33
-
34
-
35
-
36
-
37
-
38
-
39
-
40
-
41
-
42
-
43
-
44
-
45
-
46
-
47
-
48
-
49
-
50
-
51
-
52
-
53
-
54
-
55
-
56
-
57
-
58
-
59
-
60
-
61
-
62
-
63
-
64
-
65
-
66
-
67
-
68
-
69
 |
 |