Acer V360 User Guide - Page 41
Camcorder settings menu, to your smartphone's gallery.
 |
View all Acer V360 manuals
Add to My Manuals
Save this manual to your list of manuals |
Page 41 highlights
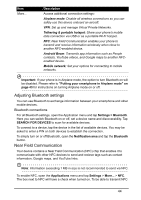
2. Align the camera to take a photo of one end of the panoramic scene (the furthest left, right, top or bottom). 3. Press the camera button to take the first image; then smoothly turn the camera to the left or right to take the next image of the scene. • A blue dot shows the center of the next image; move the camera so the dot is in the center of the screen; your smartphone will then automatically capture an image and select the center of the next section of the image. Repeat to capture all images. Note: If fewer than five images are sufficient for your panoramic photo, tap the tick icon to stop the selection process and process the captured images. The camera application will process the images and save a single extended image to your smartphone's gallery. Note: Panoramic images work best with static outdoor scenes. Objects to close to the camera or large straight edges may confuse the detection process. Camcorder settings menu Tap to activate the camcorder. Tap to mute, and tap again to unmute. To adjust the settings, tap the settings button. The menu options are: Icon Description Resolution: Set the video quality. Set the timer: Off, 5 seconds, 10 seconds, 15 seconds. * Only for the rear camera. Select photo storage location: SD card or internal memory. Set store location on (enables geotagging) or off. Please refer to "Geotagging" on page 42. Exposure value: Adjust from "-3" to "3" with "0" being the default. Focus mode: Infinity, Continuous Audio mode (noise cancellation options): Normal, Indoor, Outdoor Restore all settings to default. 41
-
 1
1 -
2
-
3
-
4
-
5
-
6
-
7
-
8
-
9
-
10
-
11
-
12
-
13
-
14
-
15
-
16
-
17
-
18
-
19
-
20
-
21
-
22
-
23
-
24
-
25
-
26
-
27
-
28
-
29
-
30
-
31
-
32
-
33
-
34
-
35
-
 36
36 -
 37
37 -
 38
38 -
 39
39 -
 40
40 -
 41
41 -
 42
42 -
 43
43 -
 44
44 -
 45
45 -
 46
46 -
47
-
48
-
49
-
50
-
51
-
52
-
53
-
54
-
55
-
56
-
57
-
58
-
59
-
60
-
61
-
62
-
63
-
64
-
65
-
66
-
67
-
68
-
69
 |
 |