Acer Veriton 7200D Veriton 7200D - Page 61
Replacing the hard disk
 |
View all Acer Veriton 7200D manuals
Add to My Manuals
Save this manual to your list of manuals |
Page 61 highlights
51 Replacing the hard disk Follow these steps to replace your computer's hard disk: Note: The mainboard model shown in the figures below may not be exactly the same with the one found in your computer. 1. Remove the side panel (see page 47). 2. Remove the four screws that hold the hard disk to the disk frame. Set the screws aside.
-
 1
1 -
2
-
3
-
4
-
5
-
6
-
7
-
8
-
9
-
10
-
11
-
12
-
13
-
14
-
15
-
16
-
17
-
18
-
19
-
20
-
21
-
22
-
23
-
24
-
25
-
26
-
27
-
28
-
29
-
30
-
31
-
32
-
33
-
34
-
35
-
36
-
37
-
38
-
39
-
40
-
41
-
42
-
43
-
44
-
45
-
46
-
47
-
48
-
49
-
50
-
51
-
52
-
53
-
54
-
55
-
 56
56 -
 57
57 -
 58
58 -
 59
59 -
 60
60 -
 61
61 -
 62
62 -
 63
63 -
 64
64 -
 65
65 -
 66
66 -
67
-
68
-
69
-
70
-
71
-
72
-
73
-
74
-
75
-
76
-
77
-
78
-
79
-
80
-
81
-
82
-
83
-
84
-
85
-
86
-
87
-
88
-
89
-
90
-
91
-
92
 |
 |

51
Replacing the hard disk
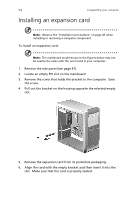
Follow these steps to replace your computer’s hard disk:
Note:
The mainboard model shown in the figures below may not
be exactly the same with the one found in your computer.
1.
Remove the side panel (see page 47).
2.
Remove the four screws that hold the hard disk to the disk frame.
Set the screws aside.