Acer Veriton 7200D Veriton 7200D - Page 64
Installing an expansion card
 |
View all Acer Veriton 7200D manuals
Add to My Manuals
Save this manual to your list of manuals |
Page 64 highlights
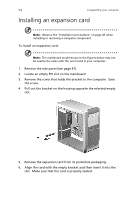
54 4 Upgrading your computer Installing an expansion card Note: Observe the "Installation precautions" on page 45 when installing or removing a computer component. To install an expansion card: Note: The mainboard model shown in the figures below may not be exactly the same with the one found in your computer. 1. Remove the side panel (see page 47). 2. Locate an empty PCI slot on the mainboard. 3. Remove the screw that holds the bracket to the computer. Save the screw. 4. Pull out the bracket on the housing opposite the selected empty slot. 5. Remove the expansion card from its protective packaging. 6. Align the card with the empty bracket and then insert it into the slot. Make sure that the card is properly seated.
-
 1
1 -
2
-
3
-
4
-
5
-
6
-
7
-
8
-
9
-
10
-
11
-
12
-
13
-
14
-
15
-
16
-
17
-
18
-
19
-
20
-
21
-
22
-
23
-
24
-
25
-
26
-
27
-
28
-
29
-
30
-
31
-
32
-
33
-
34
-
35
-
36
-
37
-
38
-
39
-
40
-
41
-
42
-
43
-
44
-
45
-
46
-
47
-
48
-
49
-
50
-
51
-
52
-
53
-
54
-
55
-
56
-
57
-
58
-
 59
59 -
 60
60 -
 61
61 -
 62
62 -
 63
63 -
 64
64 -
 65
65 -
 66
66 -
 67
67 -
 68
68 -
 69
69 -
70
-
71
-
72
-
73
-
74
-
75
-
76
-
77
-
78
-
79
-
80
-
81
-
82
-
83
-
84
-
85
-
86
-
87
-
88
-
89
-
90
-
91
-
92
 |
 |

4 Upgrading your computer
54
Installing an expansion card
Note:
Observe the “Installation precautions” on page 45 when
installing or removing a computer component.
To install an expansion card:
Note:
The mainboard model shown in the figures below may not
be exactly the same with the one found in your computer.
1.
Remove the side panel (see page 47).
2.
Locate an empty PCI slot on the mainboard.
3.
Remove the screw that holds the bracket to the computer.
Save
the screw.
4.
Pull out the bracket on the housing opposite the selected empty
slot.
5.
Remove the expansion card from its protective packaging.
6.
Align the card with the empty bracket and then insert it into the
slot.
Make sure that the card is properly seated.