Adobe 13102498 User Guide - Page 486
Use Photoshop artwork in Adobe Illustrator, TIFF Options dialog box: set Image Compression to None.
 |
UPC - 883919080192
View all Adobe 13102498 manuals
Add to My Manuals
Save this manual to your list of manuals |
Page 486 highlights
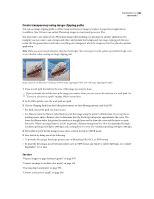
PHOTOSHOP CS3 479 User Guide If the page-layout program cannot place Photoshop PSD files, follow these steps: 1 If your image contains a transparent background or areas that you want to be transparent, create a clipping path around the opaque areas of the image. Even if you have deleted the background around the image, you must define the area with a clipping path before converting the file to TIFF or EPS format. Otherwise, areas that are transparent may appear as white in the page-layout program. 2 Choose File > Save As. 3 In the Save As dialog box, choose the appropriate format from the Format menu. The format you choose depends on the final output for the document. For printing to non-PostScript printers, choose TIFF. For printing to PostScript printers, choose Photoshop EPS. Then click Save. 4 In the TIFF Options or EPS Options dialog box, set the following options. Leave any remaining options at their default settings, and click OK. • TIFF Options dialog box: set Image Compression to None. • EPS Options dialog box (Windows): set Preview to TIFF (8 bits/pixel) and Encoding to ASCII85. • EPS Options dialog box (Mac OS): set Preview to Mac (8 bits/pixel) and Encoding to ASCII85. If the layout program displays transparent areas as white, try printing the document. Some layout programs do not display clipping paths properly but print them as expected. Use Photoshop artwork in Adobe Illustrator Adobe Illustrator can both open or place Photoshop files; you do not need to save or export your Photoshop image to a different file format. If you place an image into an open Illustrator file, you can incorporate the image as if it were any other element in the artwork, or you can maintain a link to the original file. Although you can't edit a linked image within Illustrator, you can jump back to Photoshop, using the Edit Original command, to revise it. Once saved, any changes you make are reflected in the version in Illustrator. 1 If the image file is open in Photoshop, save it as a Photoshop (PSD) file, and close the file. 2 In Adobe Illustrator, do one of the following: • To open the file directly in Illustrator, choose File > Open. Locate the image in the Open File dialog box, and click OK. • To incorporate the image into an existing Illustrator file, choose File > Place. Locate the file in the Place dialog box, make sure the Link option is not selected, and click OK. • To place the image into a file but maintain a link to the original, choose File > Place. In the Place dialog box, locate the file, select the Link option, and click OK. Illustrator centers the image in the open illustration. A red X through the image indicates it is linked and not editable. 3 If you opened or placed the image without linking, the Photoshop Import dialog box appears. Choose the appropriate option as follows, and click OK: • Convert Photoshop Layers To Objects to convert the layers to Illustrator objects. This option preserves masks, blending modes, transparency, and (optionally) slices and image maps. However, it does not support Photoshop adjustment layers and layer effects. • Flatten Photoshop Layers To A Single Image to merge all the layers into a single layer. This option preserves the look of the image, but you can no longer edit individual layers.
-
 1
1 -
2
-
3
-
4
-
5
-
6
-
7
-
8
-
9
-
10
-
11
-
12
-
13
-
14
-
15
-
16
-
17
-
18
-
19
-
20
-
21
-
22
-
23
-
24
-
25
-
26
-
27
-
28
-
29
-
30
-
31
-
32
-
33
-
34
-
35
-
36
-
37
-
38
-
39
-
40
-
41
-
42
-
43
-
44
-
45
-
46
-
47
-
48
-
49
-
50
-
51
-
52
-
53
-
54
-
55
-
56
-
57
-
58
-
59
-
60
-
61
-
62
-
63
-
64
-
65
-
66
-
67
-
68
-
69
-
70
-
71
-
72
-
73
-
74
-
75
-
76
-
77
-
78
-
79
-
80
-
81
-
82
-
83
-
84
-
85
-
86
-
87
-
88
-
89
-
90
-
91
-
92
-
93
-
94
-
95
-
96
-
97
-
98
-
99
-
100
-
101
-
102
-
103
-
104
-
105
-
106
-
107
-
108
-
109
-
110
-
111
-
112
-
113
-
114
-
115
-
116
-
117
-
118
-
119
-
120
-
121
-
122
-
123
-
124
-
125
-
126
-
127
-
128
-
129
-
130
-
131
-
132
-
133
-
134
-
135
-
136
-
137
-
138
-
139
-
140
-
141
-
142
-
143
-
144
-
145
-
146
-
147
-
148
-
149
-
150
-
151
-
152
-
153
-
154
-
155
-
156
-
157
-
158
-
159
-
160
-
161
-
162
-
163
-
164
-
165
-
166
-
167
-
168
-
169
-
170
-
171
-
172
-
173
-
174
-
175
-
176
-
177
-
178
-
179
-
180
-
181
-
182
-
183
-
184
-
185
-
186
-
187
-
188
-
189
-
190
-
191
-
192
-
193
-
194
-
195
-
196
-
197
-
198
-
199
-
200
-
201
-
202
-
203
-
204
-
205
-
206
-
207
-
208
-
209
-
210
-
211
-
212
-
213
-
214
-
215
-
216
-
217
-
218
-
219
-
220
-
221
-
222
-
223
-
224
-
225
-
226
-
227
-
228
-
229
-
230
-
231
-
232
-
233
-
234
-
235
-
236
-
237
-
238
-
239
-
240
-
241
-
242
-
243
-
244
-
245
-
246
-
247
-
248
-
249
-
250
-
251
-
252
-
253
-
254
-
255
-
256
-
257
-
258
-
259
-
260
-
261
-
262
-
263
-
264
-
265
-
266
-
267
-
268
-
269
-
270
-
271
-
272
-
273
-
274
-
275
-
276
-
277
-
278
-
279
-
280
-
281
-
282
-
283
-
284
-
285
-
286
-
287
-
288
-
289
-
290
-
291
-
292
-
293
-
294
-
295
-
296
-
297
-
298
-
299
-
300
-
301
-
302
-
303
-
304
-
305
-
306
-
307
-
308
-
309
-
310
-
311
-
312
-
313
-
314
-
315
-
316
-
317
-
318
-
319
-
320
-
321
-
322
-
323
-
324
-
325
-
326
-
327
-
328
-
329
-
330
-
331
-
332
-
333
-
334
-
335
-
336
-
337
-
338
-
339
-
340
-
341
-
342
-
343
-
344
-
345
-
346
-
347
-
348
-
349
-
350
-
351
-
352
-
353
-
354
-
355
-
356
-
357
-
358
-
359
-
360
-
361
-
362
-
363
-
364
-
365
-
366
-
367
-
368
-
369
-
370
-
371
-
372
-
373
-
374
-
375
-
376
-
377
-
378
-
379
-
380
-
381
-
382
-
383
-
384
-
385
-
386
-
387
-
388
-
389
-
390
-
391
-
392
-
393
-
394
-
395
-
396
-
397
-
398
-
399
-
400
-
401
-
402
-
403
-
404
-
405
-
406
-
407
-
408
-
409
-
410
-
411
-
412
-
413
-
414
-
415
-
416
-
417
-
418
-
419
-
420
-
421
-
422
-
423
-
424
-
425
-
426
-
427
-
428
-
429
-
430
-
431
-
432
-
433
-
434
-
435
-
436
-
437
-
438
-
439
-
440
-
441
-
442
-
443
-
444
-
445
-
446
-
447
-
448
-
449
-
450
-
451
-
452
-
453
-
454
-
455
-
456
-
457
-
458
-
459
-
460
-
461
-
462
-
463
-
464
-
465
-
466
-
467
-
468
-
469
-
470
-
471
-
472
-
473
-
474
-
475
-
476
-
477
-
478
-
479
-
480
-
 481
481 -
 482
482 -
 483
483 -
 484
484 -
 485
485 -
 486
486 -
 487
487 -
 488
488 -
 489
489 -
 490
490 -
 491
491 -
492
-
493
-
494
-
495
-
496
-
497
-
498
-
499
-
500
-
501
-
502
-
503
-
504
-
505
-
506
-
507
-
508
-
509
-
510
-
511
-
512
-
513
-
514
-
515
-
516
-
517
-
518
-
519
-
520
-
521
-
522
-
523
-
524
-
525
-
526
-
527
-
528
-
529
-
530
-
531
-
532
-
533
-
534
-
535
-
536
-
537
-
538
-
539
-
540
-
541
-
542
-
543
-
544
-
545
-
546
-
547
-
548
-
549
-
550
-
551
-
552
-
553
-
554
-
555
-
556
-
557
-
558
-
559
-
560
-
561
-
562
-
563
-
564
-
565
-
566
-
567
-
568
-
569
-
570
-
571
-
572
-
573
-
574
-
575
-
576
-
577
-
578
-
579
-
580
-
581
-
582
-
583
-
584
-
585
-
586
-
587
-
588
-
589
-
590
-
591
-
592
-
593
-
594
-
595
-
596
-
597
-
598
-
599
-
600
-
601
-
602
-
603
-
604
-
605
-
606
-
607
-
608
-
609
-
610
-
611
-
612
-
613
-
614
-
615
-
616
-
617
-
618
-
619
-
620
-
621
-
622
-
623
-
624
-
625
-
626
-
627
-
628
-
629
-
630
-
631
-
632
-
633
-
634
-
635
-
636
-
637
-
638
-
639
-
640
-
641
-
642
-
643
-
644
-
645
-
646
-
647
-
648
-
649
-
650
-
651
-
652
-
653
-
654
-
655
-
656
-
657
-
658
-
659
-
660
-
661
-
662
-
663
-
664
-
665
-
666
-
667
-
668
-
669
-
670
-
671
-
672
-
673
-
674
-
675
-
676
-
677
-
678
-
679
-
680
-
681
 |
 |