Apple M9848LL User Guide - Page 46
Recording Information on a DVD, DVD+R, DVD-RW, and DVD+RW discs.
 |
UPC - 718908454060
View all Apple M9848LL manuals
Add to My Manuals
Save this manual to your list of manuals |
Page 46 highlights
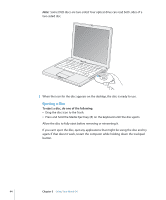
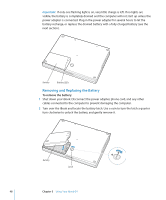
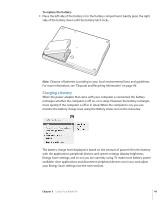
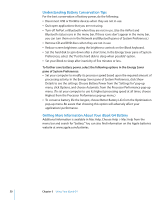
Recording Information on a DVD If you have a SuperDrive, you can record your own digital movies on a blank recordable DVD disc. You can also record other kinds of digital data. For example, you can back up files to recordable DVD discs. With your SuperDrive, you can: Â Install or use software from CDs or DVDs. Â Play music and multimedia files from CDs. Â Write music, documents, and other digital files to CD-R and CD-RW discs. Â Play DVD movies and read most DVD discs. Â Record information on blank DVD-R, DVD+R, DVD-RW, and DVD+RW discs. Important: The SuperDrive in your iBook supports standard circular 12 cm discs. Irregularly shaped discs or discs smaller than 12 cm are not supported. Noncircular discs can become lodged in the drive. With iDVD, you can create your own customized digital media project, burn it on a blank recordable DVD disc, and play it on most standard DVD players. To burn an iDVD project onto a blank DVD-R disc: 1 Open iDVD and open your completed iDVD project. 2 Click the Burn button. 3 When prompted, insert a blank recordable DVD disc in to the drive. 4 Click the Burn button again. Note: Although the SuperDrive can read both sides of a two-sided DVD-R disc, it can only record on a single side. To record data on DVD-R discs: 1 Insert a blank recordable DVD disc in to the drive. 2 In the dialog that appears, enter a name for the disc and select the format you want to use. 3 Double-click the DVD icon that appears on your desktop, and then drag files and folders to it. 4 Click the Burn Disc icon beside the disc name in the Finder sidebar. For more information about how to use iDVD, open iDVD and choose Help > iDVD Help. Important: If your battery runs down when you are burning a DVD, the burn can fail and you will not be able to use the DVD disc again. To avoid this, always use your power adapter when burning a DVD. 46 Chapter 3 Using Your iBook G4
-
 1
1 -
2
-
3
-
4
-
5
-
6
-
7
-
8
-
9
-
10
-
11
-
12
-
13
-
14
-
15
-
16
-
17
-
18
-
19
-
20
-
21
-
22
-
23
-
24
-
25
-
26
-
27
-
28
-
29
-
30
-
31
-
32
-
33
-
34
-
35
-
36
-
37
-
38
-
39
-
40
-
 41
41 -
 42
42 -
 43
43 -
 44
44 -
 45
45 -
 46
46 -
 47
47 -
 48
48 -
 49
49 -
 50
50 -
 51
51 -
52
-
53
-
54
-
55
-
56
-
57
-
58
-
59
-
60
-
61
-
62
-
63
-
64
-
65
-
66
-
67
-
68
-
69
-
70
-
71
-
72
-
73
-
74
-
75
-
76
-
77
-
78
-
79
-
80
-
81
-
82
-
83
-
84
-
85
-
86
-
87
-
88
-
89
-
90
-
91
-
92
-
93
-
94
-
95
-
96
-
97
-
98
-
99
-
100
-
101
-
102
-
103
-
104
-
105
 |
 |