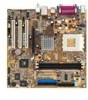
Asus A7V8X-MX SE A7V8X-MX SE User's Manual - Page 32
Managing and updating your BIOS - bios update
 |
View all Asus A7V8X-MX SE manuals
Add to My Manuals
Save this manual to your list of manuals |
Page 32 highlights
2.1 Managing and updating your BIOS • The original BIOS file for this motherboard is in the support CD. • Copy the original BIOS to a bootable floppy disk in case you need to restore the BIOS in the future. 2.1.1 Creating a bootable floppy disk 1. Do either one of the following to create a bootable floppy disk. DOS environment Insert a 1.44 MB floppy disk into the drive. At the DOS prompt, type: format a: /s , then press the key Windows® 98SE/ME environment a. From your Windows desktop, click Start, point to Settings, then click Control Panel. b. Double-click Add/Remove Programs icon from the Control Panel window. c. Click on the Startup Disk tab, then on Create Disk... button. d. Insert a 1.44 MB floppy disk when prompted. Follow the suceeding screen instructions to complete the process. Windows® XP environment a. Insert a new 1.44 MB floppy disk in the floppy disk drive. b. From the Windows desktop, click Start > My Computer. c. In the My Computer window, click the 3 1/2 Floppy icon. d. From the Menu bar, click File > Format. e. Select "Create an MS-DOS Startup Disk" in the Format Options field, then click Start. 2. Copy the original (or the latest) motherboard BIOS to the bootable floppy disk. 2-2 Chapter 2: BIOS information
-
 1
1 -
2
-
3
-
4
-
5
-
6
-
7
-
8
-
9
-
10
-
11
-
12
-
13
-
14
-
15
-
16
-
17
-
18
-
19
-
20
-
21
-
22
-
23
-
24
-
25
-
26
-
 27
27 -
 28
28 -
 29
29 -
 30
30 -
 31
31 -
 32
32 -
 33
33 -
 34
34 -
 35
35 -
 36
36 -
 37
37 -
38
-
39
-
40
-
41
-
42
-
43
-
44
-
45
-
46
-
47
-
48
-
49
-
50
-
51
-
52
-
53
-
54
-
55
-
56
-
57
-
58
-
59
-
60
-
61
-
62
-
63
-
64
 |
 |
