Asus P8Z77-V DELUXE P8Z77-V DELUXE User's Manual - Page 75
USB BIOS Flashback - downloads
 |
View all Asus P8Z77-V DELUXE manuals
Add to My Manuals
Save this manual to your list of manuals |
Page 75 highlights
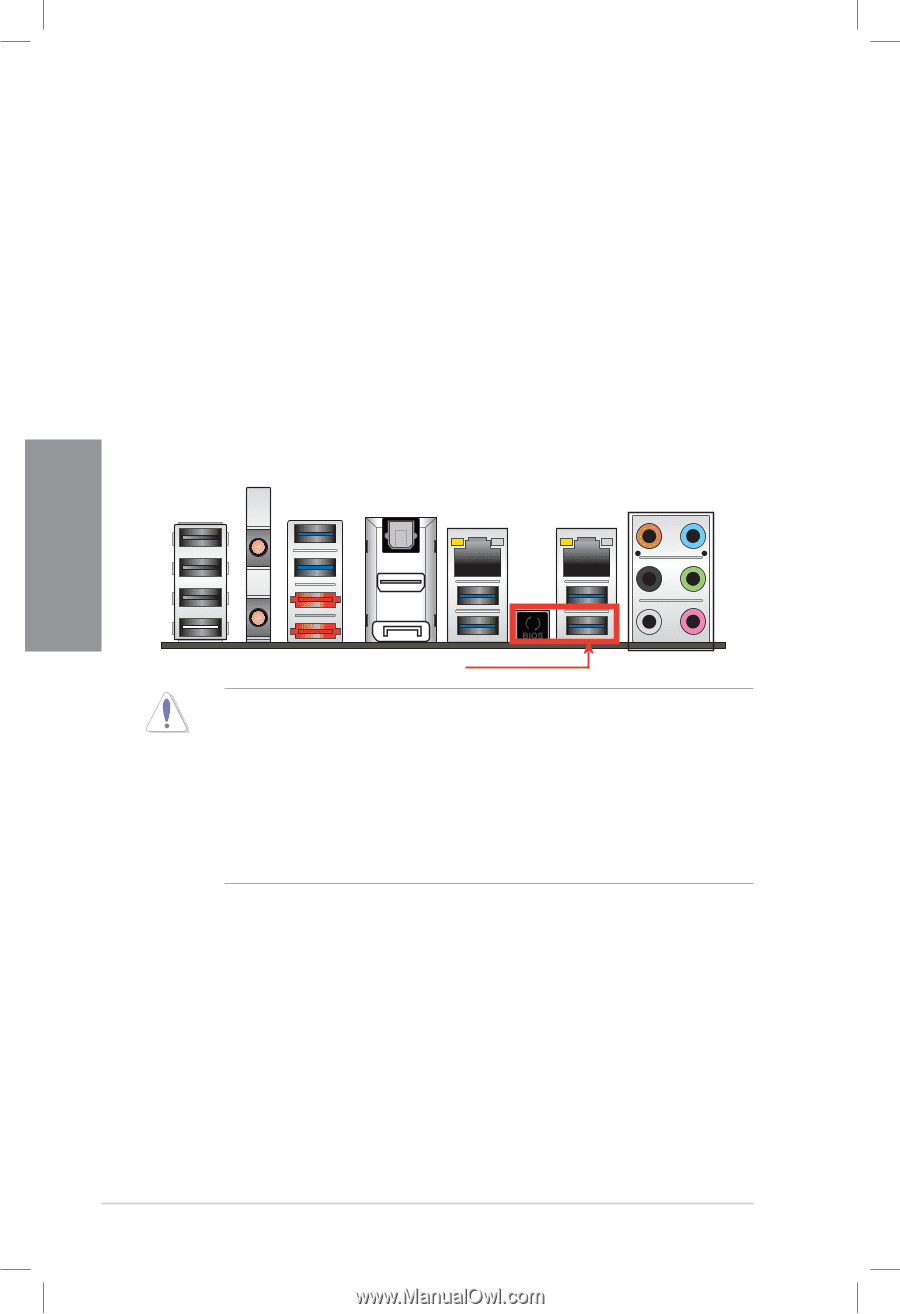
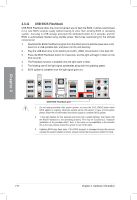
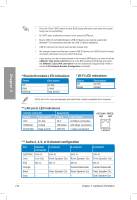
Chapter 2 2.3.11 USB BIOS Flashback USB BIOS Flashback offers the most convenient way to flash the BIOS. It allows overclockers to try new BIOS versions easily without having to enter their existing BIOS or operating system. Just plug in USB storage and push the dedicated button for 3 seconds, and the BIOS is automatically flashed using standby power. Worry-free overclocking for the ultimate convenience! 1 Download the BIOS Flashback program from the ASUS service website (www.asus.com). Save it to a USB portable disk, and place it in the root directory. 2 Plug the USB flash drive to the bottom port LAN1_USB3_34 connector in the back I/O. 3 Press the BIOS Flashback button for 3 seconds, and the light will begin to flash (on the third second). 4 The Flashback function is enabled once the light starts to flash. 5 The flashing rate of the light signal accelerates along with the updating speed. 6. BIOS update is complete once the light signal goes out. USB BIOS Flashback port 1. Do not unplug portable disk, power system, or press the CLR_CMOS button while BIOS update is ongoing, otherwise update will be interrupted. In case of interruption, please follow the recommended procedures again to complete BIOS update. 2. If the light flashes for five seconds and turns into a stable lighting, this means that the BIOS Flashback is not operating properly. This may be caused by:1. Improper installation of the portable disk.2. Error in file name or incompatibility in file format.If this is the case, please restart the system to turn off the light. 3. Updating BIOS may have risks. If the BIOS program is damaged during the process causing the system unable to reboot, please contact the local service station for help. 2-50 Chapter 2: Hardware information
-
 1
1 -
2
-
3
-
4
-
5
-
6
-
7
-
8
-
9
-
10
-
11
-
12
-
13
-
14
-
15
-
16
-
17
-
18
-
19
-
20
-
21
-
22
-
23
-
24
-
25
-
26
-
27
-
28
-
29
-
30
-
31
-
32
-
33
-
34
-
35
-
36
-
37
-
38
-
39
-
40
-
41
-
42
-
43
-
44
-
45
-
46
-
47
-
48
-
49
-
50
-
51
-
52
-
53
-
54
-
55
-
56
-
57
-
58
-
59
-
60
-
61
-
62
-
63
-
64
-
65
-
66
-
67
-
68
-
69
-
 70
70 -
 71
71 -
 72
72 -
 73
73 -
 74
74 -
 75
75 -
 76
76 -
 77
77 -
 78
78 -
 79
79 -
 80
80 -
81
-
82
-
83
-
84
-
85
-
86
-
87
-
88
-
89
-
90
-
91
-
92
-
93
-
94
-
95
-
96
-
97
-
98
-
99
-
100
-
101
-
102
-
103
-
104
-
105
-
106
-
107
-
108
-
109
-
110
-
111
-
112
-
113
-
114
-
115
-
116
-
117
-
118
-
119
-
120
-
121
-
122
-
123
-
124
-
125
-
126
-
127
-
128
-
129
-
130
-
131
-
132
-
133
-
134
-
135
-
136
-
137
-
138
-
139
-
140
-
141
-
142
-
143
-
144
-
145
-
146
-
147
-
148
-
149
-
150
-
151
-
152
-
153
-
154
-
155
-
156
-
157
-
158
-
159
-
160
-
161
-
162
-
163
-
164
-
165
-
166
-
167
-
168
-
169
-
170
-
171
-
172
-
173
-
174
-
175
-
176
-
177
-
178
-
179
-
180
-
181
-
182
-
183
-
184
-
185
-
186
-
187
-
188
-
189
-
190
-
191
-
192
-
193
-
194
-
195
 |
 |