Asus PA238Q User Guide - Page 9
MENU Button
 |
View all Asus PA238Q manuals
Add to My Manuals
Save this manual to your list of manuals |
Page 9 highlights
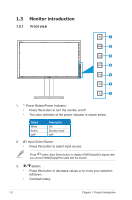
4. MENU Button: • Press this button to turn on the OSD menu, or to enact the selected OSD menu item. • Press this button to exit the hotkey OSD menu. 5. • • Button: Press this button to increase values or to move your selection right/up. Brightness hotkey 6. • • • Button: Press this button to select a desired preset mode. Press this button to exit the OSD menu or to go back to the previous menu when the OSD menu is active. Press this button for 2 ~ 4 seconds to automatically adjust the image to its optimized position, clock, and phase (for VGA mode only). 7. QuickFit button: • Press this button to activate the QuickFit function designed for alignment. • The QuickFit function contains 7 pages of common grid patterns, paper sizes, and photo sizes. (Please refer to 1.3.3 QuickFit Function) ASUS PA238Q Series LED Monitor 1-3
-
 1
1 -
2
-
3
-
 4
4 -
 5
5 -
 6
6 -
 7
7 -
 8
8 -
 9
9 -
 10
10 -
 11
11 -
 12
12 -
 13
13 -
 14
14 -
15
-
16
-
17
-
18
-
19
-
20
-
21
-
22
-
23
-
24
-
25
-
26
-
27
 |
 |