Asus TS100-E3 PI2 User Guide - Page 26
Installing the CPU heatsink and airduct, assembly
 |
View all Asus TS100-E3 PI2 manuals
Add to My Manuals
Save this manual to your list of manuals |
Page 26 highlights
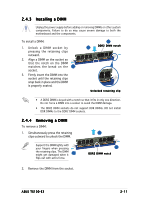
2.3.2 Installing the CPU heatsink and airduct assembly The TS100-E3 comes with a proprietary CPU heatsink. You have to assemble the CPU heatsink before installing to the motherboard. To install the CPU heatsink and airduct assembly: 1. Locate the four screw holes on the motherboard. 2. Position the CPU heatsink and airduct assembly on top of the installed CPU. Make sure that the heatsink screws match the screw holes on the motherboard. 3. Drive the four screws into the holes in a diagonal sequence to secure the heatsink and airduct assembly to the motherboard. A B B A 4. Connect the CPU fan cable to the connector on the motherboard labeled CPU_FAN1. 2-8 Chapter 2: Hardware setup
-
 1
1 -
2
-
3
-
4
-
5
-
6
-
7
-
8
-
9
-
10
-
11
-
12
-
13
-
14
-
15
-
16
-
17
-
18
-
19
-
20
-
 21
21 -
 22
22 -
 23
23 -
 24
24 -
 25
25 -
 26
26 -
 27
27 -
 28
28 -
 29
29 -
 30
30 -
 31
31 -
32
-
33
-
34
-
35
-
36
-
37
-
38
-
39
-
40
-
41
-
42
-
43
-
44
-
45
-
46
-
47
-
48
-
49
-
50
-
51
-
52
-
53
-
54
-
55
-
56
-
57
-
58
-
59
-
60
-
61
-
62
-
63
-
64
-
65
-
66
-
67
-
68
-
69
-
70
-
71
-
72
-
73
-
74
-
75
-
76
-
77
-
78
-
79
-
80
-
81
-
82
-
83
-
84
-
85
-
86
-
87
-
88
-
89
-
90
-
91
-
92
-
93
-
94
-
95
-
96
-
97
-
98
-
99
-
100
-
101
-
102
-
103
-
104
-
105
-
106
-
107
-
108
-
109
-
110
-
111
-
112
-
113
-
114
-
115
-
116
-
117
-
118
-
119
-
120
-
121
-
122
-
123
-
124
-
125
-
126
-
127
-
128
-
129
-
130
-
131
-
132
-
133
-
134
-
135
-
136
-
137
-
138
-
139
-
140
-
141
-
142
-
143
-
144
-
145
-
146
-
147
-
148
-
149
-
150
-
151
-
152
 |
 |

Chapter 2:
Hardware setup
Chapter 2:
Hardware setup
Chapter 2:
Hardware setup
Chapter 2:
Hardware setup
Chapter 2:
Hardware setup
2-8
2-8
2-8
2-8
2-8
2.3.2
2.3.2
2.3.2
2.3.2
2.3.2
Installing the CPU heatsink and airduct
Installing the CPU heatsink and airduct
Installing the CPU heatsink and airduct
Installing the CPU heatsink and airduct
Installing the CPU heatsink and airduct
assembly
assembly
assembly
assembly
assembly
The TS100-E3 comes with a proprietary CPU heatsink. You have to assemble
the CPU heatsink before installing to the motherboard.
2.
Position the CPU heatsink and
airduct assembly on top of the
installed CPU. Make sure that the
heatsink screws match the screw
holes on the motherboard.
3.
Drive the four screws into the
holes in a diagonal sequence to
secure the heatsink and airduct
assembly to the motherboard.
A
A
B
B
To install the CPU heatsink and airduct assembly:
1.
Locate the four screw holes on
the motherboard.
4.
Connect the CPU fan cable to the connector on the motherboard labeled
CPU_FAN1.