Asus TS100-E3 PI2 User Guide - Page 35
Reinstalling the front panel assembly
 |
View all Asus TS100-E3 PI2 manuals
Add to My Manuals
Save this manual to your list of manuals |
Page 35 highlights
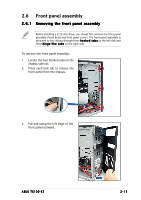
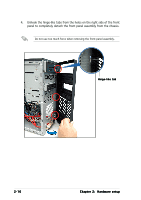
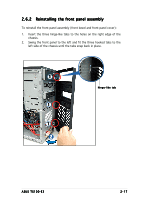
2.6.2 Reinstalling the front panel assembly To reinstall the front panel assembly (front bezel and front panel cover): 1. Insert the three hinge-like tabs to the holes on the right edge of the chassis. 2. Swing the front panel to the left and fit the three hooked tabs to the left side of the chassis until the tabs snap back in place. 1 Hinge-like tab 1 1 2 ASUS TS100-E3 2-17
-
 1
1 -
2
-
3
-
4
-
5
-
6
-
7
-
8
-
9
-
10
-
11
-
12
-
13
-
14
-
15
-
16
-
17
-
18
-
19
-
20
-
21
-
22
-
23
-
24
-
25
-
26
-
27
-
28
-
29
-
 30
30 -
 31
31 -
 32
32 -
 33
33 -
 34
34 -
 35
35 -
 36
36 -
 37
37 -
 38
38 -
 39
39 -
 40
40 -
41
-
42
-
43
-
44
-
45
-
46
-
47
-
48
-
49
-
50
-
51
-
52
-
53
-
54
-
55
-
56
-
57
-
58
-
59
-
60
-
61
-
62
-
63
-
64
-
65
-
66
-
67
-
68
-
69
-
70
-
71
-
72
-
73
-
74
-
75
-
76
-
77
-
78
-
79
-
80
-
81
-
82
-
83
-
84
-
85
-
86
-
87
-
88
-
89
-
90
-
91
-
92
-
93
-
94
-
95
-
96
-
97
-
98
-
99
-
100
-
101
-
102
-
103
-
104
-
105
-
106
-
107
-
108
-
109
-
110
-
111
-
112
-
113
-
114
-
115
-
116
-
117
-
118
-
119
-
120
-
121
-
122
-
123
-
124
-
125
-
126
-
127
-
128
-
129
-
130
-
131
-
132
-
133
-
134
-
135
-
136
-
137
-
138
-
139
-
140
-
141
-
142
-
143
-
144
-
145
-
146
-
147
-
148
-
149
-
150
-
151
-
152
 |
 |

2-17
2-17
2-17
2-17
2-17
ASUS TS100-E3
ASUS TS100-E3
ASUS TS100-E3
ASUS TS100-E3
ASUS TS100-E3
2.6.2
2.6.2
2.6.2
2.6.2
2.6.2
Reinstalling the front panel assembly
Reinstalling the front panel assembly
Reinstalling the front panel assembly
Reinstalling the front panel assembly
Reinstalling the front panel assembly
To reinstall the front panel assembly (front bezel and front panel cover):
1.
Insert the three hinge-like tabs to the holes on the right edge of the
chassis.
2.
Swing the front panel to the left and fit the three hooked tabs to the
left side of the chassis until the tabs snap back in place.
Hinge-like tab
Hinge-like tab
Hinge-like tab
Hinge-like tab
Hinge-like tab
1
2
1
1