Asus WL520GC User Manual
Asus WL520GC - Wireless Router Manual
 |
UPC - 610839732623
View all Asus WL520GC manuals
Add to My Manuals
Save this manual to your list of manuals |
Asus WL520GC manual content summary:
- Asus WL520GC | User Manual - Page 1
® WL-520g Wireless Router User Manual - Asus WL520GC | User Manual - Page 2
Index WL-520g Wireless Router User Manual 1. Package Contents 2 2. Connecting ADSL Modem and Wireless Router 3 1) Cable Connection 3 2) Status Indicators 3 3) Wall Mounting Option 4 3. Configuring the Wireless Router 5 1) ASUS Wireless Router Wired Connection 5 2) Setting IP address for - Asus WL520GC | User Manual - Page 3
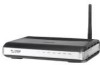
WL-520g Wireless Router User Manual 1. Package Contents • WL-520g wireless router*1 • Power adaptor*1 • External antenna*1 • Utility CD*1 • RJ45 cable*1 • Quick Start Guide*1 Manufacturer Contact Information ASUSTeK COMPUTER INC. (Asia-Pacific) Company address: 15 Li-Te Road, Beitou, Taipei 11259 - Asus WL520GC | User Manual - Page 4
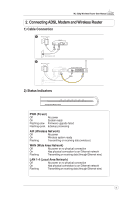
WL-520g Wireless Router User Manual 2. Connecting ADSL Modem and Wireless Router 1) Cable Connection 1 Wall power outlet Modem Power Phone Wall telephone outlet 2 Wall power outlet Modem Power Phone ASUS Wireless Router LAN4 LAN3 LAN2 LAN1 WAN Power WAN Wall telephone outlet 2) - Asus WL520GC | User Manual - Page 5
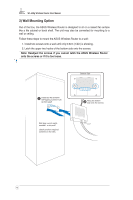
WL-520g Wireless Router User Manual 3) Wall Mounting Option Out of the box, the ASUS Wireless Router is designed to sit on a raised flat surface like a file cabinet or book shelf. The unit may also be converted for mounting to a wall or ceiling. Follow these steps to mount the ASUS Wireless Router to - Asus WL520GC | User Manual - Page 6
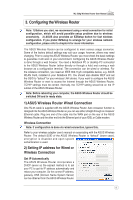
WL-520g Wireless Router User Manual 3. Configuring the Wireless Router Note: 1) Before you start, we recommend using a wired connection for initial configuration, which will avoid possible setup problem due to wireless uncertainty. 2) ASUS also provides an EZSetup button for fast wireless confi - Asus WL520GC | User Manual - Page 7
WL-520g Wireless Router User Manual Note: Before rebooting your PC, the ASUS Wireless Router should be switched ON and in ready state. Setting IP Manually If you want to set your IP address manually, the following default settings of the ASUS Wireless Router should be known: • IP address 192.168 - Asus WL520GC | User Manual - Page 8
WL-520g Wireless Router User Manual 4) Quick Setup To start quick setup, click Next to enter the "Quick Setup" page. Follow the instructions to setup the ASUS Wireless Router. 1 Select your time zone or the closest region. Click Next to continue. ASUS wireless router WL520g supports five types of ISP - Asus WL520GC | User Manual - Page 9
-520g Wireless Router User Manual PPPoE User If you are PPPoE service user, pleae select the second line. You would be required to input the username and password provided by your ISP. PPTP User If you are using PPTP services, you would be asked to input the username, password, as well as IP address - Asus WL520GC | User Manual - Page 10
using 64bits or 128bits WEP key encryption. High: only users with the same WPA pre-shared key are to connect to this access point and to transmit data using TKIP encryption. The ASUS wireless router configuration page features a convienient approach to setup the WEP Keys: with only a few taps on - Asus WL520GC | User Manual - Page 11
WL-520g Wireless Router User Manual 6 Select Connect to an existing wireless LAN (Station) when the welcome window appears, then click Next. 7 ASUS ONE TOUCH WIZARD searches and displays all the available stations as shown in the picture. Select WL520g and press Next to continue. 8 The setup - Asus WL520GC | User Manual - Page 12
WL-520g Wireless Router User Manual 5 For non-ASUS wireless adaptor users, you can set up the wireless connection between your computer and the wireless router with Windows® Zero-Configure and follow the instructions to setup the ASUS Wireless Router. Tips are given when you move your cursor over - Asus WL520GC | User Manual - Page 13
WL-520g Wireless Router User Manual 4. Commonly Used Advanced Features The following pages are setup examples of commonly used advanced features. You could setup these features in web browser. 1) How to Setup Encryption WL-520g Encryption Setup Please refer to P.7 for encryption setup information - Asus WL520GC | User Manual - Page 14
WL-520g Wireless Router User Manual 3) Setting up Switching Hub & Pure AP (Non IP Share NAT) 1 Connect the LAN port from a DSL or Cable modem to one of the LAN ports on the wireless router. DSL or Cable Modem WAN 2 Select DHCP Server in IP Config folder. LAN4 LAN3 LAN2 LAN1 WAN ASUS - Asus WL520GC | User Manual - Page 15
WL-520g Wireless Router User Manual 2 Click View network connections. 3 Right click Local Area Connection and select Properties. 4 Double-click Internet Protocol (TCP/IP). 5 Get the current TCP/IP settings. 6 Click Virtual DMZ in the NAT Settings menu. 7 Enter the IP address of the host and - Asus WL520GC | User Manual - Page 16
WL-520g Wireless Router User Manual 5) Setting up DDNS Dynamic DNS (DDNS) allows user to export host name to Internet through DDNS service provider. Each time the ASUS Wireless Router connect to Internet and get an IP address from ISP, this function will update your IP address to DDNS service - Asus WL520GC | User Manual - Page 17
WL-520g Wireless Router User Manual 7 Open your e-mail to find the activation letter. Click the hyperlink to activate your account. 8 Then press login. 9 Enter your user name and password you have set when you were applying for the account. 10 After logging in, you would see the welcome message. - Asus WL520GC | User Manual - Page 18
Wireless bridge, also known as Wireless Distribution System or WDS, allows connection to one or more access points. We now take an example to show how to setup WDS for two APs. In this example, AP1, with MAC address of 00:0E:A6: A1:3F:6E and IP address of 192.168.1.1, will operate in "Hybrid" mode - Asus WL520GC | User Manual - Page 19
WL-520g Wireless Router User Manual 1 First, we are to set up AP1. Choose Bridge in the Wireless folder. 2 Set the SSID as WL520g and WEP Encryption as None. We suggest AP1 and AP2 using the same SSID. 3 Select WAN & LAN in the IP Config folder. 4 Confirm that the IP address of AP1 is 192.168.1.1. - Asus WL520GC | User Manual - Page 20
WL-520g Wireless Router User Manual 9 Enable Connect to APs in Remote Bridge List to connect to the other APs in your list. If you want to allow anonymous user to login your network, you can select Yes in Allow anonymous field. In this example, we do not allow anonymous users. 10 Enter the MAC - Asus WL520GC | User Manual - Page 21
WL-520g Wireless Router User Manual 5. Trouble Shooting 1. Cannot access to web browser for router configuration 1. Open a web browser and open "Internet Options" dialog box. 2. Click on Delete Cookies and Delete Files. 2. Cannot Establish Connection via Wireless Out of Range: Put the router - Asus WL520GC | User Manual - Page 22
, if you push the restore button on the back of the ASUS Wireless Router over 5 seconds, or if you click the "Restore" button on the " Factory Default" page under " Advanced Setup". User Name: Password: Enable DHCP: IP address: Domain Name: admin admin Yes (if plug in Wan cable) 192.168.1.1 (Blank - Asus WL520GC | User Manual - Page 23
WL-520g Wireless Router User Manual 6. Additional Information: Router and Client Wireless Connection Setup 1) Utility Installation for WL-520g 1. Click the first line Install ASUS Wireless Router Utilities to run the setup installation program. 2. Click Next to continue. 3. Click Next to confirm - Asus WL520GC | User Manual - Page 24
WL-520g Wireless Router User Manual 2) EZSetup (Default) Wireless LAN setup will complete in two easy steps. 1 Push EZSetup over 3 sec. and release. LAN4 LAN3 LAN2 LAN1 WAN 1) If the setup button is pushed without running the EZsetup wizard utility, the PWR indicator will flash and Internet - Asus WL520GC | User Manual - Page 25
WL-520g Wireless Router User Manual 5 6 Select the connection type (Cable or ADSL) you use.(Example: Cable modem or other connection type that gets IP automatically ) (ISP requirements depend on selection in the connection type.) Depending on the connection type you selected, you may require - Asus WL520GC | User Manual - Page 26
3) EZSetup (Customized) 1 WL-520g Wireless Router User Manual Only differences between the default setup will be shown below. Select the Customization check box for advanced wireless LAN functions. 2 You can check for automatic or uncheck for manual wireless network naming. You must enter a name - Asus WL520GC | User Manual - Page 27
WL-520g Wireless Router User Manual 5 If you chose "Manually assign" and selected the WPA check box , enter a WPA (Wi-Fi Protected Access) key following the guideline as shown. 6 Security-enabled wireless LAN environment is built now.You can print your key and your other network settings - Asus WL520GC | User Manual - Page 28
WL-520g Wireless Router User Manual 7. Appendix FCC Warning Statement This device complies with Part 15 of the radiate radio frequency energy and, if not installed and used in accordance with the instructions, may cause harmful interference to radio communications. However, there is no guarantee that - Asus WL520GC | User Manual - Page 29
WL-520g Wireless Router User Manual Testing for electric safety according to EN 60950-1 has been conducted. These are considered relevant and a Class B product, in a domestic environment, this product may cause radio interference, in which case the user may be required to take adequate measures. 28 - Asus WL520GC | User Manual - Page 30
WL-520g Wireless Router User Manual 29 - Asus WL520GC | User Manual - Page 31
WL-520g Wireless Router User Manual 30
-
 1
1 -
 2
2 -
 3
3 -
 4
4 -
 5
5 -
 6
6 -
 7
7 -
8
-
9
-
10
-
11
-
12
-
13
-
14
-
15
-
16
-
17
-
18
-
19
-
20
-
21
-
22
-
23
-
24
-
25
-
26
-
27
-
28
-
29
-
30
-
31
 |
 |
®
WL-520g Wireless Router
User Manual