Asus WL520GC User Manual - Page 11
Connect to an existing wireless, LAN Station, bits 10digits, Automatic, Generation, Finish - windows 7
 |
UPC - 610839732623
View all Asus WL520GC manuals
Add to My Manuals
Save this manual to your list of manuals |
Page 11 highlights
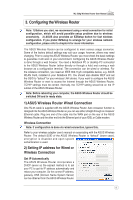
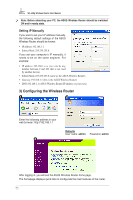
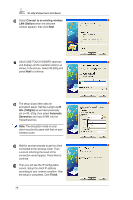
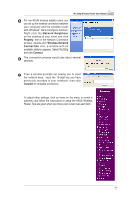
WL-520g Wireless Router User Manual 6 Select Connect to an existing wireless LAN (Station) when the welcome window appears, then click Next. 7 ASUS ONE TOUCH WIZARD searches and displays all the available stations as shown in the picture. Select WL520g and press Next to continue. 8 The setup wizard then asks for encryption setup. Set Key Length as 64 bits (10digits) as we have previously set on WL-520g, then select Automatic Generation and input 11111 into the Passphrase box. Note: The encryption mode on your client must be the same with that on your wireless router. 9 Wait for several seconds to get the client connected to the wireless router. Then a screen informing the result of the connection would appear. Press Next to continue. 10 Then you will see the IP configuration screen. Setup the client IP address according to your network condition. After the setup is completed, Click Finish. 10
-
 1
1 -
2
-
3
-
4
-
5
-
 6
6 -
 7
7 -
 8
8 -
 9
9 -
 10
10 -
 11
11 -
 12
12 -
 13
13 -
 14
14 -
 15
15 -
 16
16 -
17
-
18
-
19
-
20
-
21
-
22
-
23
-
24
-
25
-
26
-
27
-
28
-
29
-
30
-
31
 |
 |
