Behringer X32-TP User Manual - Page 30
How do I share signals over AES50 Supermac network?, 5.12 What kinds of Utilities are available?
 |
View all Behringer X32-TP manuals
Add to My Manuals
Save this manual to your list of manuals |
Page 30 highlights
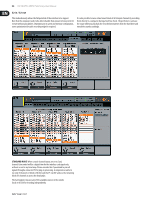
30 X32 DIGITAL MIXER Preliminary User Manual 3. Press any of encoders 1-5 to switch to the edit screen for the specific custom control that you have highlighted. The main screen will switch to an editing screen where you can assign a console parameter to the custom control. 4. Adjust the various encoders on the editing screen to make a custom control assignment, then press the encoders to make the actual assignment you have selected. 5. When you are finished, you will see that the LCD screen located in the custom controls section reflects the assignment you have made in both screen color and text. 6. You are now free to use and enjoy the custom assignments you have made. 5.11 How do I share signals over AES50 Supermac network? In many live sound situations, a single mixing console is used to cover both the front of house (FOH) mix that the audience hears, as well as all the individual "monitor mixes" that are sent to stage wedges or transmitters for in-ear monitor systems. However, in larger live sound situations, it is common to operate two separate consoles, one that covers the FOH mix, and a second, completely independent console that covers just the monitor mixes that are sent to the talent. This makes a lot of sense, because the FOH engineer can concentrate 100% on the audience mix, while a completely different monitor engineer can dedicate himself to the thankless task of crafting great monitor mixes for the different musicians. With an analog console, operating separate FOH and monitor consoles can be quite expensive, because the original stage microphone signals have to all be "split" into two copies, using an expensive multi-channel microphone splitter. The splitters ends one set of mic signals to the FOH console and the other set to the monitor console. Microphone splitters are a specialized piece of equipment and ones that work reliably and sound good are very expensive. The X32 family of products, however, makes using separate FOH and monitor consoles easy and affordable. This is due to the fact that the microphone signals, once digitized, can be easily duplicated and sent to multiple locations, using a single off-the-shelf Cat-5 Ethernet cable. Now, an expensive and bulky microphone splitter can be replaced by a couple of low-cost S16 digital stage boxes, and running separate FOH and monitor consoles is within reach of even the most modest production. This is an example for using 2 consoles and 2 stage boxes (possible are up to 3 per AES50 port) in a monitor/FOH setup: 1. Connect the AES50 A port on the first S16 to the AES50 A port on the X32 on-stage console via Cat-5. 2. Connect the AES50 B port on the first S16 unit to the AES50 A port on the second S16 via Cat-5. 3. Connect the AES50 A port of the FOH X32 unit to the AES50 B port of the on-stage X32 via Cat-5. 4. Now the configuration of the monitor console has to be set. Keep in mind that in this configuration, the on-stage console will be the one controlling the input gains of the mic preamps, so a good and intensive soundcheck should be done. 5. Press the ROUTING switch next to the display on the on-stage console. On the HOME tab select "AES50 A 1-8" as source for "Inputs 1-8", "AES50 A 9-16" for "Input 9-16", and accordingly for channels 17-32. 6. To route the channels through the on-stage console to the FOH console, switch to the AES50 B page and set "Output 1-8" to "AES50 A 1-8", "Output 9-16" to "AES50 A 9-16", etc. 7. On the FOH X32 console, press the ROUTING switch next to the display. On the HOME tab select "AES50 A 1-8" as source for "Inputs 1-8", "AES50 A 9-16" for "Input 9-16", and accordingly for channels 17-32. 8. To get the main out from the FOH back to one of the stage boxes to feed the PA, the main outs of the console which are routed per default to OUT 15 and OUT 16 have to be routed through the on-stage X32 console. To achieve this, select the AES50 A tab and set Out 1-8 to "OUT 9-16". On the on-stage console, choose the AES50 A tab and set Output 1-8 to "AES50 B 1-8". The Main Outputs of the FOH console are now available on the first S16 on OUT 7 and OUT 8 to connect your main PA system. 9. Ready to rock! 5.12 What kinds of Utilities are available? The X32 console provides various utilities that make the console much easier and more fun to use, while providing a great deal of flexibility and power. Examples Include: Channel Customization: Various input and output channels can have custom colors, names, and icons assigned to them, which are then shown in the color LCD screens located on each channel strip. Using these functions, you will always know exactly what source and destination is tied to the channel, with no need for board tape and sharpie pens. For example, an input channel could be labeled "kick drum" while the channel for a mix output could be labeled "Joey's monitor". • Press the SELECT button for a channel you wish to assign a custom label, icon, and color for. • Press the home key, then page right to the CONFIG page. You can also press the VIEW button next to the LOW CUT pot to go to the CONFIG page. • Press the UTILITIES button. • Adjust the various encoders to select a color, icon, and type in a name for the selected channel. The X32 also provides a long list of preset names for typical input sources and output destinations, saving time and effort. Copy/Paste: The X32 also provides a "copy and paste" function that allows you to take settings you have configured for one channel, and copy those settings to another channel. • Press the SELECT button for a channel whose settings you wish to copy. • Press the HOME button, then the UTILITY button. • Press the 5th encoder to copy all settings of the selected channel into the copy buffer. • Press the SELECT button for a channel who you wish to paste the settings into. • Adjust the first encoder to select which aspects of the channel you wish to copy from the source channel (i.e. the one in the paste buffer). • Press the 6th encoder to "paste" the copied settings into the currently selected channel. Store / Load Presets: The X32 allows you to save and load presets of channel settings, as well as settings made in the internal effects processor. These stored settings can later be recalled as needed. Since the stored files can also be stored and recalled to an attached USB drive, this means that you can save your favorite channel settings and effects on one console, and then quickly and easily recall and use them on a completely different X32 console. • Press the SELECT button for a channel whose settings you wish to store. • Press the HOME button, then the UTILITY button. • Press the 3rd encoder to store all settings of the selected channel. A new screen will appear where you can apply a custom name to the saved preset.
-
 1
1 -
2
-
3
-
4
-
5
-
6
-
7
-
8
-
9
-
10
-
11
-
12
-
13
-
14
-
15
-
16
-
17
-
18
-
19
-
20
-
21
-
22
-
23
-
24
-
 25
25 -
 26
26 -
 27
27 -
 28
28 -
 29
29 -
 30
30 -
 31
31 -
 32
32 -
 33
33 -
 34
34 -
 35
35 -
36
-
37
-
38
-
39
-
40
-
41
-
42
-
43
-
44
-
45
-
46
-
47
-
48
-
49
-
50
-
51
-
52
-
53
-
54
-
55
-
56
-
57
-
58
-
59
-
60
-
61
-
62
-
63
-
64
-
65
-
66
-
67
-
68
-
69
-
70
 |
 |
