Belkin F5D7132 User Manual - Page 18
Logging into the WURE - reset
 |
UPC - 722868571088
View all Belkin F5D7132 manuals
Add to My Manuals
Save this manual to your list of manuals |
Page 18 highlights
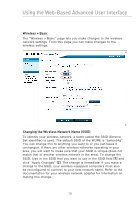
Using the Web-Based Advanced User Interface section 1 2 3 4 5 6 Note: Once you have completed configuring your WURE, repeat steps 7 1 through 3. Then select "Obtain an IP automatically" or set a valid IP for your computer on the same subnet as the network to which you are connecting. Logging into the WURE Using your Internet browser, you can access the WURE's Web-Based Advanced User Interface. In your browser, type "192.168.2.254" (do not type in anything else such as "http://" or "www"). Then, press the "Enter" key. You will see the WURE's home page in your browser window. The home page is visible to any user who wants to see it. To make any changes to the WURE's settings, you have to log in. Clicking the "Login" button or clicking on any one of the links on the home page will take you to the login screen. The WURE ships with no password entered. In the login screen, leave the password blank and click the "Submit" button to log in. Note: An IP address conflict can occur if you use a CAT5 cable to try to manage the WURE while it already has a wireless connection to the same router. To resolve this issue you need to disconnect one of the connections to the WURE (wired or wireless). 1. (Wired) Disconnect the CAT5 cable; manage the WURE wirelessly. 2. (Wireless) Reset your WURE; manage the WURE though a CAT5 cable. 15
-
 1
1 -
2
-
3
-
4
-
5
-
6
-
7
-
8
-
9
-
10
-
11
-
12
-
 13
13 -
 14
14 -
 15
15 -
 16
16 -
 17
17 -
 18
18 -
 19
19 -
 20
20 -
 21
21 -
 22
22 -
 23
23 -
24
-
25
-
26
-
27
-
28
-
29
-
30
-
31
-
32
-
33
-
34
-
35
-
36
-
37
-
38
-
39
-
40
-
41
-
42
-
43
-
44
-
45
-
46
-
47
-
48
-
49
-
50
-
51
-
52
-
53
-
54
-
55
-
56
-
57
 |
 |
