Bernina 125 Manual
Bernina 125 Manual
 |
View all Bernina 125 manuals
Add to My Manuals
Save this manual to your list of manuals |
Bernina 125 manual content summary:
- Bernina 125 | Manual - Page 1
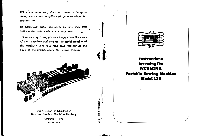
the name of your supplier and give us the serial number of the machine. You will find this number at the back of the frame, above the motor casing. %It FR. GEGAUF LIMITED Bernina Sewing Machine Factory STECKBORN Switzerland I Instructions for using the BERNINA Portable Sewing Machine Model 125 - Bernina 125 | Manual - Page 2
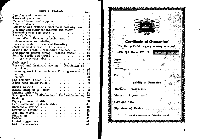
List of accessories 56 Certificate of Guarantee for the portable zigzag Sewing machine BERNINA Model 125 No. • Bayer's Nam*: Address R=332n7.-.Eikr • A: City Validity of Guarantee Ma4ilne: 2 years, until Motor : 1 year, until -- •:City and date : Signature of Dealer: (tense of guarantee - Bernina 125 | Manual - Page 3
of Guarantee During the period of two years for the machine and one year for the motor, we engage to repair only pure sewing machine oil free of acid and resinous substances, and needles of system 705. FR. GEGAUF LIMITED Bernina Sewing Machine Factory STECKBORN Switzerland 2 ■user of machine ! Name - Bernina 125 | Manual - Page 4
Notes of the Bernina Dealer regarding instructions, service and delivery of parts Date Notes Instructions forusing the BERNINA Portable Sewing Machine Zigzag Model 125 FR. GEGAUF LIMITED Bernina Sewing Machine Factory STECKBORN Switzerland 4 5 - Bernina 125 | Manual - Page 5
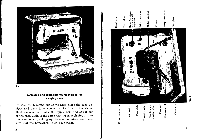
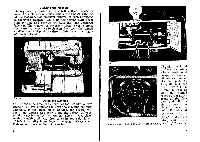
Motor houdng Drop feed knob BERNINA a E a a a Fig. I Removing and replacing the machine in the carrying case To take the machine out of its case, place the case upright and open it as shown in the illustration above. Hold the machine under the upper arm and lift it out of the case. Hold it the - Bernina 125 | Manual - Page 6
, the excess will drain off unused and may stain the fabric. Always oil the machine before use and not after it. Use clear sewing machine oil only, free of resin and acid. If oil of inferior quality is employed and correct oiling will insure easy running and prevent unnecessary wear of the parts. 9 - Bernina 125 | Manual - Page 7
the motor axle, No 9, Fig. 14. Introduce 4 or 5 drops of clear sewing machine oil into the two bearings at the points marked in red. 7. Make absolutely sure that no oil is applied to any other part of the motor. 8. These instructions for oiling apply to the motor only. 10 Fig. 6 Removable Open Arm - Bernina 125 | Manual - Page 8
) Illumination The sew-light is built into the special face plate. The 6, light faster the machine will run. Should the machine fail to start on account of heavy material or thick seams, give the handwheel a slight turn towards you. 12 Fir. 8 Removal of Bobbin Case and Bobbin Turn flywheel - Bernina 125 | Manual - Page 9
spindle will snap in the slit in the bobbin. As soon as the bobbin is inserted on the motor spindle, the sewing mechanism of the machine is automatically released. Then, from spool, which is on pin 9, lead thread through eye 11, back to thread guide lever 10, carrying the thread first under hook - Bernina 125 | Manual - Page 10
shuttle race cover 52 (Fig. 5). Then push the bobbin case on the shuttle pin as far as it will Use system 705 needles only for the portable machine model 125. Bent needles or those with blunt points should in the thread control spring 22, down under the guide 23, up to and through the eyelet 24, - Bernina 125 | Manual - Page 11
bobbin thread will come up. Pull both threads back under the presser foot, place material under same, lower foot and the machine is ready to sew. Fig. 12 Thread Tension The tension box is provided with a pointer and a demarcation line. When both form one line, then the tension is properly adjusted - Bernina 125 | Manual - Page 12
sewing, set the machine as follows : 1. Bring take-up lever 25 to its highest point. 2. Insert presser foot. For ordinary plain sewing, the zigzag presser foot them back under the presser foot. 3. Turn drop feed knob 28 to the right, until sewing sign will appear. 4. Adjust stitch regulator 29 so - Bernina 125 | Manual - Page 13
. Forward and backward sewing allows to reinforce certain parts of the fabric and from Machine Stop the machine with the take-up lever at its highest point. Raise the presser foot with zigzag adjusting knob 31. on zero. With the Bernina Portable, darning can be done with or without the sewing table - Bernina 125 | Manual - Page 14
is child's play on the Bernina, thanks to the patented hopper darning foot. however, beyond the border of thread rows from front to back and in reverse. Sew the first covering seams a little beyond the limit Darning stockings with the patented Bernina darning apparatus is particulary easy and - Bernina 125 | Manual - Page 15
lies well on the throat plate. The 26 darning ring can now easily be pushed about in any direction. It is advisable to sew first a seam round the damaged part, in order to prevent any further running. Then, begin to stretch threads from front to back and in reverse by pushing the - Bernina 125 | Manual - Page 16
of hem and push the fabric, so prepared, into the scroll of the lifted hemmer until it is under the needle; then lower the presser foot. When sewing, guide the folded edge of the cloth very lightly. If too much cloth enters the hemmer, the hem will be bulgy and eneven; if too - Bernina 125 | Manual - Page 17
BERNINA S Fig. 21 The Edger with Outlier Guide As the illustration shows, the stitch hole is located right at the edge of the presser foot. This presser foot without guide is therefore particularly suitable for sewing directly along the edge of the fabric. If the edger is fitted with the quilter - Bernina 125 | Manual - Page 18
much. 5. Turn zigzag adjusting knob 31 to the machine is stopped and the needle is stitched in the fabric. While sewing, however, the knob may freely be moved. 6. Insert sewing foot, b sew another zigzag seam. Cut the damaged part of the cloth along the inner seam, while the super- fluous part - Bernina 125 | Manual - Page 19
. F . 24 Set the machine as follows: 1. Lower feed dog adjusting knob 31 (Fig.22) on 3 or 4. The darning with wool is made in two operations, namely: 1. The damaged part is covered with wool rows. 2. Such rows are fastened together by sewing foot. Now fasten together the wool runs by sewing - Bernina 125 | Manual - Page 20
adjusting knob 31 on No. 1 or 2. Place the lace on the fabric, about 1 iH inch inside of its edge, so that the sewing is easier. Then sew the lace on and along this zigzag seam cut the superfluous part foot, marked with 1 red stripe. Insert a soft cord into the guide hole of the presser foot and - Bernina 125 | Manual - Page 21
r The Zigzag Ornamental Stitch On the Bernina zigzag sewing machine any ornamental stitch can be made in a really simple manner. According to the desired stitch, place the stitch regulator 29 (Fig. 22) more or less below zero and while sewing, turn the zigzag adjusting knob 31 (Fig. 22) to the right - Bernina 125 | Manual - Page 22
further ornamental stitches you can use also the right side stitch, eventually in connection with the aforesaid two kind of stitches. In this case, when sewing straight forward, the needle will stitch in the right side of the stitch hole and when changing over to zigzag stitch, the width of the - Bernina 125 | Manual - Page 23
..W . -d ..., - -.. .1 on the right Fig. 35 The Buttonhole Sewing We distinguish three types of buttonholes: a) the ordinary buttonhole, b) the braided buttonhole is laid into the guide of the presser foot (3 black stripes). For the raised buttonhole the tension of the bobbin thread must be - Bernina 125 | Manual - Page 24
of a Buttonhole 1. Insert buttonhole presser foot, marked with 3 black stripes. 2. Set needle to the left by turning the button 5 at the back of the arm (Fig. 7). See description on page 36. 3. Set zigzag adjusting knob 31 (Fig. 22) on No. 2. When sewing a buttonhole on jersey material, it is - Bernina 125 | Manual - Page 25
sew it on by six to eight stitches. 5. To fasten the stitches, let the needle in the hole of the button, raise the presser foot, put on zero the zigzag adjusting knob 31 (Fig. 22), lower the presser foot superfluous part of the scrap along the zigzag seam. To finish the applique works, sew another - Bernina 125 | Manual - Page 26
machine in the same manner as for plain sewing (Fig. 14) ; only replace the usual needle with a double needle and attach the pintucking presser foot. Thread the machine result because the bobbin thread tightens both top strike the presser foot or the needle plate. Therefore, zigzag adjusting knob 31 - Bernina 125 | Manual - Page 27
be made as follows : Charge the bobbin with thick thread (30.16). Loosen the top thread tension and sew with a long stitch. This incorrect foot may be used. (The ruffier is excluded from the normal accessories.) 50 Useful Suggestions in case of little troubles The Shuttle is blocked If the machine - Bernina 125 | Manual - Page 28
machine. For changing the belts, remove the cover plate of the machine below belt can now be exchanged. When replacing the hand wheel, be sure that the hub screw comes to lie on the milled part Bobbin Thread breaks Bottom thread tension is too tight. Bottom thread not properly wound on bobbin. Bobbin - Bernina 125 | Manual - Page 29
risking to pay much more than the additional price for a first class thread. Machine runs slowly Machine is insufficiently oiled (not the motor, which and got sticky. Remnants of thread are in the shuttle race. If the sewing machine has been standing in a cold room, it should be opened and brought - Bernina 125 | Manual - Page 30
Accessories supplied with the Bernina Portable Zigzag Sewing Machine Model 125 Standard Part No. On the Machine : 5952 1 presser foot for zigzag sewing, hinged 5856 1 presser foot extension 5359 1 presser foot screw 5953 862 863 5954 5320 1126 5956 1147 1164 5365 5876 134 5364 5361 5336 5877 5878
-
 1
1 -
 2
2 -
 3
3 -
 4
4 -
 5
5 -
 6
6 -
 7
7 -
8
-
9
-
10
-
11
-
12
-
13
-
14
-
15
-
16
-
17
-
18
-
19
-
20
-
21
-
22
-
23
-
24
-
25
-
26
-
27
-
28
-
29
-
30
 |
 |
Whenever
something
does
not
seem
to
be
quite
clear,
please
ask
suppliers
of
your
machine
for
explanation.
In
particular
cases,
we
ourselves
will
give
you
any
further
information
you
may
need.
When
writing
to
us,
please
always
state
the
name
of
your
supplier
and
give
us
the
serial
number
of
the
machine.
You
will
find
this
number
at
the
back
of
the
frame,
above
the
motor
casing.
%
It
FR.
GEGAUF
LIMITED
Bernina
Sewing
Machine
Factory
STECKBORN
Switzerland
I
Instructions
for
using
the
BERNINA
Portable
Sewing
Machine
Model
125