Bernina 125 Manual - Page 12
Fitting, Sewing, Table, Ordinary, Stitch
 |
View all Bernina 125 manuals
Add to My Manuals
Save this manual to your list of manuals |
Page 12 highlights
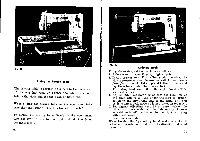
BERNINA Fig. 11 (5) (1) Fitting the Sewing Table The sewing table is secured by a bolt to the back wall of the carrying case. To release the table, turn said bolt to the right and the table can be lifted out. When sliding the sewing table on the open arm, take care that the locking lever 1 is turned to the left. To secure the sewing table firmly to the open arm, turn the lever 1 over to the right and let then down the table legs 2. 20 Fig. 14 Ordinary Stitch For plain sewing, set the machine as follows : 1. Bring take-up lever 25 to its highest point. 2. Insert presser foot. For ordinary plain sewing, the zigzag presser foot can be used as well. Thread needle from front to back. Take top and bottom threads and lay them back under the presser foot. 3. Turn drop feed knob 28 to the right, until sewing sign will appear. 4. Adjust stitch regulator 29 so that the zero line of the scale will be a little under the sign of demarcation on the right-hand side of the scale. This can be done only if lock screw 30 is not turned in too much. 5. Set zigzag adjusting knob 31 on zero position, in which case the machine will do plain sewing. As soon as said knob will be turned to the right, a zigzag stitch will result. 6. Insert sewing table. When turning the flywheel by hand, make sure that it is turned towards you, that is in the direction indicated by arrow. 21
-
 1
1 -
2
-
3
-
4
-
5
-
6
-
 7
7 -
 8
8 -
 9
9 -
 10
10 -
 11
11 -
 12
12 -
 13
13 -
 14
14 -
 15
15 -
 16
16 -
 17
17 -
18
-
19
-
20
-
21
-
22
-
23
-
24
-
25
-
26
-
27
-
28
-
29
-
30
 |
 |
