Bernina 125 Manual - Page 24
Sewing, Buttonhole
 |
View all Bernina 125 manuals
Add to My Manuals
Save this manual to your list of manuals |
Page 24 highlights
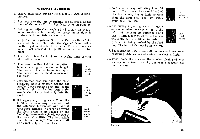
The Sewing of a Buttonhole 1. Insert buttonhole presser foot, marked with 3 black stripes. 2. Set needle to the left by turning the button 5 at the back of the arm (Fig. 7). See description on page 36. 3. Set zigzag adjusting knob 31 (Fig. 22) on No. 2. When sewing a buttonhole on jersey material, it is preferable to set this knob on 21/2. 4. Adjust stitch regulator 29 so that the zero line of the scale will be a little under the sign of demarcation on the right hand side of the scale. This can be done only if lock screw 30 (Fig. 22) is not turned in too much. 5. Turn drop feed knob 28 to the right, until sewing sign will appear. 6. Then sew the first half of the buttonhole, according to the desired length. The last stitch must be on the right. The needle shall be about 1:H inch into the cloth. Last stitch ❑n the right 7. Lift presser foot and turn the cloth clockwise half a rotation around the needle. Lower presser foot and let the needle stitch on the left. Again the needle shall be 1/8 inch only into the cloth. Let stitch on the left 8. Set zigzag adjusting knob 31 on the number corresponding to the width of the complete buttonhole and bar it with some stitches. In order to prevent • the cloth from being pushed by the feed dog, the operator should withdraw the material a little. The last stitch must be on the left. The nedle shall be Vel inch only into the cloth. Last stitch on the left 44 9. Again set zigzag adjusting knob 31 on No. 2 and sew the second half of the buttonhole, but a little shorter than the first one. The last stitch must be on the left. Ii Last stitch on the left 10. Set zigzag adjusting knob 31 again on the number corresponding to the width of the complete buttonhole and bar it with a few stitches. Withdraw the cloth again a little, in order to prevent its being pushed by the feed dog. The last stitch must be on the left. Last stitch on the left 11. Set zigzag adjusting knob 31 on zero and sew some fastening stitches, withdrawing the cloth a little. 12. Then, place the work on the wooden block and with the special cutter open the buttonhole between the two borders. l• Fig. as 45
-
 1
1 -
2
-
3
-
4
-
5
-
6
-
7
-
8
-
9
-
10
-
11
-
12
-
13
-
14
-
15
-
16
-
17
-
18
-
 19
19 -
 20
20 -
 21
21 -
 22
22 -
 23
23 -
 24
24 -
 25
25 -
 26
26 -
 27
27 -
 28
28 -
 29
29 -
30
 |
 |
