Bernina 125 Manual - Page 21
Ornamental, Stitches
 |
View all Bernina 125 manuals
Add to My Manuals
Save this manual to your list of manuals |
Page 21 highlights
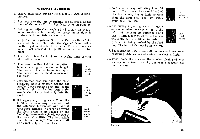
r The Zigzag Ornamental Stitch On the Bernina zigzag sewing machine any ornamental stitch can be made in a really simple manner. According to the desired stitch, place the stitch regulator 29 (Fig. 22) more or less below zero and while sewing, turn the zigzag adjusting knob 31 (Fig. 22) to the right and to the left. After having made a few stitches, one is already acquainted with this kind of embroidery. For stitches of normal length (samples a as per Fig. 80) use the zigzag sewing presser foot (Fig. 28). For very short stitches (samples b as per Fig. 30) the zigzag embroidery presser foot, marked with one red stripe, must be used (Fig. 29). Its bottom side is hollow ground, while the zigzag sewing foot is plain. Zigzag Sewing Foot Zigzag Embroidery Foot Ornamental Stitches Fig. 28 38 Fig. 29 a ba h a Fig 50 a ba b a 39
-
 1
1 -
2
-
3
-
4
-
5
-
6
-
7
-
8
-
9
-
10
-
11
-
12
-
13
-
14
-
15
-
 16
16 -
 17
17 -
 18
18 -
 19
19 -
 20
20 -
 21
21 -
 22
22 -
 23
23 -
 24
24 -
 25
25 -
 26
26 -
27
-
28
-
29
-
30
 |
 |
