Bernina 125 Manual - Page 20
ikeiwahowki, kA&A,Aoacti, fitc64,44ko
 |
View all Bernina 125 manuals
Add to My Manuals
Save this manual to your list of manuals |
Page 20 highlights
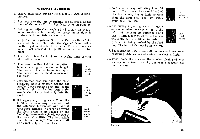
The Sewing on Laces When sewing on a lace, use a short and narrow stitch. Therefore, set stitch regulator 29 (Fig. 22) on No. 1 and zigzag adjusting knob 31 on No. 1 or 2. Place the lace on the fabric, about 1 iH inch inside of its edge, so that the sewing is easier. Then sew the lace on and along this zigzag seam cut the superfluous part of the fabric that remains under the lace. Fig. 25 Roll Hemming The roll hemmer, marked with two red stripes, is similar in form as the ordinary hemmer. The only difference is that the stitch hole is not round but large, so to allow zigzag sewing. Proceed as in ordinary hemming. Place zigzag adjusting knob 31 (Fig. 22) on No. 3 or 4. Roll hems are particularly used for edging fine material. Fig. 2.5a Shell Roll Hemming For such hems, the roll hemmer (2 red stripes) will be used as well. Proceed as in ordinary hemming. The shell roll hem is obtained by a very tight needle thread tension and by making a long stitch. 36 The Braiding For this kind of work use the zigzag embroidery presser foot, marked with 1 red stripe. Insert a soft cord into the guide hole of the presser foot and oversew the cord with zigzag stitch. Use mer- Fig. 25 cerized cotton No. 50,2 ❑r 60,2. With coloured cot- ton, coloured braid or by sewing some rows one next to each other, the effect can be increased still more. likeiwahowkikAAA. .AA&A,Aoacti Fig. 27 • fitc64,44ko - •37
-
 1
1 -
2
-
3
-
4
-
5
-
6
-
7
-
8
-
9
-
10
-
11
-
12
-
13
-
14
-
 15
15 -
 16
16 -
 17
17 -
 18
18 -
 19
19 -
 20
20 -
 21
21 -
 22
22 -
 23
23 -
 24
24 -
 25
25 -
26
-
27
-
28
-
29
-
30
 |
 |
