Bernina 125 Manual - Page 19
unnecessarily.
 |
View all Bernina 125 manuals
Add to My Manuals
Save this manual to your list of manuals |
Page 19 highlights
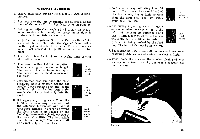
a I .1 Darning with Wool When darning with wool, use the patented wool darning foot. For top and bottom threads use darning cotton. The colour of both the wool and the top and bottom threads will be the same as the colour of the fabric to be mended, so that the darn, when finished, will be as invisible as possible. The thread tension is the same as when darning underwear, etc. Woollen socks are drawn over the open arm without using the darning apparatus for stockings. F . 24 Set the machine as follows: 1. Lower feed dog by turning knob 28 (Fig. 22) to the left until darning sign appears. 2. Set stitch regulator lever 29 (Fig.22) on zero 34 so that the lowered feed dog will not be set in motion unnecessarily. 3. Set zigzag adjusting knob 31 (Fig.22) on 3 or 4. The darning with wool is made in two operations, namely: 1. The damaged part is covered with wool rows. 2. Such rows are fastened together by sewing zigzag seams across them. The three pictures on the opposite page clearly illustrate the manner to darn. Picture a shows how to place the wool in the slit of the wool darning foot. Let project the end of the wool about half an inch beyond the rear border of the foot. Now cover the hole with the wool, as shown in Fig. b. Begin at the left hand top corner of the damaged part and stretch the wool from side to side, i. e. from Ieft to right and in reverse, one run after the other, by pushing the fabric accordingly. At the limit of each run, when changing direction, the zigzag stitch will tack the wool to the fabric. These runs shall be made as close as possible. As soon as the hole is fully covered with wool, the latter is cut off at the darning foot. Now fasten together the wool runs by sewing zigzag seams across them, as shown in Fig. c. For this purpose, the fabric is pushed forwards and backwards. In order that the darn will result elastic, the zigzag seams should not be made too close one to each other. 35
-
 1
1 -
2
-
3
-
4
-
5
-
6
-
7
-
8
-
9
-
10
-
11
-
12
-
13
-
 14
14 -
 15
15 -
 16
16 -
 17
17 -
 18
18 -
 19
19 -
 20
20 -
 21
21 -
 22
22 -
 23
23 -
 24
24 -
25
-
26
-
27
-
28
-
29
-
30
 |
 |
