Bosch WTMC6321US User Guide - Page 19
Cleaning
 |
View all Bosch WTMC6321US manuals
Add to My Manuals
Save this manual to your list of manuals |
Page 19 highlights
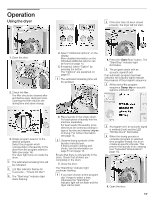
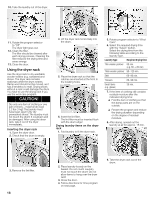
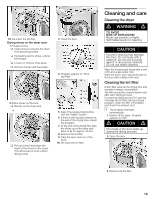
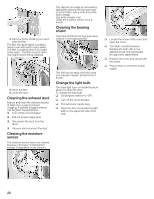
10. ReĆinsert the lint filter. Drying shoes on the dryer rack: 1. Prepare shoes. q Clean shoes to prevent the drum from becoming soiled. q If preparing sports shoes, extend the tongue. q Loosen or remove shoeĆlaces. q Remove insoles and heel pads. 3. Close the door. 4. Program selector to Time dry/High". 2. Place shoes on the rack. q Directly on the dryer rack or q Roll up a towel and place the heels of the shoes on the towel. This will ensure a more uniform drying result. 5. Select the required drying time with the Select" button. 6. If there is still residual moisture at the end of the drying time, repeat the program. 7. At the end of the drying time take the shoes out of the dryer and leave to air for approx. 30 min. 8. Remove the lint filter. 9. Take the dryer rack out of the drum. 10. ReĆinsert the lint filter. Cleaning and care Cleaning the dryer d WARNING d TO AVOID RISK OF EXPLOSION! Never use solvents or highly flammable liquids for cleaning. CAUTION Incorrect cleaning may damage the dryer. Do not spray with a water jet. Do not use scouring agents or allĆpurpose cleaners. Do not use steam cleaners. Wipe the housing and fascia with a soft cloth and soapy water only. Wipe the drum, door seal and inside of the door with a damp cloth only. Cleaning the lint filter A dirty filter extends the drying time and increases energy consumption. The filter should be cleaned before and after each drying process. If a warning signal and an E01 warning message are emitted during a drying program, clean the filter immediately and check the exhaust duct. i The program interrupts automatically. 1. Switch off the dryer. Program selector to Off". d CAUTION d The inside of the door heats up during the drying process. 2. Open the door. 3. Remove the lint filter. 19
-
 1
1 -
2
-
3
-
4
-
5
-
6
-
7
-
8
-
9
-
10
-
11
-
12
-
13
-
 14
14 -
 15
15 -
 16
16 -
 17
17 -
 18
18 -
 19
19 -
 20
20 -
 21
21 -
 22
22 -
 23
23 -
 24
24 -
25
-
26
-
27
-
28
-
29
-
30
-
31
-
32
-
33
-
34
-
35
-
36
-
37
-
38
-
39
-
40
-
41
-
42
-
43
-
44
-
45
-
46
-
47
-
48
-
49
-
50
-
51
-
52
-
53
-
54
-
55
-
56
-
57
-
58
-
59
-
60
-
61
-
62
-
63
-
64
-
65
-
66
-
67
-
68
-
69
-
70
-
71
-
72
 |
 |
